If you want to access the local files on your Windows 11/10 computer, you can do so easily with the help of OneDrive. There is a simple setting that can set this up for you, as it can mirror your data on the web version of OneDrive. Let’s check out how it can be done on your computer.
Fetch files remotely from Windows PC using the OneDrive website
One of the lesser-known and lesser-used features of OneDrive is the Fetch files feature. One can use the Fetch files feature to access all the files remotely on your PC from another computer by using the OneDrive website. If you have forgotten to upload files to OneDrive but you can still access those files on your PC remotely.
Before getting started, you should know about these things-
- You should have the OneDrive desktop app on your computer. Otherwise, you cannot enable this feature and use it.
- You must sign in to your OneDrive account on your computer. Otherwise, it won’t fetch your files.
- Your computer should be connected to an internet connection all the time.
- You cannot access network drives with the help of this guide.
- You need to upload files manually to OneDrive if you want to get store them even after disconnecting this feature.
- You can access files from multiple computers as long as you are signed in to the same OneDrive account.
If you meet these conditions, proceed and check out the steps.
Use OneDrive to access files on your Windows 11/10 PC
To use OneDrive to access your files on your Windows 11/10 PC, follow these steps-
- Open Microsoft OneDrive Settings panel on Windows PC
- Enable Let me use OneDrive to fetch any of my files on this PC
- Open OneDrive in the browser and verify your account
- Start browsing the files in the browser
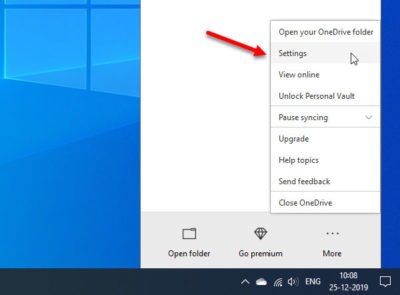
First, open the OneDrive app and set it up. If you haven’t done so already, sign in to your OneDrive account with valid credentials. After that, click on the Microsoft OneDrive icon visible in the system tray, select More, and click on the Settings button.
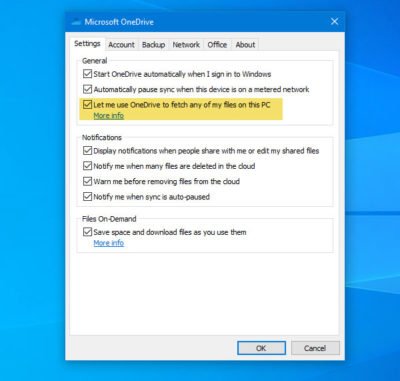
Now make sure that you are on the Settings tab. Here you need to make a tick in the checkbox saying Let me use OneDrive to fetch any of my files on this PC and click the OK button to save the change.
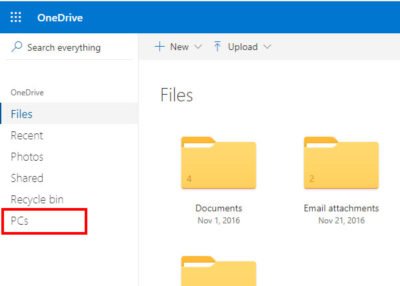
After that, open onedrive.live.com in the browser and click the PCs option that should be visible on your left-hand side. From here, you have to click on your computer name.
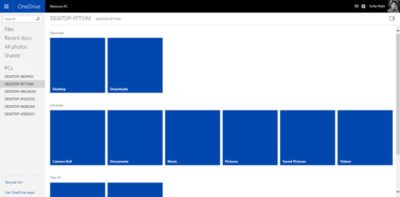
You need to go through the “Security check,” and it helps you to protect your computer from unauthorized access. In other words, you need to enter a security code or OTP that should be sent to your registered mobile number or recovery email address. It doesn’t matter whether you enabled the two-step verification or not, you need to perform this step. After that, you can access your computer files in your browser. It shows all the drives, Library folders, etc.
As mentioned earlier, these files are not uploaded to your OneDrive account. If you want to upload a file, you need to select it and choose the Upload to OneDrive option in the top menu bar.
It shows some other useful options. For example, if you need to download a file, you can click the Download button. Alternatively, if you want to get the dimensions, file size, and other details, you can click the Properties option.
If you no longer want to access your computer files in the browser or want to disable it, you can do that, too. To get started, open OneDrive’s Settings page, remove the tick from the “Let me use OneDrive to fetch any of my files on this PC” checkbox, and save your change as you did earlier.
One can browse that PC and access files remotely, you can download those required files, you can stream video, view photos in a slide-show. One can access network locations if they are included in the PC’s libraries or mapped as drives.
When accessing the remote PC for the first time, one might have to pass the security check for the Trusted PC. Then, one will receive the security code, which helps protect the computer from unauthorized access.
In some cases, Group Policy on your domain-joined computer may prevent the use of this Fetch file feature, making the Fetch file settings unavailable. In this case, you will have to contact the network admin.
Read: How to use Copilot in OneDrive
OneDrive is not fetching files from your PC
If you have followed all these steps, but the OneDrive is showing your computer in the PC’s section while setting it up, you should follow these steps-
- Ensure that Let me use OneDrive to fetch any of my files on this PC is checked
- Open Registry editor
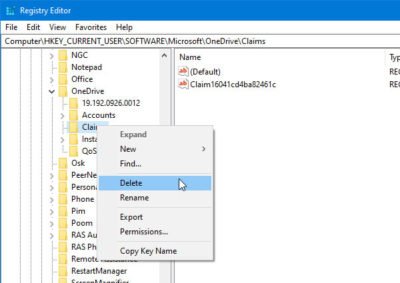
- Delete the Claims key
- Restart OneDrive on Windows 10 PC
Make sure that you have turned on the Let me use OneDrive to fetch any of my files on this PC option in the Settings panel. After that, open the Registry Editor and navigate to this path-
HKEY_CURRENT_USER\SOFTWARE\Microsoft\OneDrive\
Expand the OneDrive folder, and you will see a key called Claims. Right-click on this key and select Delete.
After that, restart the OneDrive app on your Windows PC and go to the Settings panel to ensure that the Let me use OneDrive to fetch any of my files on this PC option is checked.
If not, you need to enable this option and follow the same steps as mentioned earlier.
