Device Drivers are software that let you use anything on a PC with the OS. There are drivers for the graphics card, keyboards, mouse, and everything else. Now it may so happen that for some reason a device has stopped working, or is not responding as it should. In that case, the only option is to remove the driver and reinstall it. In this guide, we are sharing some of the best methods to Backup and Restore Drivers in Windows 11/10.

While it sounds easy, not everyone has their device drivers available right on the Windows PC. One may have to download it from OEM or let Windows configure it by downloading through the updates. The only solution is to back up the driver so you can use it anytime. This becomes very useful for old devices for which OEMs don’t have the device driver anymore.
How to Backup and Restore Drivers in Windows 11/10
To backup and restore drivers in Windows 11/10, you may use either of these methods:
- Use DISM
- Use PnPUtil
- Use third-party software
Before you start to get all of these done, you need admin privileges with your account. You should know that unless you are very clear about these methods, do not attempt them. We will start with Windows inbuilt methods and then suggest some third-party software that has an easy-to-use interface.
1] Backup Drivers using DISM
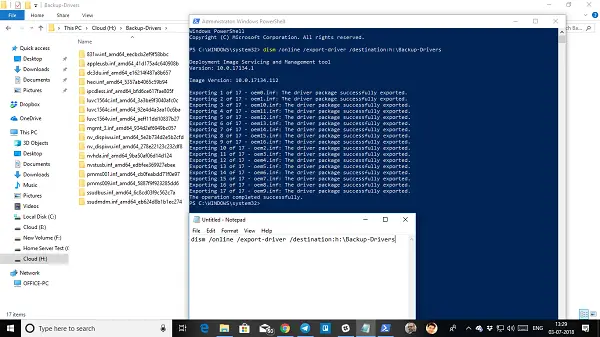
We will use the popular tool DISM (Deployment Image Servicing and Management) here. It can both export and import drivers in bulk.
Create a folder “Driver-Backups” in your PC anywhere on a drive other than where Windows is installed.
Open Command Prompt with admin privileges, and execute the following command-
dism /online /export-driver /destination:"Driver-Backups folder path"
Here and later elsewhere in this post, “Driver-Backups folder path” is the path of the folder you created. If you created this folder on your D drive, then the path would be D:\Driver-Backups.
This will export all the drivers in your Windows 11/10 PC in that folder. It should say – The operation completed successfully. Make sure to keep a backup of that folder in one of your cloud drives.

The driver servicing command supports only .inf files. Windows Installer or other driver package types (such as .exe files) are not supported.
Now here is the deal. While this tool lets you export all drivers, it doesn’t help you install those drivers back to Windows. The command has an option /add-driver, but it will work with Windows 11/10 ISO image. If you are creating an ISO and then planning to install it, you can use the following command.
Open Command Prompt with admin privileges. Navigate to the Backup Driver folder. Execute the following command:
dism /ISOIMAGENAME /Add-Driver /Driver:"Driver-Backups folder path" /Recurse
If you are used to PowerShell than the command prompt, you can use that too. It offers a command, which lets you take a backup of your drivers. Here’s the command:
Export-WindowsDriver -Online -Destination "Driver-Backup folder path"
Please read the detailed post about exporting Device Drivers using PowerShell here.
Restore Device Drivers in Windows
After you’ve backup up the drivers using DISM, you may use Device Manager to restore them on your Windows 11/10 PC. You may also install the drivers manually if you are following this method. You will have to do it one by one, but in case something goes wrong, you will have a better understanding of what caused the problem. Make sure to keep the path of your backup driver handy.
- Open Device Manager using the Win+X menu.
- Now right-click on any of the devices for which you want to install the driver, and click on Update driver.
- You will have two options, automatic, and manual. Select Browse my computer for drivers software.
- In the next screen, you need to copy-paste the folder path, and also select the option to include subfolders.
- Click Next.
The Device Manager will now search for the driver that is available for the hardware and install it. It is possible that Windows might have updated it with the new version, but if you want to roll back driver or keep an old version, you can do so.
2] Backup & Restore Drivers using PnPUtil
PnPUtil is a command-line utility used to manage the driver store in Windows. It can be used to add, delete, and enumerate driver packages, as well as export drivers from the driver store.

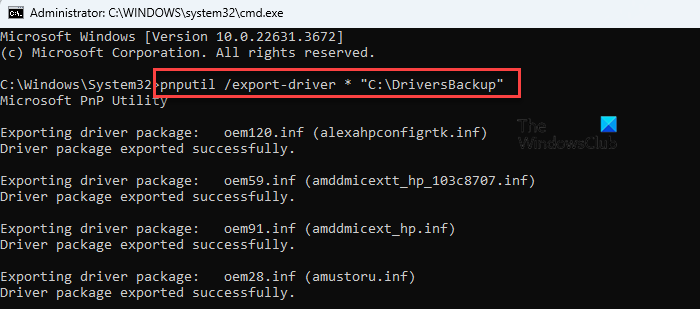
You may use PnPUtil to export all installed drivers from the current Windows installation to a specified directory. To do so, follow these steps:
Open Command Prompt using administrator privileges, type the following command in the Command Prompt window, and press the Enter key:
pnputil /export-driver * "D:\DriverBackup"
The asterisk (*) is a wildcard character that indicates all drivers. When used with pnputil /export-driver, it means export all drivers.
Once the command is executed, you will see a ‘Driver package exported sucessfully.’ message. Along with this, the tool also lists the number of total driver packages and exported driver packages.
This is how you backup your drivers using PnPUtil. To restore drivers, execute the following command in an elevated Command Prompt:
pnputil /add-driver "D:\DriverBackup\*.inf" /subdirs /install
The above command will add and install all driver packages found in ‘D:\DriverBackup’ and its subdirectories.
3] Backup & Restore Drivers using third-part software
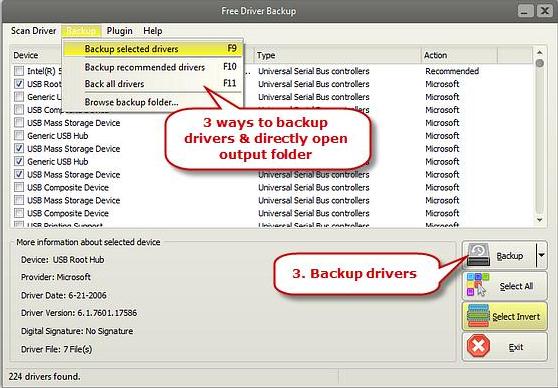
If you are looking for an easy way to backup drivers in Windows 11/10, then you may also use third-party driver backup software which can do that for you. This software can create a backup, and later restore them on demand.
Free Driver Backup is one such software that can do that for you. Apart from drivers, it can also backup cookies, registry, and other things as well. It also offers recommendations, or you can choose to back up all the drivers. Restoring is easy as well. Just point out to the backup folder, and it will pick up, and install it one by one.

Some other similar third party software you may want to check out are Driver Sweeper, Free Driver Backup, and Double Driver. If you are specifically looking to update your AMD driver, check out AMD Autodetect, and for Intel, check out Intel Driver Update Utility.
Let us know if we missed anything.
How to copy drivers from Windows 11?
You may copy drivers from your Windows 11 PC using built-in tools such as PowerShell or using third-party software. PowerShell offers a straightforward approach to exporting all drivers. Third-party software, on the other hand, offer additional features to not only export drivers but also restore them, schedule backups, and even update drivers automatically. Manually copying drivers from the Driver Store is also possible but is generally less convenient.
How do I reinstall drivers on Windows 11?
You may reinstall device drivers in Windows 11 using Device Manager, Windows Update, downloading the driver from the manufacturer’s website, or using third-party driver update tools. Press Win+X and select Device Manager from the menu. Right-click the device you want to reinstall the driver for and select Uninstall device. Reboot your PC. Windows will automatically detect the device and attempt to reinstall the driver. Alternatively, navigate to Windows Update > Advanced options > Optional updates in the Windows Settings app. If Windows finds any updates for your drivers, they will be listed. Select the desired update and click Download & install.
Read Next: Universal Device Client Device not working in Windows.