Desktop, Start Menu & Taskbar are the crucial aspects of Windows 10 customization, especially regarding productivity. We discussed how you can beautifully customize Windows 10 Desktop Background, Color, Lock screen, and Themes. In this post, we are looking at the Start Menu in Windows 10.
To change their settings, you must open Windows 10 Settings > Personalization.
How to customize Windows 10 Start Menu
The Start menu has evolved from being a list of programs to a full-blown overlay that not only lets you pin apps and folders to it, but with the help of live tiles, you get to know more information. When it comes to usage, everyone has their way. Some like the Start Menu to fall back to how it was during Windows 7, while others like it how it is on Windows 10. You should know its called just “Start” in Windows 10.
What does the Start menu show by default

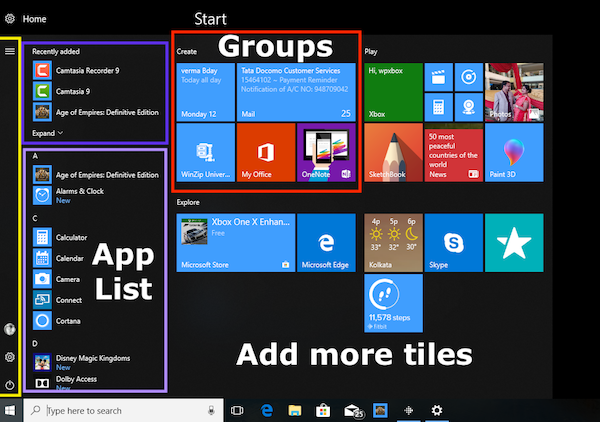
The image clearly shows all the parts. The majority of the Start menu is taken up by Tiles. You also have Recently added programs, followed by the Application list. In the leftmost section, you can access Profile, Settings, and Power. The tiles can be grouped under different headings.
Control what shows on the Start Menu
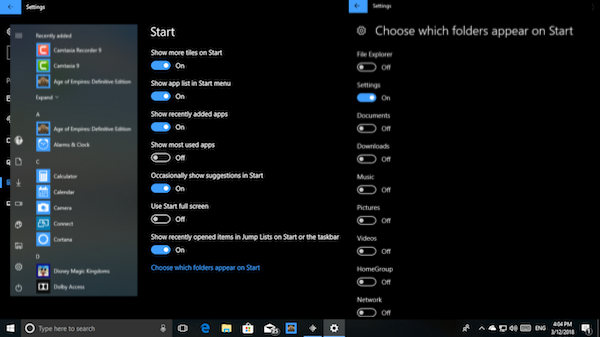
Under Settings > Personalization > Start, you will find the following options:
Show more tiles on Start: If you want to see more tiles than the default offering, use this, and it will add a fourth column that can fill in 8 small tiles.
Show app list in Start menu: If you choose to use more tiles, hiding the app list makes sense. Turn off this option, and your start menu will no more display a list of programs. This will add two more icons on the leftmost section. One will give you access to a List of programs, and the second will let you switch back to the Start menu tiles section.
You can turn off the options to show recently added apps, show most used apps, and show recently opened items in Jump Lists on Start of the Taskbar.
Occasionally, Windows suggest apps in the Start menu. It’s a native advertisement section that Microsoft uses to tell users about the new app. While I have found it useful sometimes if you don’t like it, turn it off by toggling Occasionally show suggestions in Start.

Choose which folders appear on Start
The left bar on the Start Menu can display more folders. This can be configured using the option that is available at the end. While I like to keep it in the taskbar all the time, if you like it on the Start menu, you can choose to show additional folders there.
Customizing Live Tiles
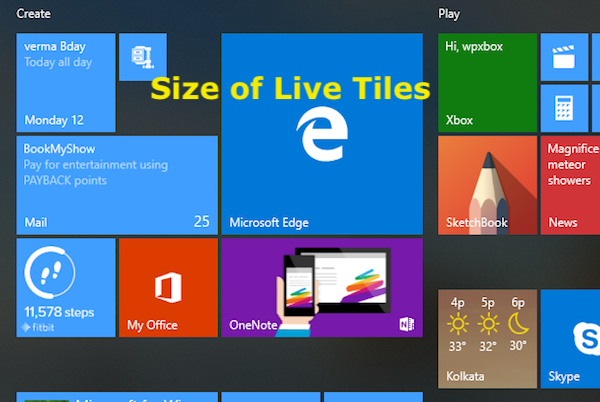
Unlike Icons, Live Tiles can be heavily customized. You can choose to resize it from being a small icon-like tile to Large or Wide tile to display more information. Choose based on the kind of information you want to see more of the tiles.

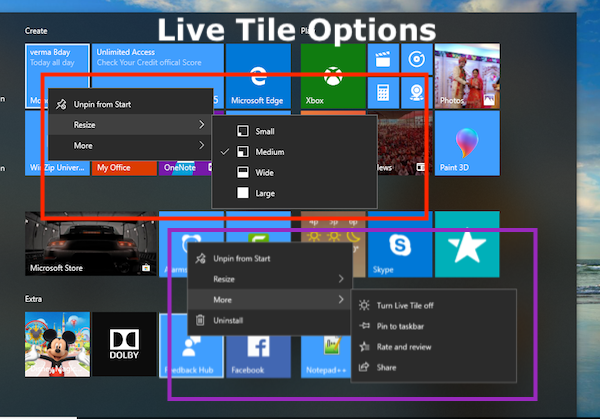
Right-click on any of the Live Tiles, and you should get the option to resize. Apart from resizing, you get two more options, first is More which offers you options like Turn Live Tile off, Pin to taskbar, rate, and review, share, and lastly uninstall. Second lets you unpin from Start menu.
If you look closely, these options offer time-saving options, especially with Uninstall option. If you want to add to the taskbar, you don’t have to find the program again and drag it here.

Pro Tip: If you don’t like the tiles at all, and want them gone, just remove all tiles from the Start menu, and you will see the Windows 7-like Start menu.
Read next: How to customize Windows 10 taskbar
This summarizes everything you should know about the Windows 10 Start menu and taskbar customization. I would suggest you also read our post on customizing Windows 10 Desktop Background, Color, Lock screen, and Themes as well if you came here directly.
Let us know if you have any questions about them.