Microsoft Word has a feature called Editing Restrictions that helps such writers restrict unnecessary editing & formatting by proof-readers to their documents. In this post, we will show you how to Restrict Editing in Word documents.
Proof-reading articles often require a second pair of eyes, but at times rather than suggesting changes to be incorporated, direct modifications are made in the document by the proofreaders without the writer’s consent. Some may find this discouraging as it takes them hours to complete a document but just minutes for an editor/proofreader to strike that tag line out.
How to Restrict Editing in Word
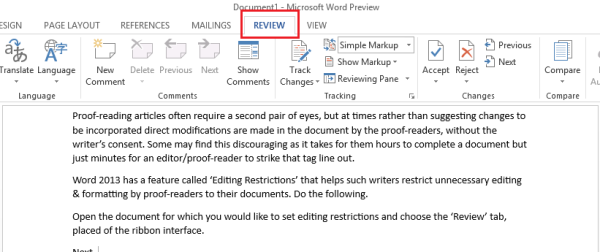
Open the document for which you would like to set editing restrictions and choose the ‘Review’ tab, placed on the ribbon interface.
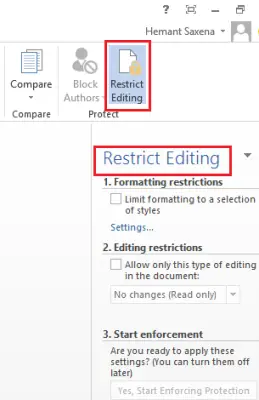
Next, from the ‘Protect’ section, select ‘Restrict Editing’ option. Once selected, you will be in the editing restriction area. From here you can provide options for setting editing restrictions.
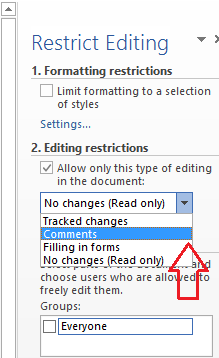
Just under the heading that reads as ‘Editing Restrictions’, check the box adjacent to the following option – ‘Allow only this type of editing in the document’.
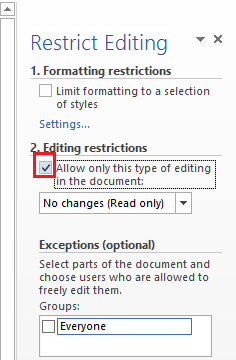
Here you can set the formatting restrictions as well for the document. However, these restrictions aren’t that important. So, you can leave the options in the as-it-is state.
When done, click on the drop-down arrow, and from the list of options displayed, choose the desired option. If you would not like to allow others to make any changes to your document, you can go for the ‘No changes’ (Read-only mode). Still, many prefer choosing the ‘Comments’ option as it does not allow the reader to make changes to your documents but suggests some changes via comments, if required.
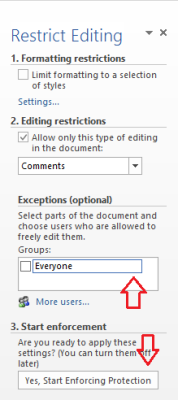
Next, if you are ready to apply the chosen settings, click on ‘Yes, Start Enforcing Protection’ button and wait for few seconds.
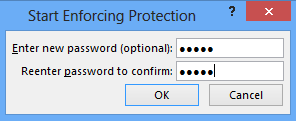
A small ‘Start Enforcing Protection’ window will appear on your computer screen, offering you the option to password-protect the Restriction on the document.
That’s it! With these settings in place, a proofreader will invariably have permission to leave comments and recommendations, but any attempts of introducing direct changes in the document will fail.
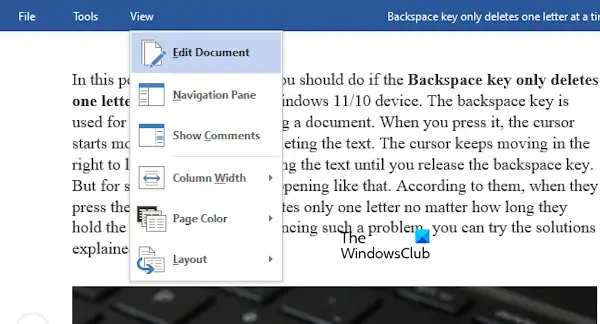
A restricted Word document shows only a few options on the Menu bar. So, if you want to remove the editing restrictions from a Word document, go to View > Edit document. Now, go to Review > Restrict Editing and then click on the Stop Protection button.
How do I enable Read Only editing in Word?
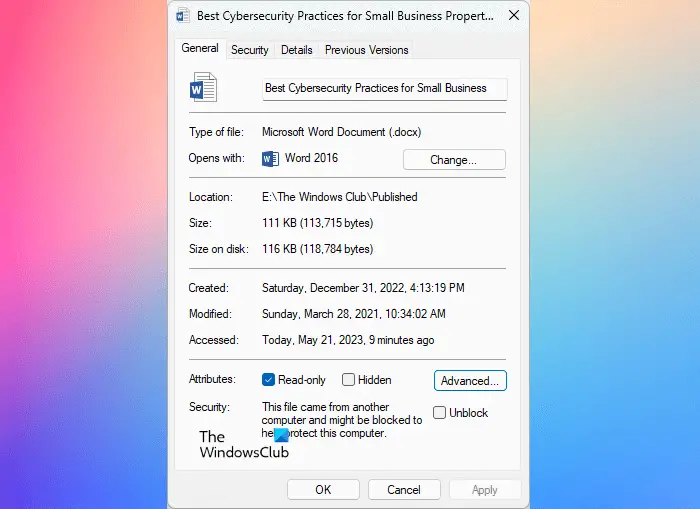
You can enable Read Only editing in Word by changing its properties. Right-click on the Word file that you want to make Read Only and select Properties. Now, under the General tab, check the Read only checkbox. This will enable the Read Only attribute for that Word document. From now, that Word document will open in Read Only mode.
How do I turn off editing marks in Word?
Microsoft Word has a feature that helps users track changes in a document. When you delete or add a word, Word creates a red mark to show you that some changes are made in that particular line or para. You can view these changes by clicking on these red marks. To turn off this feature, go to “Review > Track changes” and click on the Track changes option.
That’s it. I hope this helps.
Read next: How to save a Word document as a JPEG in Windows.