You can set up Windows 11/10 Pro, Windows 11/10 Enterprise and Windows 11/10 Education as a device in the Kiosk mode, to run a single Universal Windows app using the Assigned Access feature. This post shows how to do it.
What is Kiosk Mode in Windows?
Kiosk mode is a built-in feature of Windows 11 and Windows 10 that you can use to run a single UWP app (in full-screen mode only) for a particular local user account. Once the kiosk mode is set up, then only the selected app (say Microsoft Edge, Calculator, Mail, Maps, etc.) can be used in that user account and nothing else. While it restricts a user account to run only a single app, there are other benefits of turning your Windows 11 device into a kiosk. For example, you can use the kiosk feature to use your device as an interactive display, digital sign, etc.
Assigned Access feature in Windows 11 and Windows 10
The Kiosk mode is useful if you want to create a lockdown environment and set up and display a Windows system in a general public area, and give access to any user to access and use any single app for a particular function – eg as an information kiosk or a kiosk for checking the weather, and so on.
For a kiosk device to run a Universal Windows app, we can use this Assigned Access feature. For a Windows 11/10 Enterprise or Education to run a classic Windows software, you need to use Shell Launcher to set a custom user interface as the shell.
When you used the Assigned Access feature, the user does not access to the desktop, Start Menu or any other part of the computer. He can only access and use a particular function.
Things you should know before you set up Kiosk Mode
Before you set up kiosk mode on your Windows 11 computer, here are a few things to know about:
- You cannot set up kiosk mode for a Microsoft account or administrator account. Only a local account is supported
- There will be no Start menu, taskbar, File Explorer, Desktop, etc., in the user account where you have set up kiosk mode
- You won’t be able to use hotkeys to open the Settings app, File Explorer, etc.
- You need to use the Ctrl+Alt+Del hotkey to exit from that user account and access the lock screen.
In simple words, you can’t do anything outside of the kiosk app in that local user account.
How to set up Kiosk Mode in Windows 11
When you don’t want to use a local user account as a kiosk, then simply turn off or remove the kiosk using the following steps:
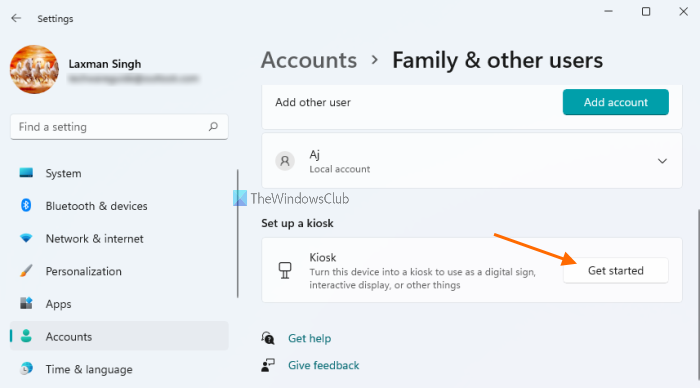
- Press Win+I hotkey to open the Settings app
- Click on the Accounts category
- Open the Family & other users Settings page available on the right section
- Click on the Get started button available for Set up a kiosk section. A Create an account box will open
- In that box, add a name for the new local user account. Windows will automatically create an account with that name for the kiosk mode. If you already have some local account for which you want to set up kiosk mode, then select Choose an existing account option, and select that account
- Click on the Next button
- The list of apps that can be used in kiosk mode will visible. Select a kiosk app of your choice
- Press the Next button
- Press the Close button.
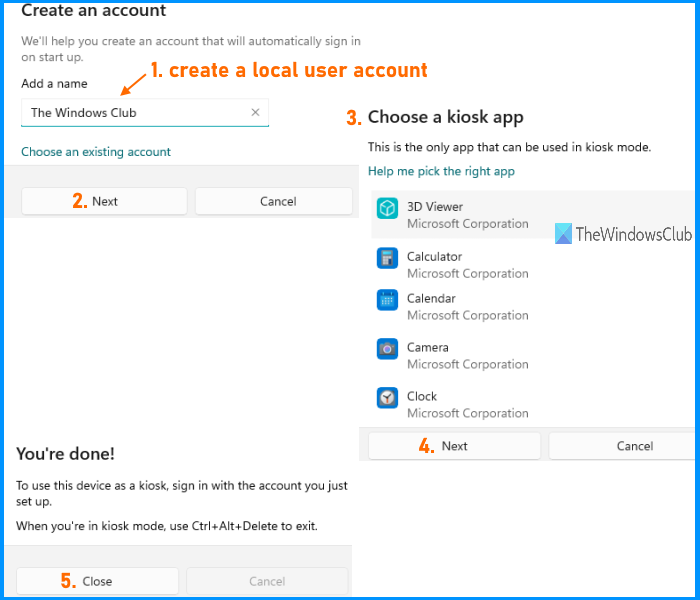
That’s it! Now just access the lock screen and log in to that user account with kiosk mode.
Related: Set up kiosk mode in Microsoft Edge.
Add Multiple Apps in Kiosk Mode in Windows 11
1] Through Windows PowerShell and MDM
Apart from configuring the kiosk mode through Windows Settings, we can also use a hybrid approach by combining Windows PowerShell and the MDM bridge for the configuration. WMI or Windows Management Instrumentation bridges the Windows system and the Mobile Device Management Server, allowing it to manage the device remotely. The sample XML code for the multi-app kiosk is written below:
$MultiKioskModeConfig= @"

<?xml version="1.0" encoding="utf-8" ?>

<AssignedAccessConfiguration

xmlns="http://schemas.microsoft.com/AssignedAccess/2017/config" xmlns:win11="http://schemas.microsoft.com/AssignedAccess/2022/config">

<Profiles>

<Profile Id="{579c1e63-dccc-4403-a565-86b1f5db5fdd}">

<AllAppsList>

<AllowedApps>

<App AppUserModelId="Microsoft.WindowsCalculator_8wekyb3d8bbwe!App" />

<App AppUserModelId="Microsoft.WindowsNotepad_8wekyb3d8bbwe!App" />

<App AppUserModelId="Microsoft.Paint_8wekyb3d8bbwe!App" />

<App AppUserModelId="Microsoft.Windows.Photos_8wekyb3d8bbwe!App" />

<App AppUserModelId="windows.immersivecontrolpanel_cw5n1h2txyewy!microsoft.windows.immersivecontrolpanel" />

</AllowedApps>

</AllAppsList>

<win11:StartPins>

<![CDATA[

{ "pinnedList":[

{"packagedAppId":"Microsoft.WindowsCalculator_8wekyb3d8bbwe!App"},

{"packagedAppId":"Microsoft.WindowsNotepad_8wekyb3d8bbwe!App"},

{"packagedAppId":"Microsoft.Paint_8wekyb3d8bbwe!App"},

{"packagedAppId":"Microsoft.Windows.Photos_8wekyb3d8bbwe!App"},

{"packagedAppId":"windows.immersivecontrolpanel_cw5n1h2txyewy!microsoft.windows.immersivecontrolpanel"}

] }

]]>

</win11:StartPins>

<Taskbar ShowTaskbar="true"/>

</Profile>

</Profiles>

<Configs>

<Config>

<AutoLogonAccount/>

<DefaultProfile Id="{579c1e63-dccc-4403-a565-86b1f5db5fdd}"/>

</Config>

</Configs>

</AssignedAccessConfiguration>

"@

$namespaceName="root\cimv2\mdm\dmmap"

$className="MDM_AssignedAccess"

$obj = Get-CimInstance -Namespace $namespaceName -ClassName $className

$obj.Configuration = [System.Net.WebUtility]::HtmlEncode($MultiKioskModeConfig)

Set-CimInstance -CimInstance $obj
This script configures a multi-app kiosk mode in Windows 11 using PowerShell and MDM through WMI.
- The starting lines (Lines 1-3) include comments and references that describe the script’s purpose.
- The next part ( Lines no. 5-32) defines the Kiosk mode configuration that includes:
$MultiKioskModeConfig: A variable that stores an XML configuration string that defines the Kiosk mode settings.
xmlns attributes: defines the namespaces fir the elements defined in the code
<Profiles>: defines the profile configuration
<AllAppsList>: specifies the list of applications allowed in the Kiosk mode.
<AllowedApps>: lists the individual apps using their unique Application ID or AppUserModelId
<win11:StartPins>: defines the pinned apps in the Start Menu.
<Taskbar>: configures the behavior of the Taskbar
ShowTaskbar=”true”: is used to ensure the Taskbar is visible in Kiosk mode.
After defining the configuration, the next part of the code ( Lines No. 34-38) sets the configuration wherein,
$namespaceName: is a variable that stores the namespace for accessing the AssignedAccess settings.
$className: stores the name of the class for AssignedAccess configuration.
$obj = Get-CimInstance: is used to retrieve the current AssignedAccess configuration.
$obj.Configuration: sets the configuration property of the retrieved object with the Kiosk mode configuration variable $MultiKioskModeConfig
[System.Net.WebUtility]::HtmlEncode: is the function that encodes XML string for using special characters.
windows.immersivecontrolpanel_cw5n1h2txyewy!microsoft.windows.immersivecontrolpanel: allows access to the Settings panel.
AutoLogonAccount: This creates a separate user account in Kiosk mode, and the user logs in automatically with that account.
The PowerShell script needs to be executed through the PsExec command line tool for remote configuration deployment. The tool can be downloaded from here, and the below-mentioned steps can be followed to execute the script:
- Once downloaded, type cmd in the Desktop Search Bar and Run it as an Administrator.
- On the Terminal prompt type,
Psexec.exe -i -s powershell.exe
-i specifies that the command would run in interactive mode and
–s ensures that the command is executed in the System Account.
- Once the PowerShell is launched, we need to allow the scripts to run in the current session by typing:
Set-ExecutionPolicy -scope Process RemoteSigned
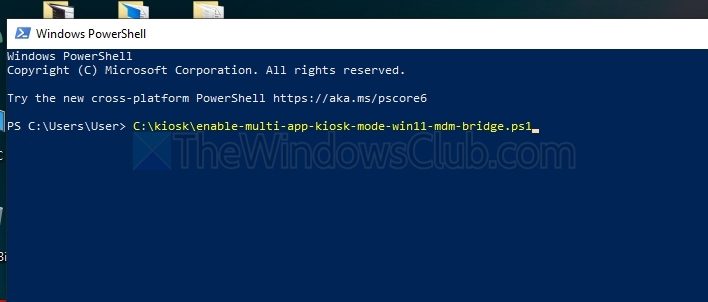
- Execute the script by typing:
C:\kiosk\enable-multi-app-kiosk-mode-win11-mdm-bridge.ps1
This assumes that the XML file is stored in the C:\kiosk folder, and the script file is saved as enable-multi-app-kiosk-mode-win11-mdm-bridge.ps1.
- Restart the system to apply the changes
3] Through Microsoft Intune
Setting up a multi-app kiosk in Windows 11 through Microsoft Intune involves three distinct phases: creating a device group, creating a Kiosk Mode Configuration Profile, and syncing the client device. Once this is done, we can restart the device to test the configuration.
Create device group
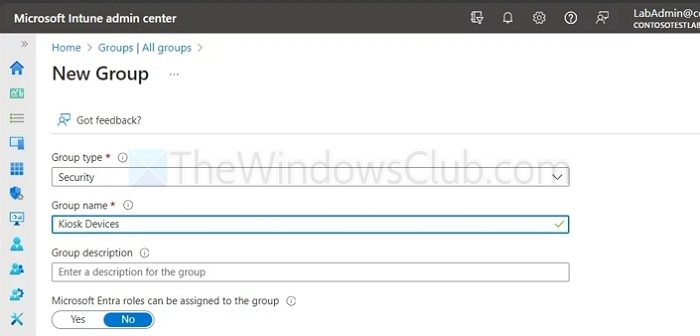
- The first step involves creating a device group through the Intune Admin Centre by clicking New Group.

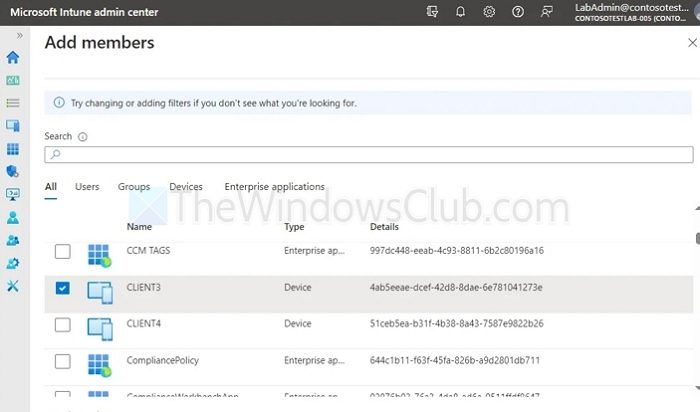
- The next step is to enter a name for the newly created group and select the devices to be added to it. Finally, click on Create to confirm the group creation.
- Choose and select the Device/s to be added to the group.
Create a kiosk mode configuration profile
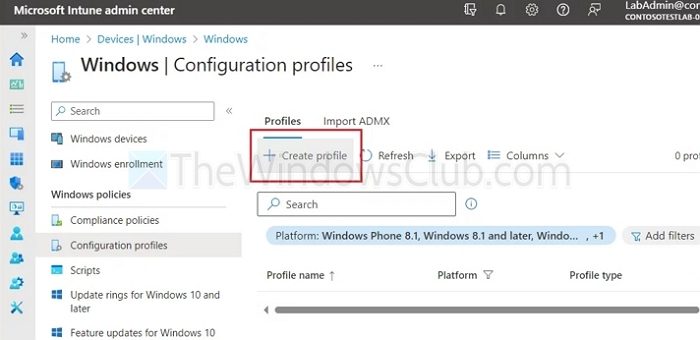
- Once the group creation is completed, we can create the configuration profile for the group by selecting Devices-> Configuration Profile -> Create Profile.
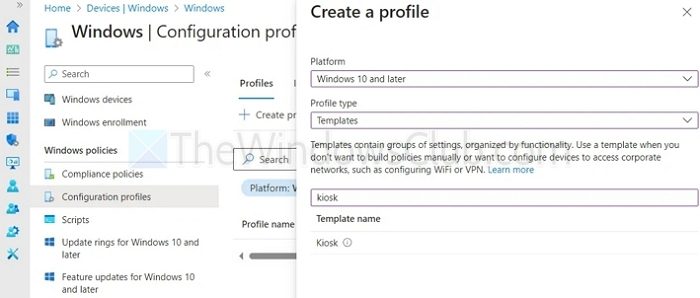
- While creating the profile, we can select the platform as Windows 10 and later from the drop-down list, Templates under Profile Type, and Kiosk in Template Name, and then click Create to complete the profile creation.
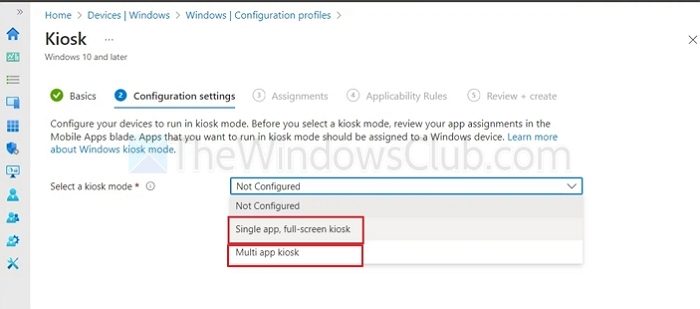
- Under Select a Kiosk Mode, choose Single App, full-screen kiosk, or Multi App from the drop-down and proceed to the next screen.
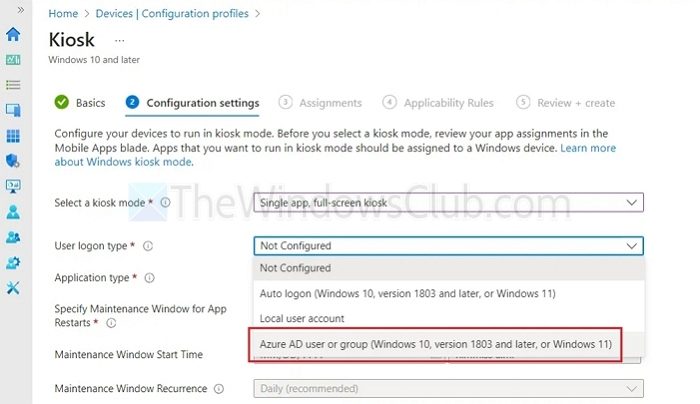
- Choose Azure AD User or Group under User Logon Type and click Next.
- Click on Add to the Azure AD as the assigned access account
- Choose and select the Azure AD account for which the access needs to be granted in the Add Members window.

- In the next step, select Multi App Kiosk from the drop-down menu, then select Kiosk Mode, No for Target Windows 10 in S mode devices, and Autologon as the User Logon Type.
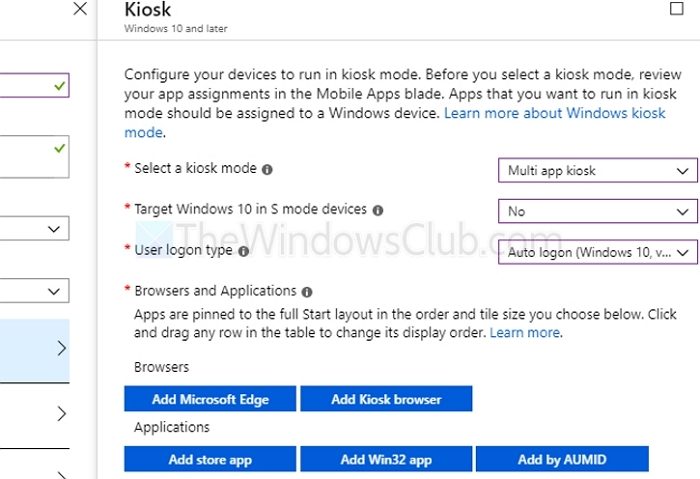
- To add Microsoft Edge as the browser, click Add Microsoft Edge or any other browser by clicking Add Kiosk Browser. To add other applications, click Add Win32 App for any installed application. Applications not installed on the system but available in the Microsoft Store can be added by clicking on the Add Store App. For example, if we select Microsoft Edge, we need to specify the URL that should be loaded when the Kiosk Device is launched.
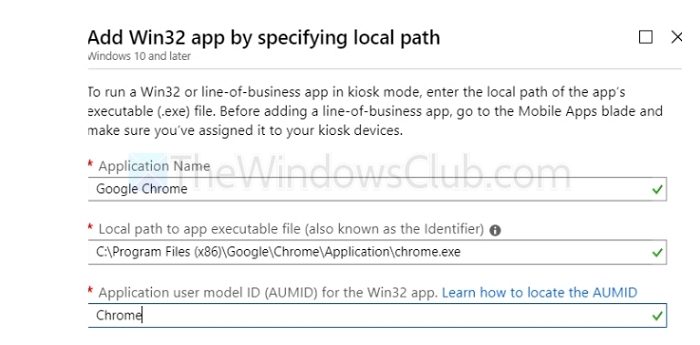
- Once the applications are selected, we must assign the configuration profile to the device group we created by clicking Add Group and selecting the Kiosk Device group. Click on Next to proceed.
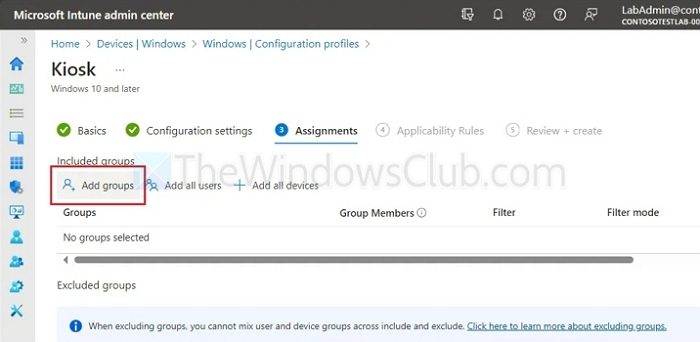
- Click on Create to complete the process.
Sync client device
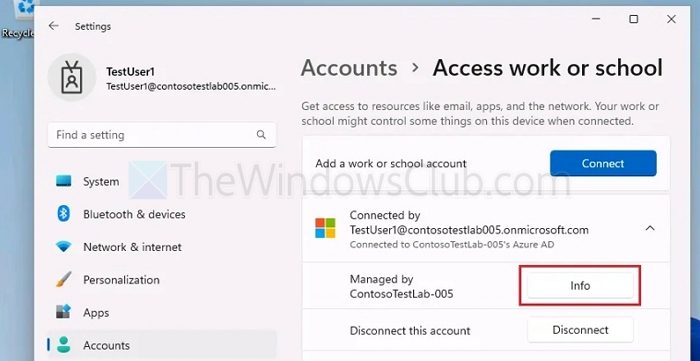
- Open the Settings app, proceed to Accounts -> Access work or School, and click the Info button.
- Scroll down and click on Sync to complete the process.
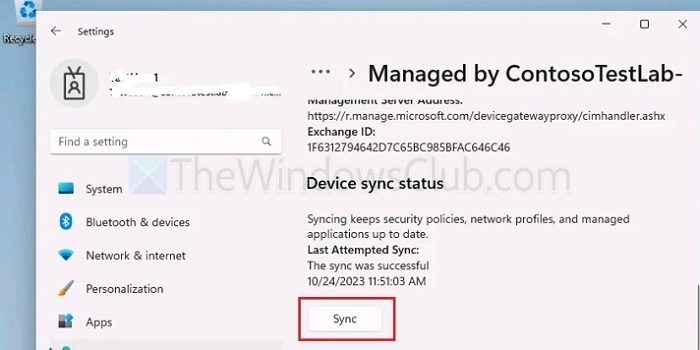
- Once the syncing process is complete, restart the system and log in with the relevant user account, as mentioned in the kiosk mode configuration profile.
How to Turn off or remove Kiosk Mode in Windows 11
When you don’t want to use a local user account as a kiosk, then simply turn off or remove the kiosk using the following steps:
- Open Settings app using Win+I hotkey
- Access the Accounts category
- Access Family & other users Settings page
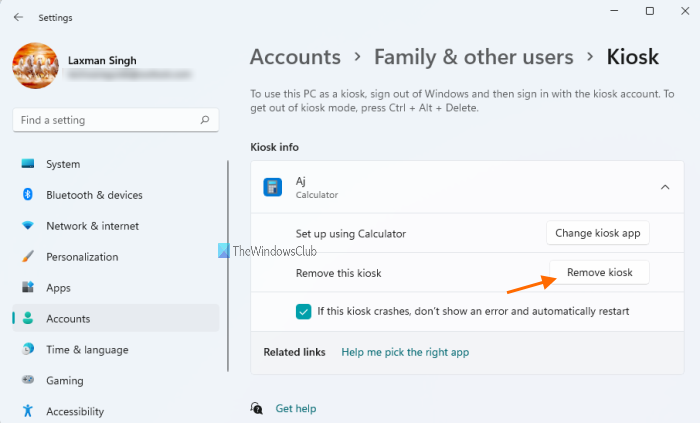
- Click on the Kiosk option available under Set up a kiosk section
- Click on the app (that you have set for kiosk mode) name to expand the options available under it
- Press the Remove kiosk button. It will open a confirmation box
- In that box, click on the Remove button.
This will successfully remove kiosk mode from your Windows 11 computer for that user account.
Read: How to enable On-screen Keyboard in Kiosk mode
How to set up Kiosk Mode in Windows 10
Open Windows 10 Settings and select Accounts. Click on Family & other people on the left side to open the following settings.
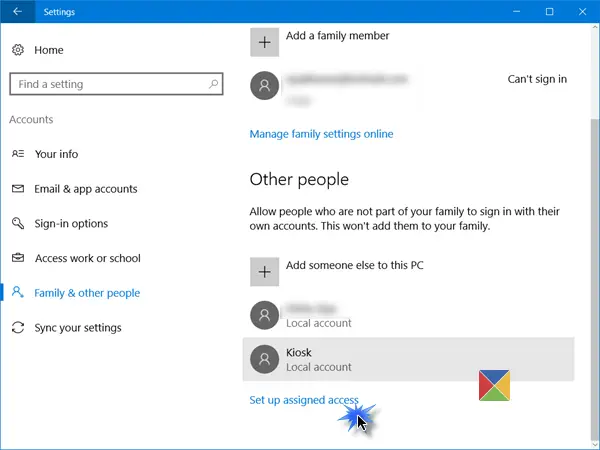
Scroll down and towards the end you will see a Set up assigned access link. Click on it to open the following window.
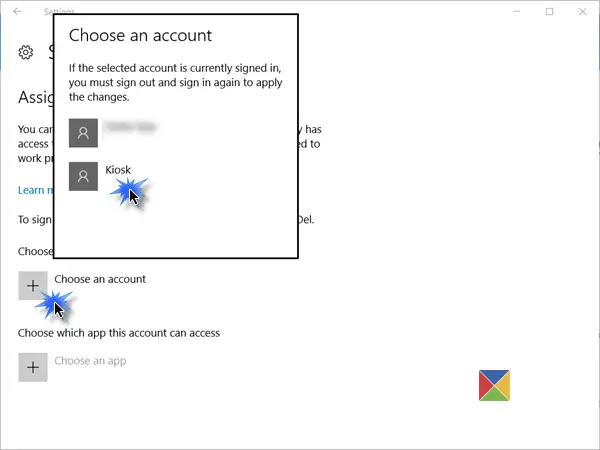
Now you will have to Choose an account, under which you want to run the device in Kiosk mode.
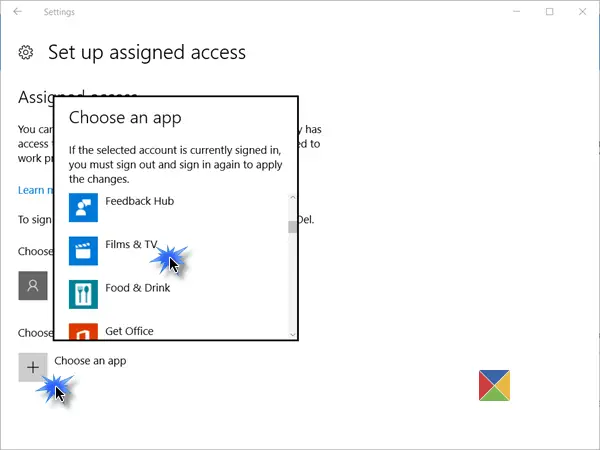
Having done this, you will have to next click on the Choose an app link and from the pop-up, select the Universal Windows app, to which you would like to give access to.
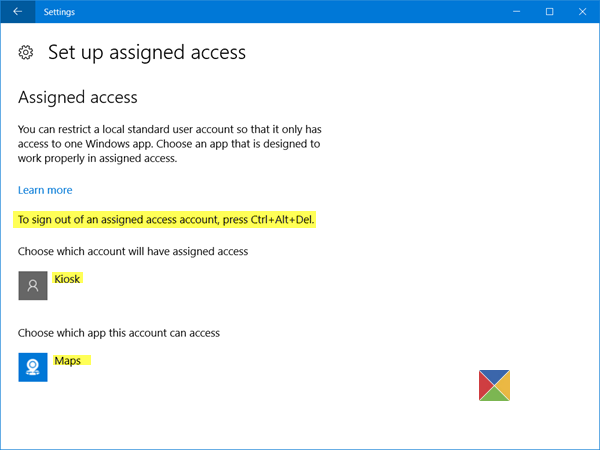
Restart your computer so that you sign out of all user accounts.
TIPS:
- To sign out of an assigned access account, since you may not have access to the Start Menu, you will have to use Ctrl+Alt+Del.
- To change the Universal app, click on the app (In our example, the Maps app) and select another app from the popup.
- To remove the account, select on Kiosk user account here and then select Don’t use Assigned Access from the pop-up which appears.
How to secure Windows Kiosk Mode
For a more secure kiosk experience, you want to make further configuration changes to the device:
- Open Settings > System > Tablet mode and choose On to put the device in Tablet mode.
- Go to Settings > Privacy > Camera, and turn off Let apps use my camera, to disable the camera.
- Go to Power Options > Choose what the power button does, change the setting to Do nothing, and then Save changes. This will disable the hardware power button.
- Go to Control Panel > Ease of Access > Ease of Access Center, and turn off all accessibility tools.
- Run GPEDIT and navigate to Computer Configuration > Windows Settings > Security Settings > Local Policies >Security Options > Shutdown: Allow system to be shut down without having to log on and select Disabled. This will remove the power button from the sign-in screen.
- Open the Group Policy Editor > Computer Configuration > Administrative Templates > System > Logon > Turn off app notifications on the lock screen.
- To disable removable media, in the Group Policy Editor, navigate to Computer Configuration > Administrative Templates > System > Device Installation > Device Installation Restrictions. Make suitable changes here, but ensure that you allow administrators to override Device Installation Restriction policies.
Visit this TechNet link for more details on configuring and locating a device running Windows Pro, Windows Enterprise, or Windows Education as a kiosk device.
How do I put my computer in Kiosk Mode?
If you are using a Windows 11 computer, setting up kiosk mode is pretty simple. The Settings app of Windows 11 provides the option for creating kiosk mode with a UWP app. We have already covered the steps to set up kiosk mode in Windows 11 in this post above.
Does Windows 10 have Kiosk Mode?
Yes, similar to Windows 11 OS, Windows 10 also comes with a kiosk mode feature. You can easily set up Windows 10 in kiosk mode using the Settings app. You need to:
- Open the Settings app
- Go to the Accounts category
- Access the Family & other people page
- Click on the Set up assigned access option.
After that, you can follow the steps to set up kiosk mode on your Windows computer.
FrontFace Lockdown Tool is a freeware that can help you protect Windows PCs that are used as public kiosk terminals.
Read next: How to set up Shared PC Mode in Windows using Group Policy.