If you want to start a blog, but do not like WordPress, you might like the way Drupal works. Although WordPress does not require any programming knowledge, Drupal needs PHP knowledge since most of the elements are made of PHP on Drupal. Drupal is a very interesting CMS made for PHP lovers, which is being used by thousands of people from across the globe to make a good-looking website. If you are not so familiar with Drupal or you want to test some modules on localhost, this post will show you how to install Drupal using WAMP on Windows or localhost.
Install Drupal using WAMP on Windows
To get started, you should have two software – WAMP and the Drupal package. WAMP is a software stack consisting of Windows, Apache, MySQL and PHP.
First, you will have to install WAMP on Windows. In that link, you can also find how to install WordPress on localhost on WAMP. See this post if after installing WAMP, if receive a MSVCR110.dll is missing error. After installing WAMP successfully start it. You will see a green WAMP icon in the system tray.
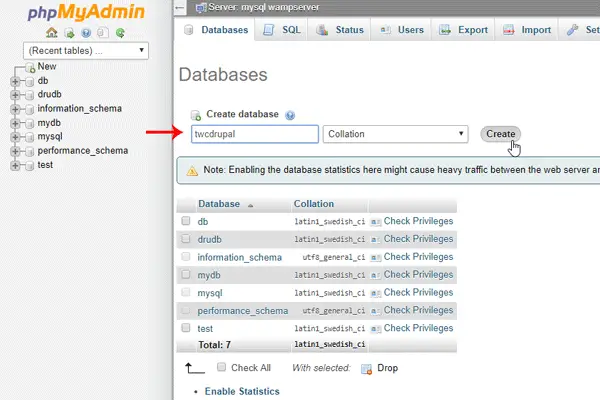
Now, you have to create a database for your Drupal installation. For that, you need to click on that green WAMP icon and select phpMyAdmin. Alternatively, you can open this URL in your browser:
http://localhost/phpmyadmin/
Click on Databases > enter a database name under Create database box, make sure you have selected Collation, and hit the Create button. You should keep that database name in mind since you are about to use it after a few moments.

Now, download the Drupal installation package from the official website. After downloading, extract the ZIP file and move it to this folder:
C:\wamp\www
Next, rename the folder according to your wish. Make it simple and write down a name for this. Now, go to Sites > Default folder, copy the default.settings.php file and paste it in the same folder. Following that, rename it as settings.php. That implies this Default folder should contain these three files;
- services.yml
- settings.php
- php
After that, click on the green WAMP icon in the system tray, and select Put Online. Now open the Drupal installation page:
http://localhost/drupal
Here drupal is the name of the folder that you have set while moving the Drupal installation folder to the WWW folder. It should be redirected to http://localhost/drupal/core/install.php.
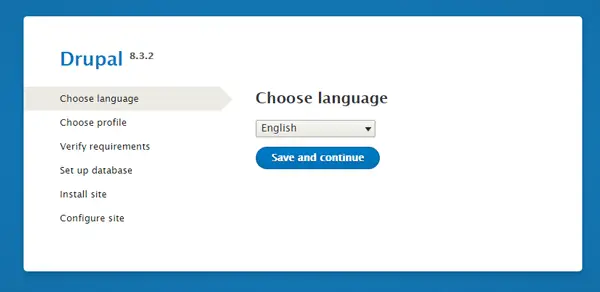
Next, select your default language.

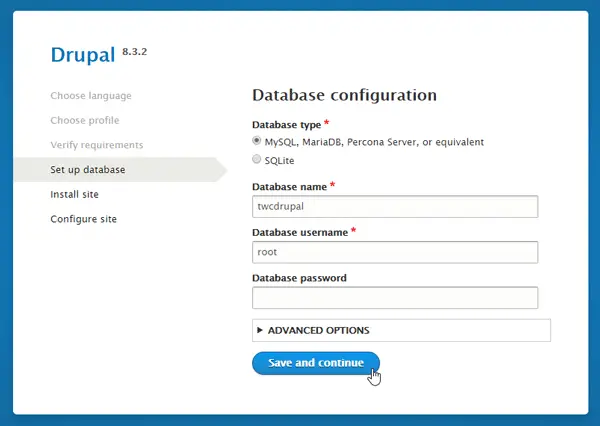
After that, select Standard as installation profile, select MySQL, MariaDB, Persona Server, or equivalent as the Database type. You need to enter a database name, database username, and password as follows:
- Database name: This is what you have created earlier.
- Database username: root
- Database password: blank (no need to enter any password).

Moving on, the Drupal installation will start, and it will take some time to complete the module installation. Following that, you need to enter site information i.e. site name, email address, username, password, time zone, etc.
That is it! After that, you can access the Drupal site on your localhost.
I hope this guide was useful!
How to install Drupal on Windows?
To install Drupal on Windows, you need to use WAMP. After installing WAMP, a database is required, which will be mapped to the installation. On the other hand, you must download the official installation package of Drupal from the official website. Following that, the installation process is the same as the regular one. You need to choose a language, select a profile, choose the database, enter the database username/password, etc.
Can Drupal run on Windows?
Yes, you can run Drupal on Windows. Whether you use Windows 11, Windows 10, or any other version, you can install Drupal on Windows with the help of WAMP. It is the easiest method you can follow to test things on a Drupal website and migrate data to a live website.