Finding the best time for a meeting with your office colleagues is often not easy. It would be best to ask them about their convenient time and then match it with your schedule to arrive at the best-suited time. The job of deciding when to meet is relatively simple if there are lesser people as attendees, however, how about if the meeting requires more people. The job gets tough, with some people not available or dropping off for various reasons. All this process makes you invest lots of your productive time.
UPDATE: The FindTime Outlook add-in has been integrated into Outlook and is now called Scheduling Poll.
How to access the Scheduling Poll feature and create a Poll on Outlook
Microsoft regularly updates its products with new features. It has introduced a new Scheduling Poll feature that does not need any add-in. It has integrated the FindTime Outlook add-in as a feature now. You can schedule meetings via polling by sending multiple time options as an organizer. Anyone with a valid email can join the Scheduling feature meetings. The scheduling poll feature is currently available to Microsoft 365 Apps for business or enterprise users which includes Exchange Online.
To get started, open Outlook on your web browser.
Create a new email or reply to an existing one in your inbox.
Fill out the To field with the attendees you want in the meeting and fill out the Cc field with the optional attendees.
Once you are done filling in the attendees’ emails, select the Insert tab and click on Scheduling Poll.
If you do not find the button, click the three-dot button in the ribbon menu.
Then, click on the Scheduling poll under the Options section.

A scheduling poll sidebar will open. Select the times you wish to meet for the attendees to choose.
You can customize the poll under the Manage poll settings options in the Scheduling poll sidebar. Click on it to see the options.
If you want to schedule the meeting only when the attendees reach a consensus, check the box beside Schedule when attendees reach consensus.
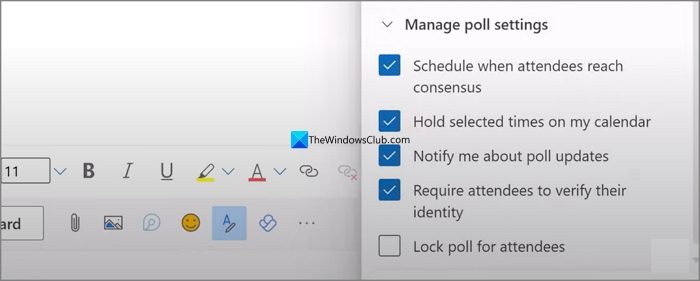
Select other poll options if needed and click on the Create poll button at the bottom. The poll you have just created will be inserted into your email. You can add other details to the email by clicking Send.
That’s it.
How to use Microsoft FindTime to schedule meetings faster on Outlook
FindTime is an application that can help you schedule meetings faster. An add-in for Microsoft Outlook, FindTime helps you decide on a meeting time easily with a systematic approach and that too without much of your involvement. The app automatically suggests what days and times work best for the people required to attend the meeting, helping you arrive at the consensus time pretty easily. Read below to find out how to schedule meetings faster.
FindTime cuts down on organizing time. As an Organizer, you propose your selected times to all attendees and allow everyone to vote. Once there is a consensus through voting, FindTime sends out the meeting invite on your behalf, thus eliminating the time that you usually have to invest in coordinating with people and arriving at the best time for all.
To start using FindTime
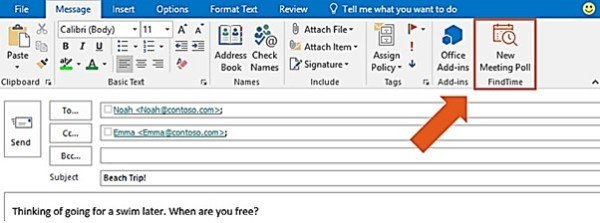
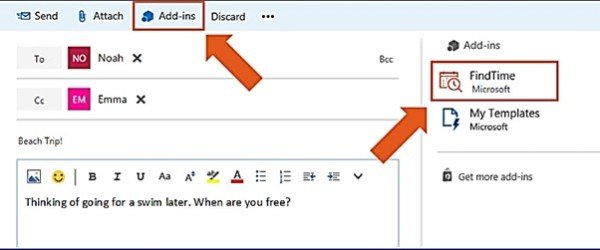
The first step is to install FindTime, and to do that, you must log into your Office 365 accounts. Once you are logged in, you can install FindTime from the Office store. Once installed, restart Outlook, and you can see the FindTime icon located at the top right corner of the screen. Note the difference in appearance between Outlook and Outlook on the Web shown below.
On Outlook app
On Outlook on the web
So, having set up the App, you can now compose a new email or reply to an existing email to schedule a meeting.
For instance, if you want to set up a meeting with the people listed by replying to an existing email. Click on”Reply with Meeting Poll”.

A panel opens, through which you can set the meeting duration time. The middle and lower portion of the panel allow you to see the schedule of the people whom you wish to invite to a meeting. Here, you can select multiple time slots and send them to the people involved, asking them to vote.
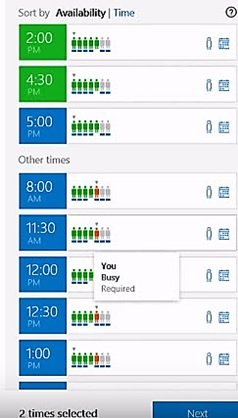
People’s statuses are represented by different colors, and based on this, you can decide which meeting slot is best suited for each.

Click on “Next” and you see the shortlisted time slots and tabs like “meeting location”. You are now ready to make an invite. Click “Insert to email” to make an invite.
Having made an invite, click “send” on your message inbox window to allow people to start voting on the time slots you have selected. Everyone invited can see the online poll about who is voting for which time. You can even know others know about your favorite slot.
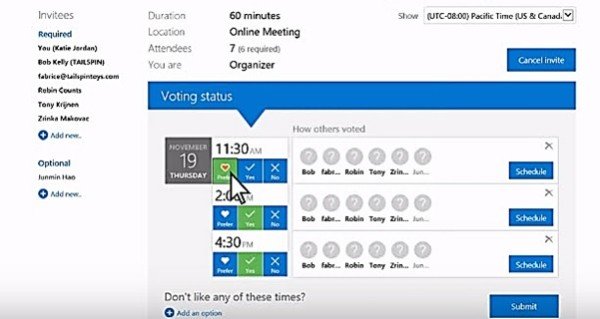
As soon as the votes are in, the invite is scheduled, and your meeting is set up. The Organizer also receives an email about the invite confirmation.
Note: On the recipients’ side, they just need an email address to receive your invite and internet access to vote at the FindTime website. They can also vote from any device they wish. Recipients do not need to have FindTime installed on their PC or smartphone or, for that matter, an Office 365 account.
Visit findtime.microsoft.com to start using FindTime and let us know if you like this new app from Microsoft.
Leave a Reply