This post will tell you about SIP, how to go about hosting a SIP Server, creating your own SIP internet network, and more on a Windows PC. SIP stands for Session Initiation Protocol. It is a protocol used for high ended multimedia communications over the Internet Protocol that is IP. Some examples of SIP are, media streaming, screen sharing, video and voice conferring, multiplayer gaming, sessional network and etc. The SIP protocol is different from all other protocols as this protocol runs as an independent layer on other protocols such as Transmission Control Protocol (TCP), Stream Control Transmission Protocol (SCTP). SIP protocol was originally designed by Henning Schulzrinne and Mark Handley. This protocol can be seen widely used in Cellular System Technologies.
There are many free utilities out there that allow you to create a SIP server on Windows, but here we have chosen the best out of them that is OfficeSIP. OfficeSIP Server is a free utility that allows you to create and host a SIP server on your Windows computer.
Host your own SIP server on Windows at home
Step 1: Visit officesip.com and download the latest release of OfficeSIP Server from the download menu at the top right of the webpage.
Step 2: Open the downloaded setup file and install the setup as guided by the install wizard. After the installation is complete, run the SIP Server Control Panel.
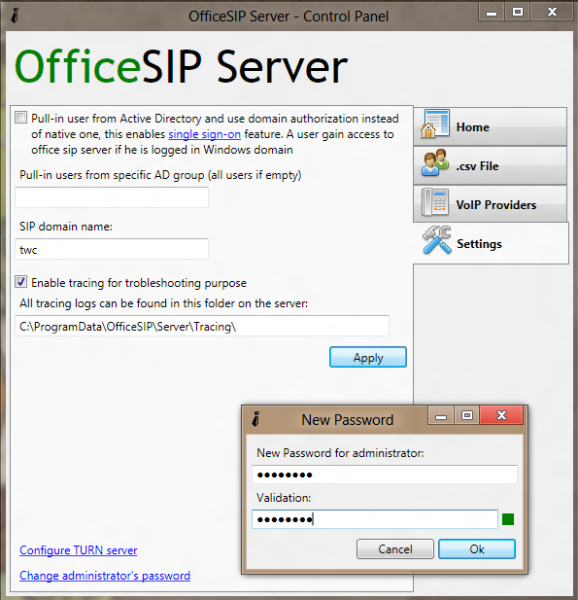
Step 3: Press the Connect button and you will be successfully connected to your server. You can now change the default settings of your server. To change settings, go to the settings tab on the left and choose your own SIP domain name, you can even create password for your administrator account from the same window.
Save all your settings and you are done. Now we will discuss how to add users to our server, setup voice and video calls over this server and how to set up messaging on the same server.
Add users to your SIP server
Step 1: Open OfficeSIP Server Control Panel and login with your administrator credentials.
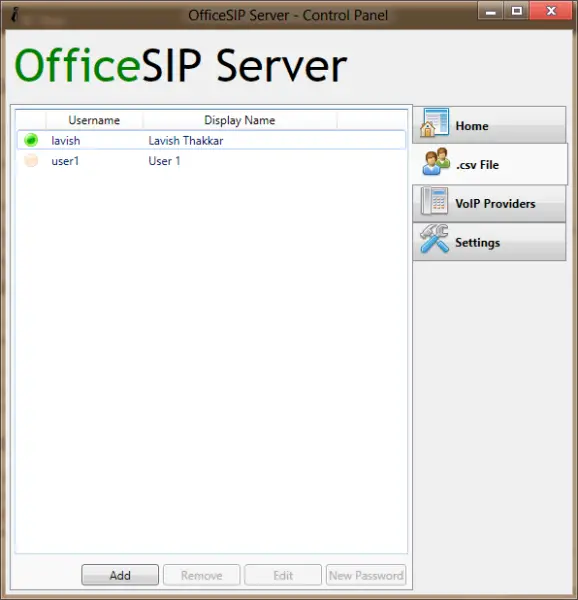
Step 2: From the left menu click on “.csv File” option. And now click on “Add” button, a new dialog would pop out where you can enter all the details of the users. Unlimited users can be created on our server.
Set up Messaging on your SIP server
There are lots of SIP messengers available out there but we recommend we would use the OfficeSIP Messenger that is completely compatible with OfficeSIP server.
Step 1: Download and install OfficeSIP Messenger from here on officesip.com. Run the installed application. Now we need to set up our account there.
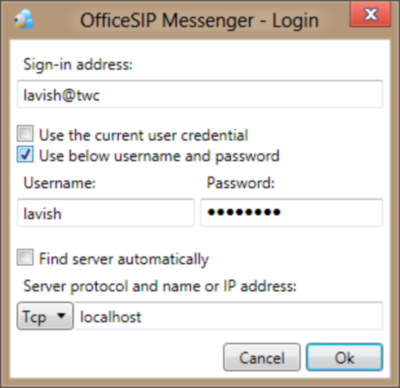
Step 2: In the sign-in address, enter the address assigned to you, by your SIP administrator. Click on the check box that says “Use below username password”, in the username field enter the username and in the password field enter the password assigned to you by your administrator. Uncheck the check box that says “Find server automatically” and in the text box below enter “localhost” and you are done.
Step 3: You will be successfully logged into your Messenger account, and you can now chat within your local area networked SIP server. You will be taken to a messenger screen where all the other users would be shown to you, and you can easily have a conversation with them. You can even start an audio or a video session by clicking on “Contacts” menu and selecting your desired option.
That is all. I hope you have liked the tutorial.
You may use your desired programs for SIP messaging and multimedia conferencing, but I like OfficeSIP as it is good and free.


