A Windows System Image is a file or a set of files containing everything on a PC’s hard drive or from a particular partition at any given point in time. It is an exact copy of a drive. It includes all the files that are required to run Windows properly – including the data files. A system image comes in handy when your computer or its hard disk stops working, or your Windows gets corrupt. In such a case, you can use the system image to restore the content of your computer or hard disk. You would not have to reinstall Windows or apps on your computer.
System Image Backup failed, Error 0x80780038
Creating a System Image backup is a simple process involving a few easy steps. But at times, the system image backup might fail. When trying to create a system image backup, you might get a message displaying an error as below:
The backup failed. The specified backup storage location has the shadow copy storage on another volume (0x80780038)
This error is displayed right at the stage where the Shadow Copies get created. You could try closing all apps that might be using the drive at the time of creating the backup and start again. But, this error points at issues in the target location because of which Windows fails to write a system image there.
The issue could be related to security clearance too. If the partition does not have security clearance to make shadow copies on itself, the system image backup operation gets declined. This means that for the backup to finish, the drive should get a security clearance.
We could try the following procedure step by step to resolve the issue:
1] SFC scan
Press Win+X and click on Command Prompt (admin). Type sfc /scannow and hit Enter to start the System File Checker scan.
See if the problem gets resolved, once the scan is over and you have restarted your computer.
2] Configure System Protection
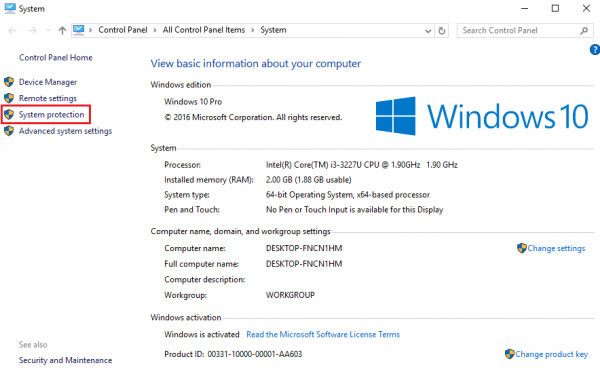
However, in case it does not, you can also open the Control Panel, then go to System, and select System Protection. Under System Protection, activate the protection for the partition, as follows.
Press Win+E. This will open File Explorer. In the File Explorer window, right-click on This PC and click on Properties.
The System applet will open up. Click on the System protection link.
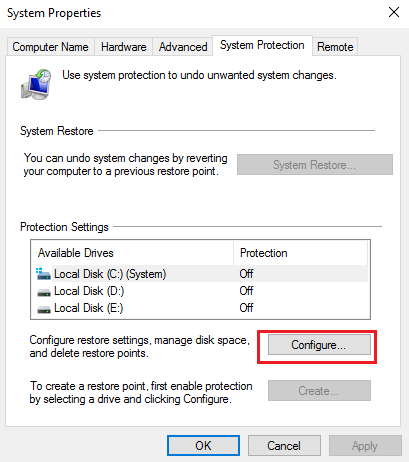
In System Properties, select the drive WHERE you are creating the image and click on Configure. It will not be the System Drive – but it will be the drive where you are creating and saving the system image file.
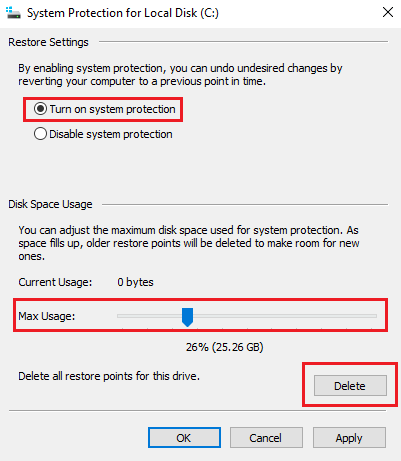
You will get a System Protection box for the chosen drive. The box will show Restore Settings. Under that, select Turn on the system protection.
Further, under Disk Space Usage, set the Max Usage slider to a value lower than what it is already set at.
Next, click on Delete to remove all restore points for the drive. After you do so, click on Apply and then OK.
Once you are done with that, close System Properties.
Try creating the System Image back-up again and see if it has worked.
Hope it helps!
Now read: