Windows Ink Workspace is one of the new features introduced with Windows 10. With the power to engage more digitally with your computing environment, Windows Ink empowers you to interact with your system and navigate the screen with a digital pen. In this post, we will see how to use Windows Ink Workspace like a pro.
Microsoft had the plans for Windows Ink under wraps for quite some time now. When Windows 10 was released to the general masses last year, we saw the new browser Edge embracing this new feature, where you could take web notes and interact freely with the web itself. Windows Ink can be called as an enhanced system-level tool using which you can use to do several things with your digital pen. Microsoft has a pretty successful range of Surface products, and if you have one of those tablets or something like the Dell XPS 12, Windows Ink starts making more sense for you.
How to use Windows Ink Workspace
Before learning how to use it, do you need to download or install Ink Workspace? No – it is already present, and you need to know where to find it.
Where to find & open Windows Ink
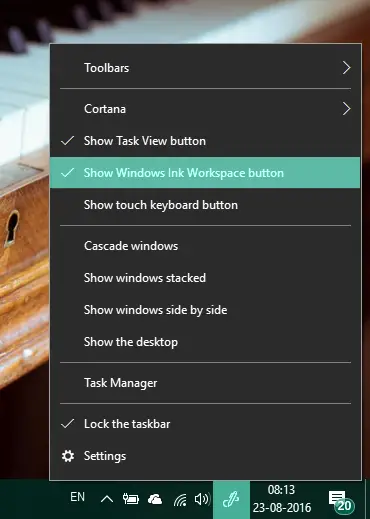
Windows Ink Workspace is a hub present on your PC which contains several tools, utilities, and apps that are pen-friendly. You can launch it from the far right end of taskbar by clicking on the icon that looks like a pen. However, if it is not present there, then you might have to add it to your taskbar. To do so, right-click anywhere on the taskbar and select Show Windows Ink Workspace button.
What does it offer
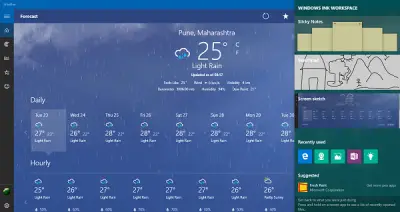
When you launch the Windows Ink hub, it slides from the right just like Action Center containing several pen-friendly apps. On the top, you can see utilities like Sticky Notes, Sketchpad and Screen Sketch which forms the prime core of Windows Ink. Sticky Notes is available as a separate Windows Store app, but the other two are bundled with Windows Ink only. We’re going to see how to use these nifty little tools, later in the post.
Apart from these three major components, you can also see the apps that you have recently used and that are compatible with a pen.
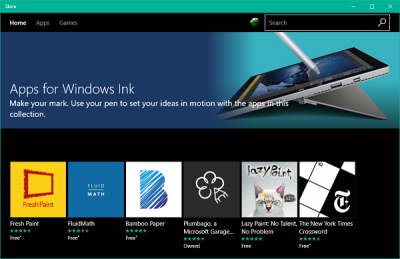
Down below, you can see the suggested apps from Windows Store that you can download to enhance your pen experience. Click on Get more pen apps to land on a Store page with lots of pen-friendly apps. You can download these and add up your collection.
How to use it
Now, let’s examine how to use three main features encapsulated at the top level of Windows Ink.
Sticky Notes
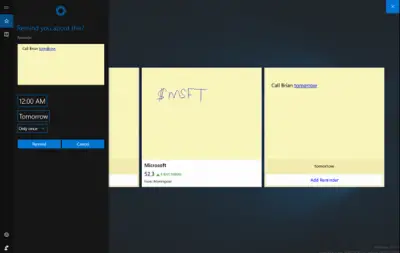
Earlier bundled in Windows as a built-in system component, Sticky Notes is now available for everyone as a separate Windows Store app. In Windows 10, you can use Sticky Notes to set a reminder, view flight information, send an email or visit web links and even more. You need to set your region and language to English[US] and enable insights for sticky notes, post which, you will be able to test out the enhanced capabilities of Sticky Notes. You can use Windows 10 Sticky Notes to create Cortana Reminders.
Sketchpad
Sketchpad can be used for putting your art at an exercise. You can use the available pen, pencil, crayons, etc. to draw and then share with your friends. You can also use a handy scale to draw straight lines. Use your pen/stylus device to shift your way around the canvas.
Screen Sketch
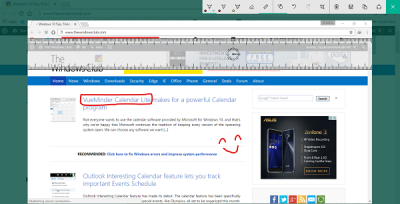
Similar to taking web notes in Edge, this particular feature enables you to take a screenshot of the currently open window and then use Sketchpad features to annotate, draw or highlight any parts of the image. Quite useful when you want to share an annotated image among your friends!
These are the integral bits of Windows Ink. You can play around with these features and install other pen-oriented apps for a richer experience.
Ink Workspace in Windows 11
Windows 11 ships with a new, customizable Ink Workspace panel. You can pin apps to a quick-launch bar, which is easily accessible via a Pen peripheral.
To enable Windows Ink Workspace panel on Windows 11, do the following:
- Open the Settings app (Press Win+I)
- Navigate to Personalization > Taskbar.
- Click on the Ink Workspace taskbar button
- The app will launch and you will see its icon in the Notification area.
Read: How to show the Pen Menu Taskbar Icon on Windows 11.
Besides supporting digital pen-enabled apps, the Windows Ink Workspace contains Sticky Notes, Sketchpad and Screens Sketch applications. All three applications are geared towards making it easier and faster to use digital pens.
Sketchpad is primarily a blank whiteboard that allows you to choose different styles of writing, thickness, and colors of pens. The image drawn on the sketchpad can conveniently be saved to an image file or shared through apps installed on your PC.
The Screen Sketch application, on the other hand, allows you to take a quick snapshot of your screen and write or draw directly on the screenshot. Similar to Sketchpad drawing, you can save the screenshots to an image file and share it using the sharing options given in the application.
But what is truly amazing about Windows Ink’s ink-powered features is their integration with Cortana, Bing, and apps like Maps. As Microsoft conveys very well, Windows Ink “combines the speed and naturalness of pen and paper with the power of the computer.”
So, how do you benefit from using Windows Ink? First, it helps you put your “ideas in motion”. Have a thought? Write it straight away on a sticky note or draw it effortlessly on the sketchpad! This will require nothing more than a simple click of your digital pen. How would you feel if you wrote a flight number on a sticky note and automatically obtained all details regarding the route, timings, etc. of the flight? By clicking on “Enable Insights”, you can integrate the sticky notes with Cortana and other apps.
Here’s how to use Windows Ink to enhance your user experience:
- Go to the taskbar in the lower-right part of your screen and select the Windows Ink Workspace or click the back of your pen. In case you don’t see the Windows Ink icon, you can right-click anywhere in your taskbar and then select Show Windows Ink Workspace button.
- That’s it! You are ready now to start drawing, editing documents, and writing sticky notes. There are no worries for those of you who do not have a pen; you can conveniently use your mouse or finger to get started!
The Windows Ink Workspace even allows you to customize your pen’s settings by going to Start> Settings > Devices > Pen & Windows link. This enables you to exert greater control over how your pen functions. You can also assign programs to certain button presses so that the set program gets opened when you press those buttons. All you have to do is to simply set up pen shortcuts by clicking the eraser button on top of the pen. Of course, if you do not use it, you can always disable Windows Ink Workspace.
Also, see how you can configure Pen shortcuts & Touch settings.
Let us know your thoughts on the possible utility of Windows Ink Workspace for you.
