As a part of the Ease of Access Center, one of the Accessibility tools that Microsoft has included in Windows 11 and Windows 10, is the all-improved Magnifier. This Magnifier tool makes it easier for people with disabilities, to read and view various parts of their computer screen more clearly, as it makes items appear larger.
Magnifier Tips and Tricks in Windows 11
Among many Accessibility tools in Windows, the all-improved Magnifier is worth mentioning. It makes the life of people with disabilities a lot easier, especially visually challenged ones. The tool makes items appear larger in size. This makes it easier to spot them and read the content on the screen more clearly. Let’s find how to use Magnifier in Windows.
Here, we’ll cover the topics around,
- Different ways to open Magnifier in Windows 11
- Calibrate magnification level
- Manage other Controls
In the end we’ll also learn in brief how does a computer screen Magnifier work?
Different ways to open the Magnifier in Windows 11
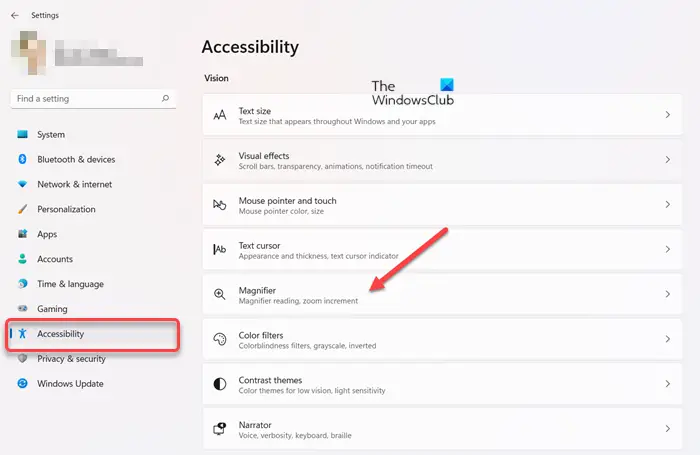
To run the Magnifier in Windows 11, type ‘magnifier‘ inside the start search and hit Enter. or press WinKey & + keys together to open it.
Alternatively, you can open Settings, choose Accessibility from the side panel and locate Magnifier under Vision section on the right.
Calibrate Magnification level in Windows 11 Magnifier
This process in both, Windows 11 and Windows 10, remains the same. When opened, simply adjust the zoom level using the ‘+’ and ‘-‘ buttons. The default value of zoom increment is set to 100%.
Manage other Controls in Windows 11 Magnifier
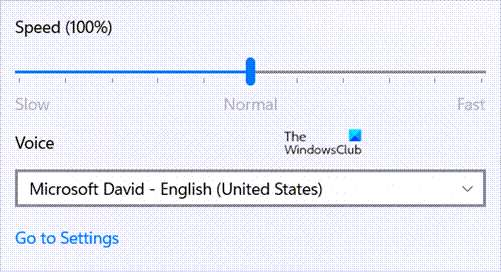
In addition to adjusting zoom level you can manage ‘read from here’ controls, move forward or backward, play/pause and access Settings from the same window. It allows you to change the default voice and control reading speed.
Detailed read: How to Use the Magnifier in Windows 11.
How to use the Magnifier in Windows 10
In this post, we will see how to open, use, or turn off the Magnifier in Windows 10. Let us check out the Windows 10 zoom application & learn about its settings.
How to open Magnifier in Windows 10
To run the Magnifier, type ‘magnifier‘ in start search and hit Enter. You can also press WinKey and + keys together to open it. Alternatively, you can access it via the Control Panel > All Control Panel Items > Ease of Access Center or from the Accessories folder in your Start Menu. You will see it appear on your desktop.

You can increase or decrease the magnification. It also lets you Play/Pause and ‘read from here’ and open the Settings.
If you click on the Settings icon on the right side, the following windows will pop up.
If you move your mouse pointer over it and click, it will transform into a small window that will offer you various settings and options. Here, you can control the amount of magnification you desire using the ‘+’ button.
Magnifier Settings in Windows 10
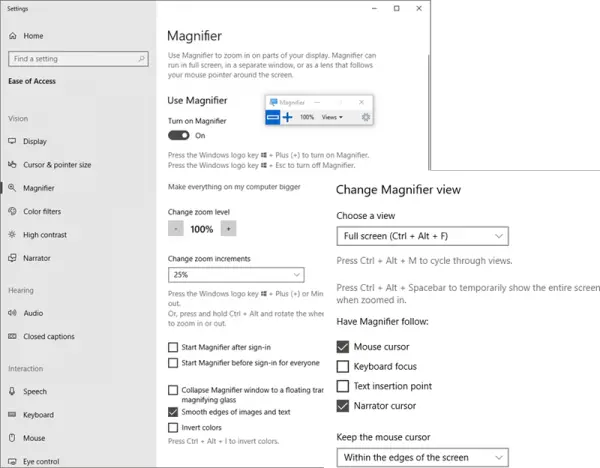
When the Magnifier is open in Windows 10, you may click on the wheel symbol to open its settings. Alternatively, you may open Settings > Ease of Access > Vision > Magnifier to see all its settings. You will also see all the Magnifier shortcuts mentioned there. You can:
- Change zoom level
- Change zoom increment
- Start Magnifier after sign-in
- Start Magnifier before sign-in for everyone
- Collapse Magnifier to a floating transparent magnifying glass
- Smooth edges of images and text
- Invert colors:
- Choose Magnifier view – Docked, Fullscreen, or Lens.
How to use the Windows Magnifier
There are three Magnifier modes where you can set your magnifier view to:
Full-screen mode. In full-screen mode, your entire screen gets magnified. Depending on your screen resolution, some parts of your items may go out off-screen, but you can always move your pointer in that direction to see them.
Lens mode. In lens mode, the Magnifier will move as a lens along with your mouse pointer, and the area around the mouse pointer gets magnified.
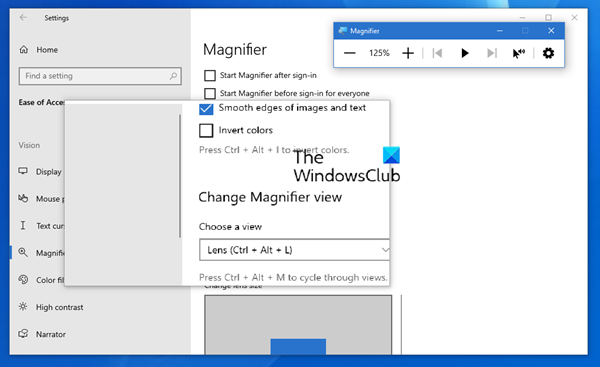
You can change the lens size by pressing Ctrl+Alt+R, and then moving the pointer up and down to change the height, and left and right to change the width.
Docked mode. The Dock stays on the top end of your screen and magnifies the part on which you are working.

In docked mode, only a portion of the screen is magnified, leaving the rest of your desktop unchanged. If your computer does not support Aero, this is the only mode that will be available to you.
You can set the zooming and also decide on where you want the Magnifier to focus – whether you want the Magnifier to follow the mouse pointer, follow the keyboard focus or the text insertion point.
Moreover, you can also fine-tune the appearance of your fonts using ClearType and opt to make Magnifier start every time your Windows computer starts. You can also change the screen resolution, which adjusts the clarity, size, and a number of things that fit on your computer monitor.
If you need high-contrast, you can Turn on color inversion here. This will invert all the colors – make white into black and vice versa. Turning on color inversion increases the contrast between items on your screen, which can help make your screen easier to see.
You can also keep the Magnifier mouse cursor in the center of the screen.
How to zoom out or zoom in using Windows Magnifier
You can zoom in and out by pressing the Winkey & +, or Winkey & –. You can also zoom in and out by pressing Ctrl + Alt and then rotating the wheel on your mouse.
Read: Windows Magnifier keyboard shortcuts.
How to turn off Magnifier in Windows 11/10
Simply click on the ‘x’ symbol to turn off the Magnifier, as you would do for any other application.
Seeing the versatility of this tool, it can prove to be useful not just to elderly people with vision problems, but it could also prove to be of immense help if you find that your laptop screen is moving away too far from you while reclining on your favorite armchair, or even if you want to see the real colors of any negative image!
How does a computer screen Magnifier work in Windows 11?
The computer screen Magnifier in Windows work by making the text appear larger in size than normal. This helps visually challenged people read texts on screen more comfortably. You can set your magnifier view to any one of the following.
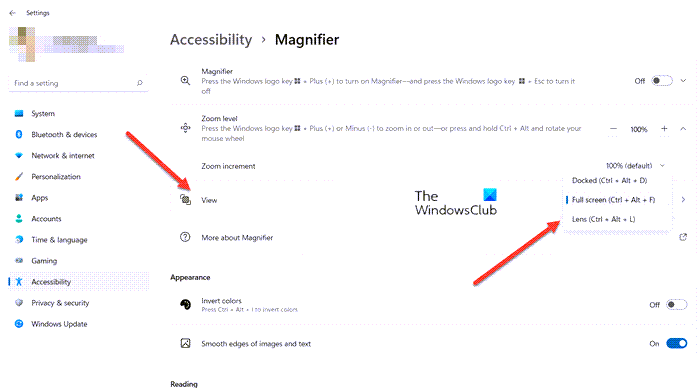
- Full-screen mode – In full-screen mode, your entire screen gets magnified. Depending on your screen resolution, some parts of your items may go out off-screen, but you can always move your pointer in that direction to see them.
- Lens mode – In lens mode, the Magnifier will move as a lens along with your mouse pointer, and the area around the mouse pointer gets magnified. You can change the lens size by pressing Ctrl+Alt+R, and then moving the pointer up and down to change the height, and left and right to change the width.
- Docked mode – The Dock stays on the top end of your screen and magnifies the part on which you are working. In docked mode, only a portion of the screen is magnified, leaving the rest of your desktop unchanged. If your computer does not support Aero, this is the only mode that will be available to you.
Apart from the above, you can set the zooming and also decide on where you want the Magnifier to focus, i.e., whether you want the Magnifier to follow the mouse pointer, follow the keyboard focus or the text insertion point. Also, you can also fine-tune the appearance of your fonts using ClearType and opt to make Magnifier start every time your Windows computer starts.
Lastly, if you need high contrast, you can Turn on color inversion here. This will invert all the colors—making white into black and vice versa. Turning on color inversion increases the contrast between items on your screen, which can help make your screen easier to see.
Just one of the several Windows 11 Tips and Tricks!
