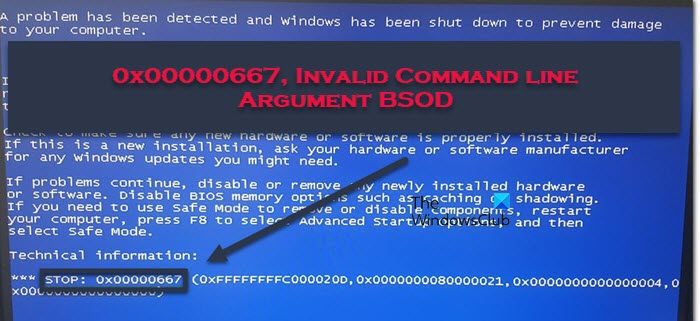
You may encounter 0x00000667, ERROR_INVALID_COMMAND_LINE Argument stop error code on your Windows 11/10 computer if there is conflicting software, virtual conflict, disabled virtualization, and more. In this post, we will see what to do to resolve this Blue Screen.

0x00000667
ERROR_INVALID_COMMAND_LINE
Invalid command-line argument. Consult the Windows Installer SDK for detailed command line help.
You might encounter the BSOD error due to one or more (but not limited to) of the following known causes;
- Third-party security software conflict.
- Virtualization conflict.
- Virtualization is disabled from BIOS/UEFI.
- Intel HAXM (Hardware Accelerated Execution Manager) installation is missing or outdated.
- Windows installer is partially de-registered.
- Windows Installer service is disabled.
0x00000667, Invalid Command line Argument Blue Screen

If you’re faced with this issue, you can try our recommended solutions below in no particular order and see if that helps to resolve the issue.
- Disable/Uninstall 3rd-party security software (if applicable)
- Disable Hyper-V (if applicable)
- Enable Virtualization Technology from BIOS or UEFI
- Install Intel HAXM (if applicable)
- Unregister and Re-register Windows Installer service
- Enable the Windows Installer service
- Perform System Restore
Let’s take a look at the description of the process involved concerning each of the listed solutions.
If you can log in normally, good; otherwise you will have to boot into Safe Mode, enter the Advanced Startup options screen, or use the Installation Media to boot to be able to carry out these instructions.
1] Disable/Uninstall 3rd-party security software (if applicable)
During the course of the investigation, it was discovered that PC users who had 3rd-party antivirus software like AVAST, and AVG installed on their Windows 10 devices were affected. In this case, the issue can be resolved by removing any third-party antivirus programs from your PC using the dedicated removal tool to remove all files associated with your antivirus program. The reason is, that it’s much more efficient and invasive to use the custom uninstall tools for the AV program from the manufacturer, if available, whenever uninstalling antivirus software, as there are registries and dependencies, installed deep within the OS which the traditional Control Panel uninstaller (appwiz.cpl) might miss in most cases.
If removing the antivirus fixes this error, you can now install the same antivirus again, or you can switch to an alternative software or better still stick to Windows 11/10 native AV program – Windows Defender.
2] Disable Hyper-V (if applicable)

If you’re running an Android-based emulator or you have virtual machine software like Virtualbox and VMWare installed on your Windows 10 device, it’s very possible that it’s conflicting with the Hyper-V service that’s enabled by default on your Windows computer. In this case, you can disable Hyper-V and then restart your computer.
To disable Hyper-V, do the following:
- Press Windows key + R to invoke the Run dialog.
- In the Run dialog box, type
appwiz.cpland hit Enter to open the Programs and Features applet. - In the window, on the left side, click the Turn Windows features on or off link.
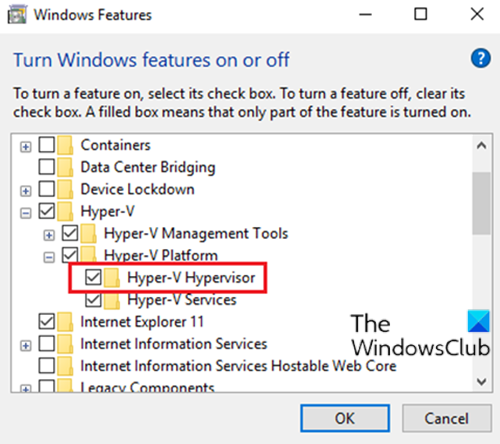
- Expand Hyper-V, expand Hyper-V Platform,
- Clear the Hyper-V Hypervisor check box or you can just uncheck the parent Hyper-V folder.
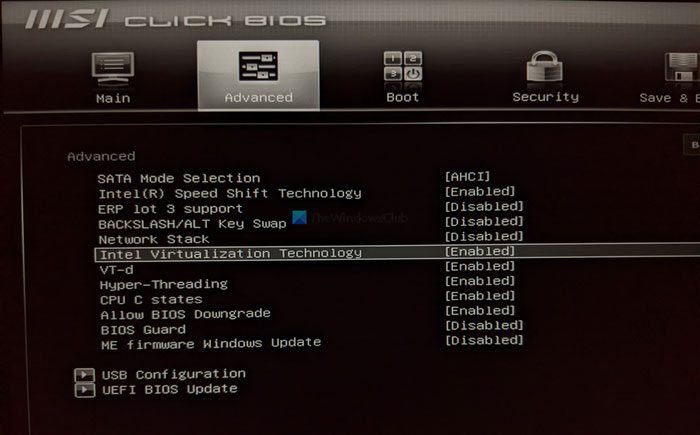
3] Enable Virtualization Technology from BIOS or UEFI

If you’re encountering this problem when using some kind of application that uses virtualization technology, it’s possible to encounter this BSOD error because SVM (Secure Virtual Machine) or Intel’s equivalent (Intel VT-X / Intel Virtualization) is disabled in your BIOS or UEFI settings. In this case, you should be able to fix the problem by enabling the virtualization technology on your Windows 10 device.
4] Install Intel HAXM (if applicable)
PC users running Android Emulator like BlueStacks or Nox when testing apps that are still in development mode, are most likely to encounter this BSOD error. In this case, you might be able to fix the problem by downloading and installing (with admin privilege) Intel HAXM (only applicable if your PC is using Intel’s Virtualization technology – Intel VT) directly or using SDK Manager.
5] Enable the Windows Installer service
If it is disabled, you might want to enable the Windows Installer service and see if that helps you.
6] Unregister and Re-register the Windows Installer service
Suppose you’re encountering the BSOD error when attempting to install a new program using Windows Installer or when using a component Windows Installer SDK. In that case, you might be able to fix the problem by temporarily unregistering the Windows Installer component and then re-registering the service again.
Do the following:
- Press the Windows key + R to invoke the Run dialog.
- In the Run dialog box, type
cmdand then press CTRL + SHIFT + ENTER to open Command Prompt in admin mode. - In the command prompt window, type the command below and hit Enter to temporarily unregister the Windows Installer service:
msiexec /unreg
- Once the command is processed successfully and you get the success message, input the following command and hit Enter to register the Windows Installer once again:
msiexec /regserver
After the second command is processed successfully, restart your computer once again, repeat the action that was previously causing the error, and see if the issue is resolved. If not, try the next solution.
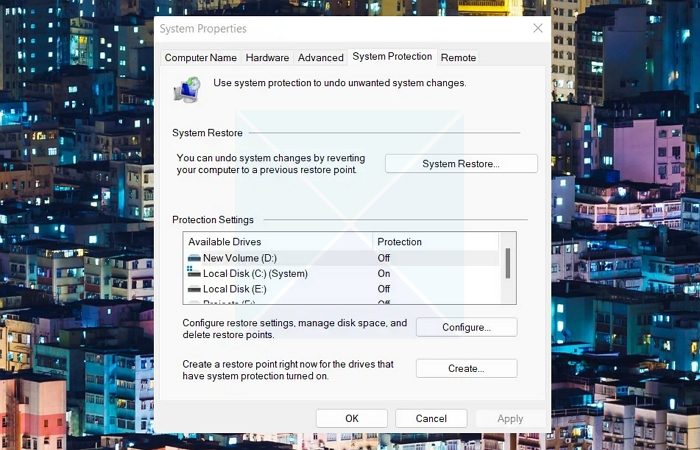
7] Perform System Restore

If you only started getting this Blue Screen of Death error recently, it’s likely that a recent software change is actually triggering this error code. If you can’t pinpoint a potential culprit, your best option for getting the issue fixed without having to do a clean install is to perform a System Restore.
Any of these solutions should work for you.
How to fix BSOD error Windows 11?
The best way to resolve BSOD errors is by running the Blue Screen troubleshooter. It will automatically detect what’s wrong with your system and then resolve it. You can also try running BSOD troubleshooter from the Get Help app.
Also Read: Recover Data after Blue Screen of Death in Windows 11.
Leave a Reply