If you are having problems connecting with VPN, then this guide shows how to fix Windows 11/10 VPN not working issues. This post offers solutions for – VPN client does not work or is not connecting, connects but no access, connects but webpage not loading, failed to initialize the connection, etc. The solution could be as simple as a DNS flush or as complex as editing a registry entry.
Many use a VPN to ensure they are not traceable throughout the Internet, or sometimes, their work requires them to connect to a VPN to be on a secure network. Sometimes, network issues result in an error, and you cannot connect. Either the website doesn’t load, or you cannot log in to a network using VPN.
Just before we start, here are some basic troubleshooting tips you need to try to fix VPN issues on Windows 11/10. First, make sure your Windows 11/10 is updated to the latest version. Some updates fix known issues around VPN which helps instantly. Second, reinstall the network drivers to the latest version or try some old drivers to see if that fixes. Lastly, the issue could be as simple as Cached DNS. Even though you had changed it, the computer uses an old address. So you may want to flush the DNS cache. You can also check if your router needs an update. The information will be available with the Web Interface of the router.
Fix VPN not working in Windows 11/10
Now, let’s take a look at some of the advanced tips to fix issues around VPN. These tips will need someone who has good knowledge of Windows. Along with this, you need an Administrator account.
1] Change VPN Protocol
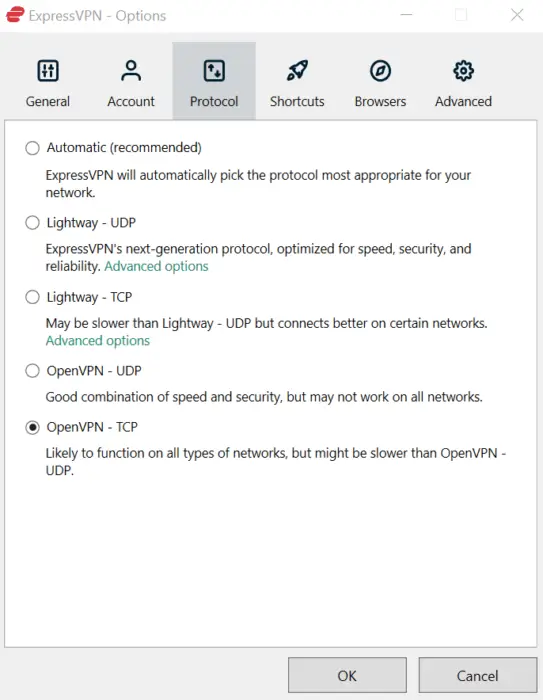
Open your VPN Settings and change the VPN Protocol. Setting it to OpenVPN has helped many get over this issue.
2] Reinstall VPN Software
If you are using a VPN software, instead of the inbuilt VPN feature of Windows, it is always a good idea to reinstall it. Many a time the configuration of the software is the root cause of the problem, and simple reinstallation fixes. Also, cross-check if your VPN software subscription has expired.
3] Reinstall WAN MiniPorts
WAN Miniports are drivers for various types of network connections. WAN Miniport (IP), WAN Miniport(IPv6) and WAN Miniport (PPTP) are used for VPN connections, i.e., connection to a PPTP VPN server. You can easily reinstall the drivers again using Windows.
- Open Device Manager
- Find Network Adapters
- Uninstall WAN Miniport (IP), WAN Miniport(IPv6) and WAN Miniport (PPTP).
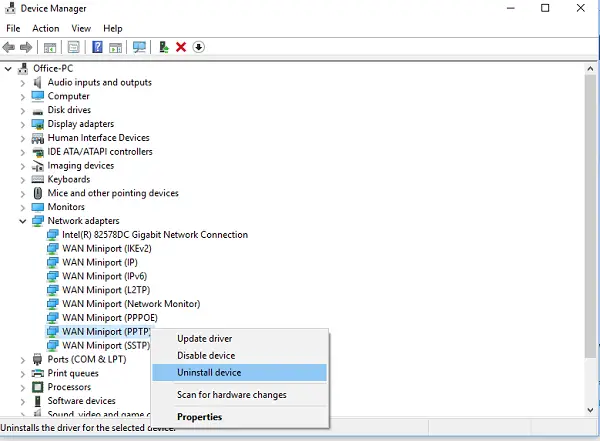
- Click Action, then Scan for hardware changes
- The adapters you just uninstalled should come back
Try connecting again. Hopefully, you should be good to go.
Related: Fix Can’t connect to VPN connection error on Windows
4] Troubleshoot TAP-Windows Adapter
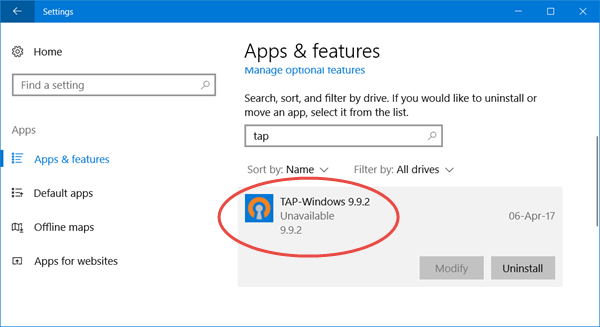
These are virtual network kernel devices i.e. software-based, and offer virtual TAP device functionality on the Windows OS. Many a time this is required the VPN software to work properly. We would highly recommend you to check out our tutorial on TAP-Windows Adapters.
5 Insert an Exception for UDP by editing The Registry
UDP, or User Datagram Protocol, is another way of transmitting data, just like TCP. However, UDP is used primarily for establishing low-latency and loss-tolerating connections between applications on the Internet. Many VPN software and even Windows use it. If there is a security issue around it, it fails. For example, UDP needs to establish security associations between the server and the Windows PC.
Follow these steps to access Registry Editor. You may need to create or update new input.
Backup your registry. In the search bar, type regedit and open the Registry Editor from the list of the results
Navigate to:
HKEY_LOCAL_MACHINE\SYSTEM\CurrentControlSet\Services\PolicyAgent
Right-click, and create a new DWORD (32-bit) Value.
Type AssumeUDPEncapsulationContextOnSendRule and then press ENTER.
Right-click AssumeUDPEncapsulationContextOnSendRule, and then click Modify.
In the Value Data box, type 2. A value of 2 configures Windows so that it can establish security associations when both the server and the Windows-based VPN client computer are behind NAT devices.
Reboot, and try again.
Read: Wireless Network not detected when using VPN
6] Configure Firewall
Windows Firewall makes sure that no unsecured or unauthorized connection gets access to your PC. Windows Firewall might disable or lock those requests from the VPN software, assuming it to be a threat. You need to allow the VPN through the Fiirewall.
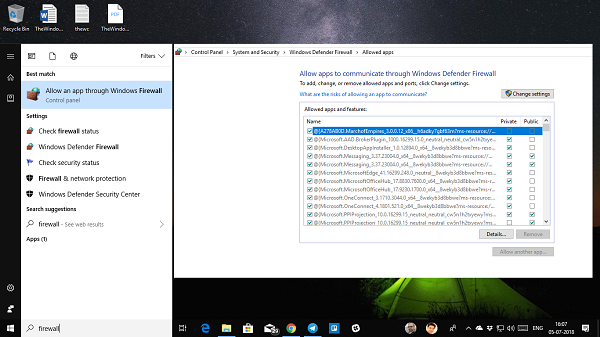
- In the Search bar, type Firewall and select ”Allow an app through Windows Firewall”.
- Click on the Change settings button.
- In the huge list, look for your VPN software. Make sure to make sure that both the Public and Private networks are enabled.
- If your software is not listed, you can find it manually using Allow another app.
- Confirm changes and try connecting through your VPN again.
Read: VPN not hiding or changing Location
7] Disable IPv6
Many times, IPv6 may cause a problem connecting to the network. While the default is still set to IPv4, you can cross-check by disabling IPv6 and running everything on IPv4. Every VPN creates a software-based network adapter. You just need to change the adapter settings for this VPN to IPv4.
- Open Network and Internet and then Network and Sharing Center.
- Select Change adapter settings from the left pane.
- Right-click on VPN network adapter and open Properties.
- Uncheck the box beside IPv6 and confirm changes.
Reboot your PC if you have to and try again.
These posts will help you if the following VPNs are not working on your PC:
McAfee | Kaspersky | Norton | Malwarebytes | ExpressVPN.
How do I fix VPN Error Code?
If you have an error code for your VPN issue, we have a dedicated post, and possible solutions to fix them. Do check out our post on Common VPN error codes troubleshooting & solutions for Windows 11/10
Solution 2 worked for me . thanks.