We all use the Windows Command Prompt regularly to solve system issues, run batch files, and also perform advanced administrative functions. As you use the Command shell window frequently, you may find that the default font is not to your liking, and you may want to change the font in the command prompt for better readability.
However, the Windows command prompt has limited scope for customization. While it is possible to make a few customizations to the command prompt user interface, like, adding transparency, changing colors, etc., it still looks like the old DOS interface with the limited flexibility for customizing according to the user’s preference. Moreover, the command line interpreter application has very few choices for changing the font. The font selection is limited to a few choices from 2 to 7 depending on the Windows version.
While there is no direct provision to add custom fonts and change the fonts in the Windows Command Prompt, you can now add custom fonts to the Command Prompt by using the registry.
In this article, we explain how to add custom fonts to the command prompt in Windows 11/10. But before we start, it is important to note that the Windows command prompt can only support monospace fonts. Monospace fonts are fixed-width fonts where the spacings and letters occupy the same width in contrast to the variable-width fonts. It is worth mentioning that, monospace fonts are extremely useful for writing the computer program source code. The character’s fixed-width aids programmers to keep track of special character strings in the program code. Once you have found the suitable monospace font, users can enable the custom fonts in Command Prompt by tweaking the Registry. Follow the below steps to add the custom fonts to the command prompt.
Find & install a suitable monospace font
The Windows command prompt mostly has two font choices: Lucida or Raster. One must install a font on a system using web services like FontSquirrel, Google Fonts, and others to add custom fonts.
As mentioned earlier, the Command Prompt will recognize only monospace fonts. Additionally, Microsoft also specifies that the custom font you add to the command shell window must be FF_MODERN if it is a TrueType font and OEM_CHARSET if it is a font other than the TrueType font. Microsoft also adds the criteria that the fonts you choose for the command prompt cannot have a negative A or C space, and it cannot be an italic-style font.
To know if the font will work on the command prompt, users must first install the font and then try to enable it. While most monospaced fonts from third-party web services are recognized by the Windows Command prompt, you will not be able to predict in advance if the font works for your Windows version until and unless you try to install it.
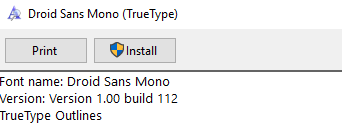
Once you find the suitable monospace font, download it and install it on your Windows system.

Once the font is installed, the next step is to add it to the command prompt using the registry editor.
Add the custom font to the Registry
Windows OS does not allow users to add custom fonts to the command prompt directly through the user interface. To make the monospace font available in the Command prompt, you need to first add the information of the installed fonts to the registry.
Open the Run box, type regedit, and press Enter.
Next, navigate to the following path:
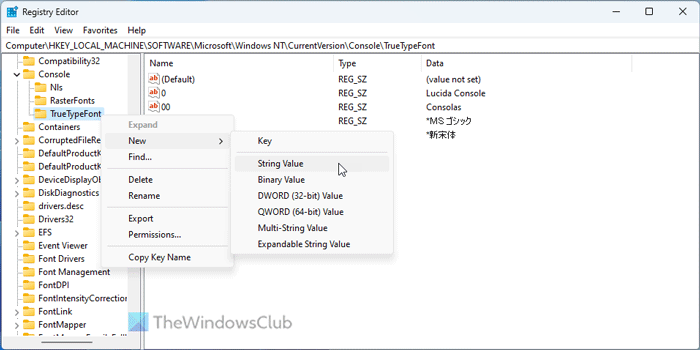
HKEY_LOCAL_MACHINE\SOFTWARE\Microsoft\Windows NT\CurrentVersion\Console\TrueTypeFont
On the right side of the registry panel, you will see the list of fonts that are used by the command prompt with the respective unique name values like 0, 00,01, etc.
To create a custom font, right-click on the right side of the registry panel and click on New.

Now select the string value and name the string value with a unique number. If you already have a string value with 00, then name the new string value as 000. Just note that the value you enter should be some unique number.
Double-click on the newly created string value and give the name of the font in the value data field.

Click OK to apply the changes and restart your system.
Read: How to get Mac-like smooth fonts on Windows.
Add the custom font to the Command Prompt
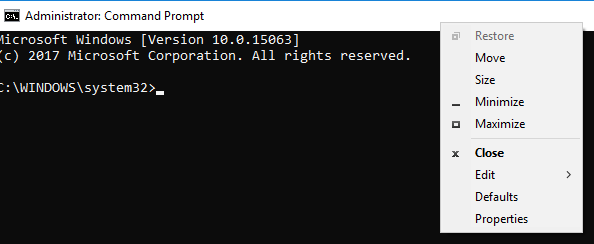
Open Command Prompt, right-click on the title bar, and click on Properties from the drop-down menu.

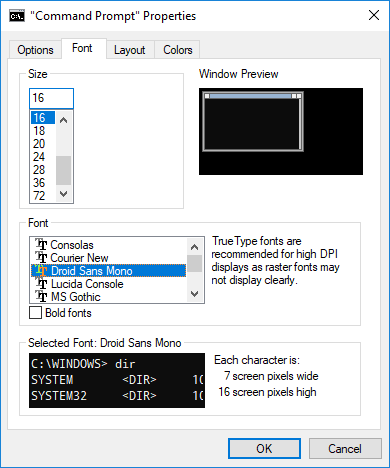
Navigate to the Font tab in the Command Prompt Properties window.
Select the font you installed under the Font section and click on OK.

Once done you must be able to use the command prompt with your favorite installed font. One can also change the font size for good readability.
It is worth noting that if you cannot see the font in the font list of the Properties window in the Command prompt, it is likely that the font you have chosen is either not supported by your Windows version or you have added a font that is not a monospace font.
Read: How to change the Background and Foreground Color in Command Prompt
How do I add custom fonts to cmd?
To add custom fonts to CMD, you need to install the font first and note down the name. Then, open the REGEDIT. go to this path: HKEY_LOCAL_MACHINE\SOFTWARE\Microsoft\Windows NT\CurrentVersion\Console\TrueTypeFont and create a Sting Value named 000. Then, add the name as Value data. Finally, you can open the CMD to set the font.
How do I change the font in Windows 11 Command Prompt?
To change the font in Windows 11 Command Prompt, you need to right-click on the title bar and select Properties. Then, go to the Font tab and choose a font from the Font section. Finally, click the OK button to save the change.
Read: Use ColorTool to change Command Prompt color scheme & download more color schemes
Leave a Reply