PC users can display and use the Start menu with a feature called Show App List In Start Menu. The Show App List In Start Menu is enabled by default. In this post, we will show you the thre ways on how to Add or Remove All Apps List in Start Menu on Windows 11/10.
Add or Remove All Apps List in Start Menu
We can add or remove All Apps List in Start Menu in Windows 11/10 in 3 quick and easy ways. We’ll explore this topic under the methods outlined below in this section as follows.
1] Via Settings app

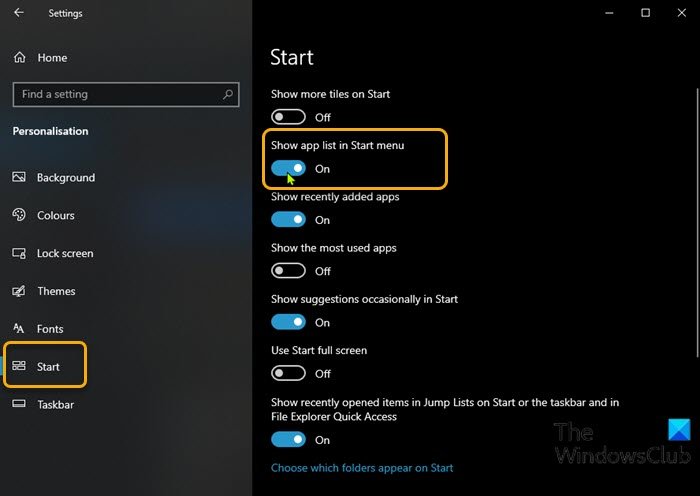
To add or remove All Apps List in Start Menu in Windows 11/10 via Settings app, do the following:
- Press the Windows key + I to open Settings.
- Click Personalization.
- Click Start on the left pane.
- On the right pane, toggle the button for Show app list in Start menu to On or Off per requirement.
Alternatively, you can achieve the same result by following these steps:
- Right-click on the Taskbar and select Taskbar Settings.
- On the Taskbar page, select the Start tab on the left pane.
- On the Start page, toggle the button for Show app list in Start menu to On or Off per requirement.
Now, when you access the Start menu, just the tiles will be displayed – this is called the Pinned Tiles view. In the upper left, you’ll see two new buttons that allow you to switch between the Pinned Tiles view, which is the default, and the All Apps view.
1] Via Local Group Policy Editor

To add or remove All Apps List in Start Menu in Windows 11/10 via Group Policy, do the following:
- Press Windows key + R to invoke the Run dialog.
- In the Run dialog box type gpedit.msc and hit Enter to open Group Policy Editor.
- Inside the Local Group Policy Editor, use the left pane to navigate to the path below:
User Configuration > Administrative Templates > Start Menu and Taskbar
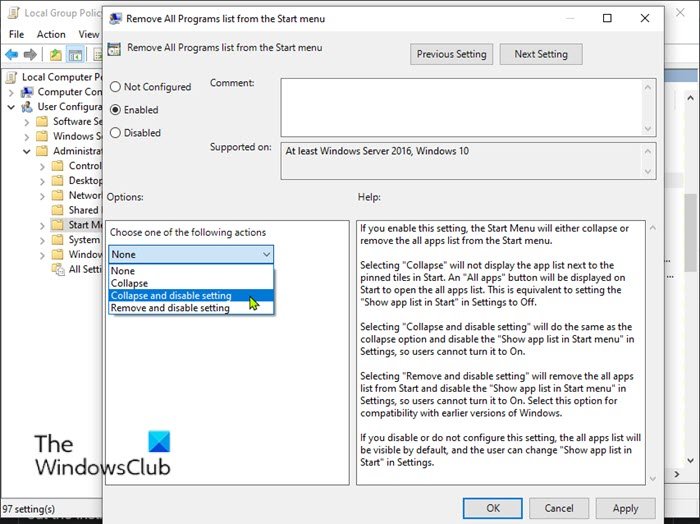
- On the right pane, scroll, locate and double-click on Remove All Programs list from the Start menu policy to edit its properties.
- In the policy properties window, set the radio button to either Not Configured (Default setting) or Disabled to Add All Apps List to Start Menu.
- To hide All Apps List on Start Menu, select the radio button for Enabled, and select Collapse and disable setting from the Choose one of the following actions drop-down menu under Options section.
- Click Apply > OK to save the changes.
- Exit Local Group Policy editor.
- Restart PC.
For Windows 10/11 Home users, you can add Local Group Policy Editor feature and then carry out the instructions as provided above or you can do the registry method below.
3] Via Registry Editor

To add or remove All Apps List in Start Menu in Windows 11/10 via Registry Editor, do the following:
Since this is a registry operation, it is recommended that you back up the registry or create a system restore point as necessary precautionary measures. Once done, you can proceed as follows:
- Press Windows key + R to invoke the Run dialog.
- In the Run dialog box, type regedit and hit Enter to open Registry Editor.
- Navigate or jump to the registry key path below:
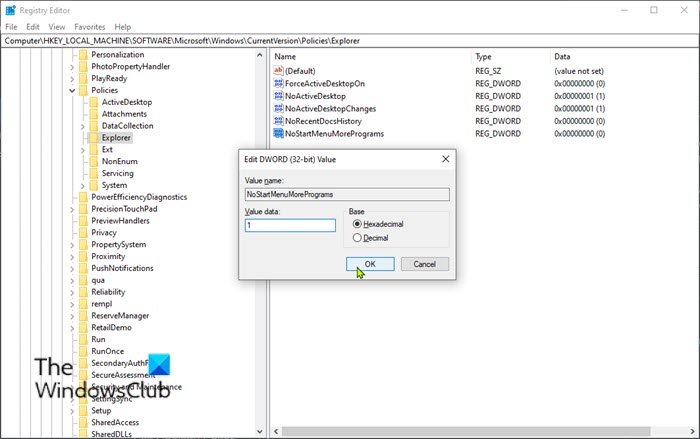
HKEY_LOCAL_MACHINE\SOFTWARE\Microsoft\Windows\CurrentVersion\Policies\Explorer
- At the location, right-click on the blank space on the right pane and then select New > DWORD (32-bit) Value to create the registry key and then rename the key as NoStartMenuMorePrograms and hit Enter.
- Double-click on the new entry to edit its properties.
- Input 1 in the Value data field to remove All Apps List in Start Menu.
The key initially not available is the default setting – it adds the All Apps List in Start Menu. Similarly, deleting the key you created will add the All Apps List in Start Menu.
- Click OK or hit Enter to save the change.
- Exit Registry Editor.
- Restart PC.
That’s it on the 3 ways to Add or Remove All Apps List in Start Menu in Windows 11/10!
Random read: How to browse and edit the Registry from Explorer.
Leave a Reply