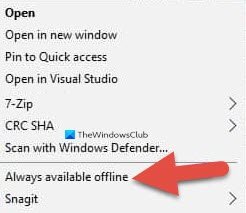
Offline Files is a feature of Sync Center that makes network files available to a user, even if the network connection to the server is unavailable. In this post, we will show you how to add or remove Always Available Offline from Context Menu in Windows 11/10.
![]()
Add or remove Always Available Offline Context Menu item
Since this is a registry operation, it is recommended that you back up the registry or create a system restore point as necessary precautionary measures.

To add Always Available Offline to Context Menu in Windows 11/10, do the following:
- Press Windows key + R to invoke the Run dialog.
- In the Run dialog box, type notepad and hit Enter to open Notepad.
- Copy and paste the syntax below into the text editor.
Windows Registry Editor Version 5.00

[HKEY_CLASSES_ROOT\AllFilesystemObjects\shellex\ContextMenuHandlers\{474C98EE-CF3D-41f5-80E3-4AAB0AB04301}]

[HKEY_CLASSES_ROOT\Folder\shellex\ContextMenuHandlers\Offline Files]
@="{474C98EE-CF3D-41f5-80E3-4AAB0AB04301}"

[HKEY_CLASSES_ROOT\Directory\shellex\ContextMenuHandlers\Offline Files]
@="{474C98EE-CF3D-41f5-80E3-4AAB0AB04301}"
- Now, click the File option from the menu and select Save As button.
- Choose a location (preferably desktop) where you want to save the file.
- Enter a name with .reg extension (eg; Add-To-Menu.reg).
- Choose All Files from the Save as type drop-down list.
- Double-click the saved .reg file to merge it.
- If prompted, click on Run > Yes (UAC) > Yes > OK to approve the merge.
- You can now delete the .reg file if you like.
To remove Always Available Offline from Context Menu in Windows 10, do the following:
- Open Notepad.
- Copy and paste the syntax below into the text editor.
Windows Registry Editor Version 5.00

[-HKEY_CLASSES_ROOT\AllFilesystemObjects\shellex\ContextMenuHandlers\{474C98EE-CF3D-41f5-80E3-4AAB0AB04301}]

[-HKEY_CLASSES_ROOT\Folder\shellex\ContextMenuHandlers\Offline Files]

[-HKEY_CLASSES_ROOT\Directory\shellex\ContextMenuHandlers\Offline Files]
- Now, click the File option from the menu and select Save As button.
- Choose a location (preferably desktop) where you want to save the file.
- Enter a name with .reg extension (eg; Remove-From-Menu.reg).
- Choose All Files from the Save as type drop-down list.
- Double-click the saved .reg file to merge it.
- If prompted, click on Run > Yes (UAC) > Yes > OK to approve the merge.
- You can now delete the .reg file if you like.
That’s it!
Leave a Reply