Office apps automatically correct a few things as you type. However, if you want to add or remove AutoCorrect exceptions in Word, Excel, and PowerPoint, here is how you can do that. You can include or exclude predefined AutoCorrect options with the help of this guide.
Here, we have shown the screenshots of PowerPoint. However, you can do the same in Microsoft Word and Excel as well.
Add or remove AutoCorrect Exceptions in Word, Excel, PowerPoint
To add or remove AutoCorrect exceptions in Word, Excel, or PowerPoint, follow these steps:
- Open PowerPoint, Word, or Excel on your computer.
- Click on the Options.
- Go to the Proofing tab.
- Click on the AutoCorrect Options button.
- Click the Exceptions button.
- Select a word and click the Delete button.
- Write a word and click the Add button.
- Click the OK button to save changes.
Let’s check out these steps in detail.
First, you need to open Microsoft Word, Excel, or PowerPoint. Here we have used PowerPoint to give you an example. Therefore, open PowerPoint and click on the Options.
However, if you have already opened any of those apps, you can click on the File menu and choose Options.
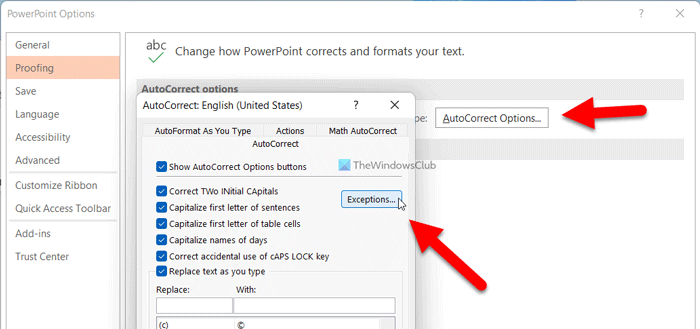
Once the PowerPoint Options panel is opened on your screen, go to the Proofing tab and click on the AutoCorrect Options button.
Then, make sure that you are in the AutoCorrect tab. If so, click on the Exceptions button.

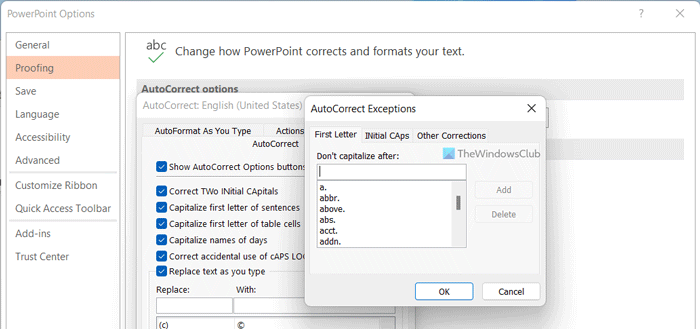
Here you can find three options – First Letter, Initial Caps, and Other Corrections. Each tab denotes a different thing.
Let’s say you do not want to capitalize the word “a” when you add a period after that. If so, you can add a. to the list. For that, you need to type the exact word and click the Add button.

Similarly, if you do not want PowerPoint or Word, or Excel to do that, you can select the specific correction and click the Delete button.
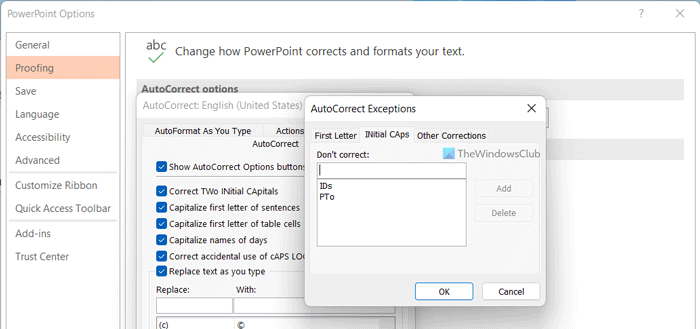
Likewise, there are more other options in the INitial CAps tab. At times, you might not want to allow Office apps to correct some words like IDs, PTo, etc. In such a situation, you can type that word, and click the Add button.

As usual, if you do not want to make that correction, you can select the predefined word, and click the Delete button.
Next one is Other Corrections. Although it doesn’t contain many options, you can set up a few things. For example, you can add a specific word that you do not want to be corrected automatically and is not enlisted in those two earlier categories.
In such moments, you can write down the desired word and click the Add button. On the other hand, if you want to remove a preset word, select it, and click the Delete button.
Finally, click the OK button to save all the changes you made here.
Read: How to enable or disable Overtype Mode in Word
How do I add an AutoCorrect exception in Word?
To add an AutoCorrect exception in Word, you can go through the aforementioned steps. That said, open the Word Options first and switch to the Proofing tab. Then, click on the AutoCorrect Options button and click the Exceptions button. Following that, you can select a word and click the Delete button. Alternatively, you can write a new word and click the Add button.
Read: How to convert Excel to PowerPoint
How do I stop PowerPoint from auto correcting certain words?
To stop PowePoint from auto correcting certain words, you need to remove that word from the corresponding list. As it comes with a predefined list of words, you need to remove the desired word. That way, PowerPoint won’t recognize the auto correct word and will keep the written word automatically.
That’s all! Hope you got some help.
Read: How to enable or disable Text Predictions while typing in Word.
Leave a Reply