Here is a tutorial on how you can add or remove keyboard layouts on your Windows 11 PC. You can easily set up and then add a new keyboard layout on your PC. Windows 11 provides you the flexibility to search, install, and add new keyboard layouts in multiple languages on your system. After adding your favorite keyboard layouts, you can easily switch from one layout to another using the taskbar. In case you need to remove any of the added keyboard layouts, you can do that too. Let us now check out the detailed procedure to add, remove, and switch between keyboard layouts on Windows 11.
How to Add Keyboard Layout in Windows 11
Here are the main steps to add a keyboard layout on Windows 11 PC:
- Open the Settings app.
- Go to the Time & language section.
- Click on the Language & region option.
- Under the Language section, select the pre-installed language pack and tap on the three-dot menu present beside it.
- Select Language options.
- Click on the Add a keyboard button.
- Choose the keyboard language from available ones to add a keyboard layout to the taskbar.
Let us discuss the above steps in detail now!
Firstly, you need to open the Settings app on your Windows 11 PC using the Windows + I shortcut key.
Now, navigate to the Time & language tab present on the left-hand side, and then click on the Language & region option from the right panel.
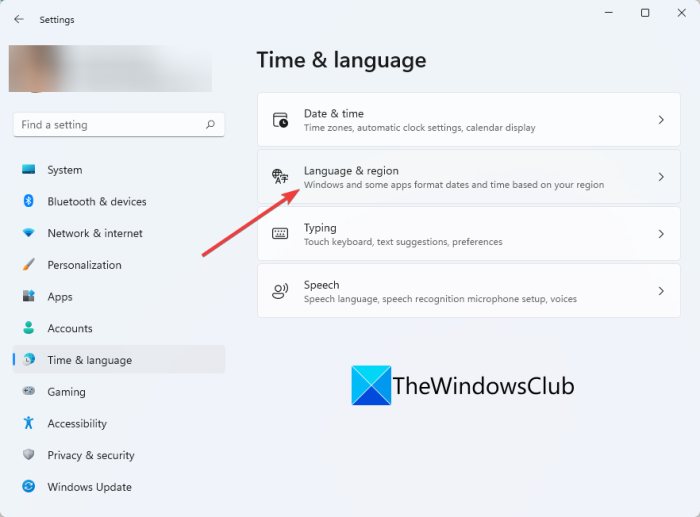
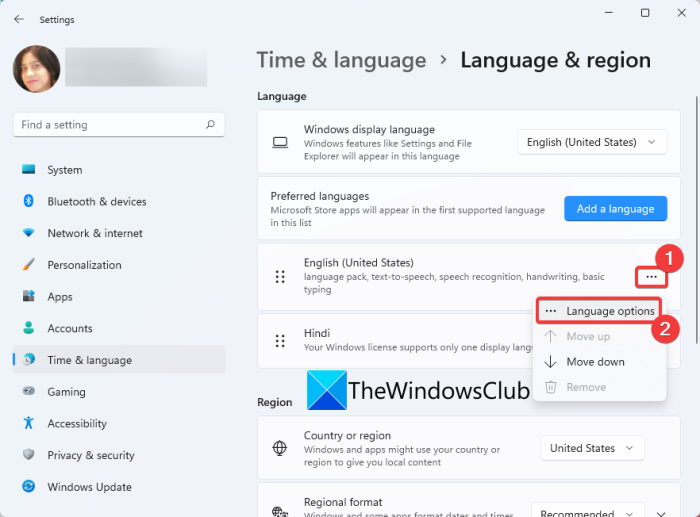
Next, you will see default and installed languages packs under the Language section. From here, just select the language for which you want to add a keyboard layout and then tap on the three-dot menu button present next to it. Then, click on Language options from the appeared options.
Read: How to reset Keyboard settings to default in Windows
On the next page, scroll down to the keyboards section and click on the Add a keyboard button which is present next to the Installed keyboards option.
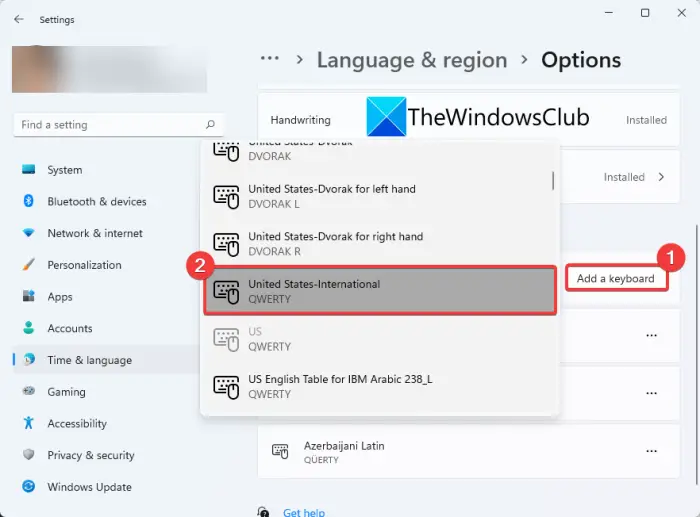
After that, you can simply select the desired keyboard layout from the available and installed ones. As you do that, the selected keyboard layout will be added to the system tray on the taskbar.
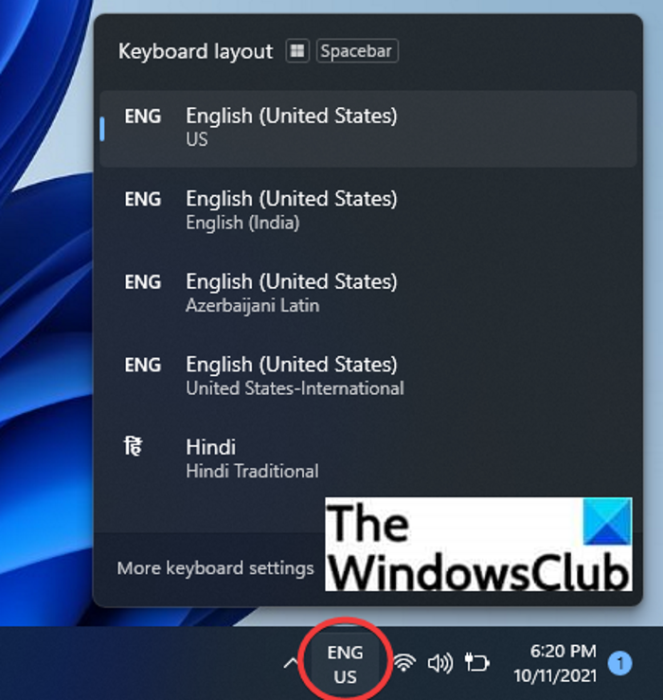
In a similar manner, you can add multiple new keyboard layouts in Windows 11 and quickly access and switch between them as per your requirements.
See: Microsoft Keyboard Layout Creator: Create custom keyboard layouts
How to install new keyboard layouts in Windows 11?
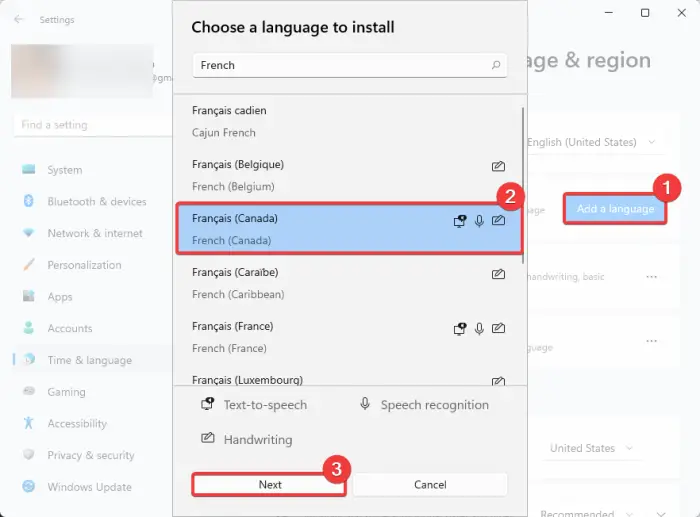
You can install new keyboard layouts in your regional or preferred languages like Hindi, Japanese, Spanish, French, Afrikan, Korean, and more. Search and browse through a variety of keyboard layouts and then install and add the one you like in your Windows PC. To install new keyboard layouts in a specific language in Windows 11, you can follow the below steps:
- Firstly, open the Settings app and then go to the Time & language tab from the left panel.
- After that, on the right, press on the Language & region option.
- Now, under the Language section, click on the Add a language option.
- Next, type a specific language in the search box and then select the desired keyboard layout from the search results.
- Then, press the Next button, and finally, tap on the Install button to install the selected keyboard layout.
After installing the new keyboard layout, you can add and use it by following the steps we mentioned earlier in this article.
Related: How to remove Language Switcher Icon from Taskbar.
Can you change keyboard layout on Windows 11?
Yes, you can change the keyboard layout on Windows 11. There are different ways to open and switch between keyboard layouts in Windows 11. Here are the three common methods you can use to access all your keyboard layouts and then use the one you want:
- Click on the keyboard layout name on the taskbar.
- Use shortcut key or hotkey to open keyboard layouts.
- Open keyboard layouts from the Quick Settings panel.
1] Click on the keyboard layout name on the taskbar
After you add a keyboard layout, you can see the language and keyboard layout name on the taskbar. You can simply click on the name of the keyboard layout on the taskbar and switch between the keyboard layouts as per your requirement. It is one of the most common methods to switch between keyboard layouts in Windows 11.
Read: How to Change Key Sequence to Change Input Language in Windows 11
2] Use shortcut key or hotkey to open keyboard layouts
Another way to open up the keyboard layouts in Windows 11 is to use the Windows + Spacebar key combination. Press both the keys simultaneously and it will show you all the added keyboard layouts. You can then easily switch to a different keyboard layout as you need.
Alternately, you can also try the Shift + Alt hotkey to quickly switch from the current keyboard layout to another keyboard layout.
Read: Windows key + Space bar combination not working on Windows
3] Open keyboard layouts from the Quick Settings panel
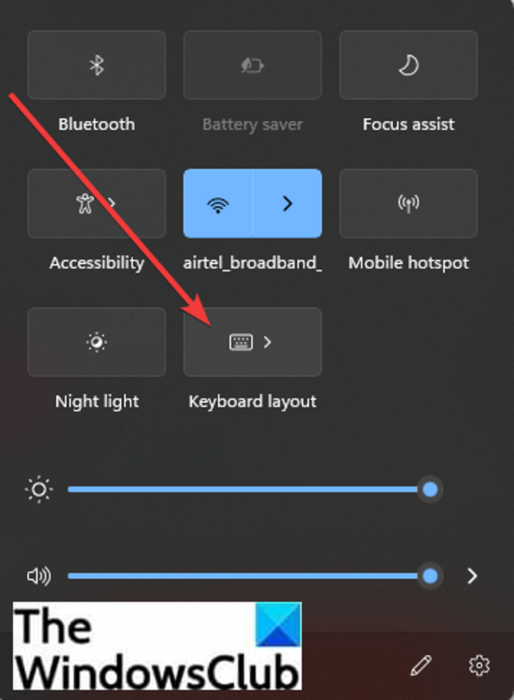
You can also try to open keyboard layouts from the new Quick Settings panel in Windows 11. Simply click on the WiFi or volume icon which will open up the Quick Settings panel. You will see different options in this panel including the Keyboard layout option. If you don’t see this feature, click on the pen (Edit quick settings) button, select the Add option and then choose the Keyboard layout option.
How to Remove Keyboard Layout in Windows 11?
Now, if you need to remove a particular keyboard layout in Windows 11, you can do that using similar steps as we used for adding a keyboard layout. Here are the main steps to remove a keyboard layout in Windows 11 PC:
- Firstly, launch the Windows 11 Settings app and then go to the Time & language tab at the left.
- Now, press on the Language & region option present in the right panel.
- Next, below the Language section, select the three-dot menu present next to the default language.
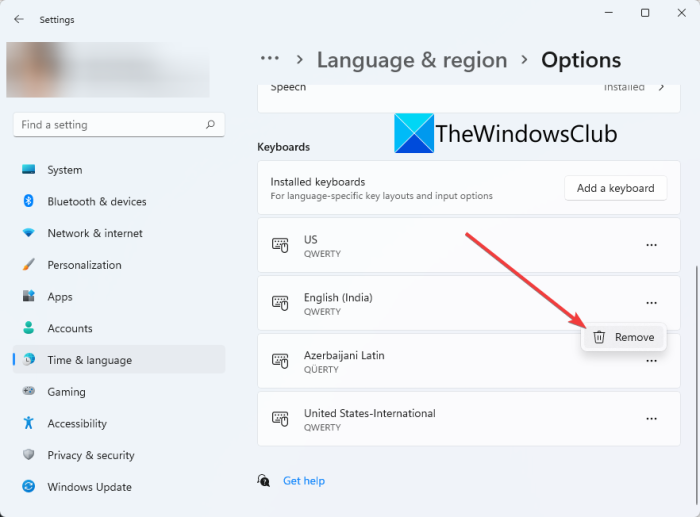
- From the options, click on Language options, and then under the Keyboards section, select the keyboard layout you want to remove.
- After that, tap on the three-dot menu present beside the keyboard layout you want to remove.
- Finally, click on the Remove button to remove that particular keyboard layout.
See: Keyboard layout error 0x8007012a or 0x80070057 in Windows RE
How do I remove automatically added keyboard layouts?
To remove automatically added keyboard layouts in Windows 11, use the method and steps we mentioned above in the article. In case Windows keeps adding Keyboard layouts without permission, you can enter a command in Powershell to remove them; refer to the aforementioned guide to know the command. Apart from that, you can disable the Let me use a different input method for each app window option under the Advanced keyboard settings.
See: Can’t remove a Keyboard layout in Windows computer
Where are keyboard layouts stored in Windows 11?
Windows 11 stores all the keyboard configurations in the Registry Editor. That being said, if you want to check the location, you need to open the Registry Editor first. Then, you can navigate to this path: HKEY_LOCAL_MACHINE\SYSTEM\CurrentControlSet\Control\Keyboard Layouts. After that, you need to open each value to find the configuration.
That’s it! Hope this article helps you add or remove specific keyboard layouts in Windows 11.
Now read: