In this post, we will show you how to add or remove the Mouse Keys icon on the Taskbar in Windows 11. Mouse Keys is an accessibility feature that allows users to control the mouse pointer using the numeric keypad on their keyboard. Designed for those who struggle to operate a conventional mouse or other pointing devices, Mouse Keys is made available as an optional accessibility feature, which is, by default, turned off in Windows.
![]()
When you turn on the feature, Windows automatically sets it to work only when Num Lock is ‘On’. A Mouse Keys icon also appears in the system’s taskbar area, indicating the current status of the feature (active or inactive), depending on the status of the Num Lock key (Mouse Keys becomes inactive if you turn off Num Lock). If you no longer want to see the icon in your taskbar, you may choose to remove it from there. In this article, we will show you 3 different ways of adding or removing the Mouse Keys icon on the taskbar.
Add or Remove Mouse Keys Icon on Taskbar in Windows 11
To add or remove the Mouse Keys icon on Windows taskbar, you may use one of these methods:
- Use Mouse Settings to add or remove the Mouse Keys icon
- Use Taskbar Settings to add or remove the Mouse Keys icon
- Use Control Panel to add or remove the Mouse Keys icon
Let us see this in detail.
1] Use Mouse Settings to add or remove the Mouse Keys icon

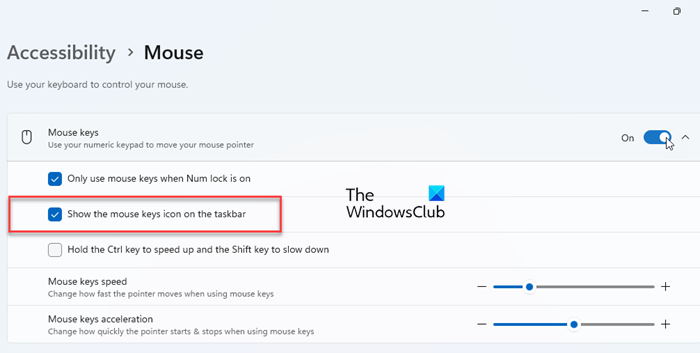
Press the Windows key on your keyboard and select Settings from the Start menu. On the Settings page, click the Accessibility option in the left panel. In the right panel, scroll down to the Interaction section and click on Mouse.
Turn on the toggle next to the Mouse keys option at the top. You’ll see 3 checkboxes, of which 2 will be selected by default. The second checkbox, ‘Show the mouse keys icon on the taskbar‘, decides whether to show or hide the Mouse Keys icon in the taskbar area.
The default state of the checkbox is ‘checked’, so you’ll see the icon in the taskbar as soon as you turn on the Mouse Keys feature. If you don’t see the icon, click the ‘Show hidden icons’ arrow in the taskbar; you’ll find the MouseKeys icon there.
![]()
To drag the icon to the taskbar, you need to turn the feature on from the Taskbar Settings, as explained in the next section.
To remove the icon, simply uncheck the checkbox for ‘Show the mouse keys icon on the taskbar’.
2] Use Taskbar Settings to add or remove the Mouse Keys icon
![]()
Open Windows Settings and navigate to Personalization > Taskbar. Scroll down and click on the Other system tray icons option. In the list of items, locate Windows Explorer with a MouseKeys icon. Use the toggle next to the icon to add or remove the Mouse Keys icon on the taskbar.
If this toggle is ‘off’, but the ‘Show the mouse keys icon on the taskbar’ checkbox is checked, the icon will still be in the taskbar, but with other hidden icons in the system tray area.
3] Use Control Panel to add or remove the Mouse Keys icon
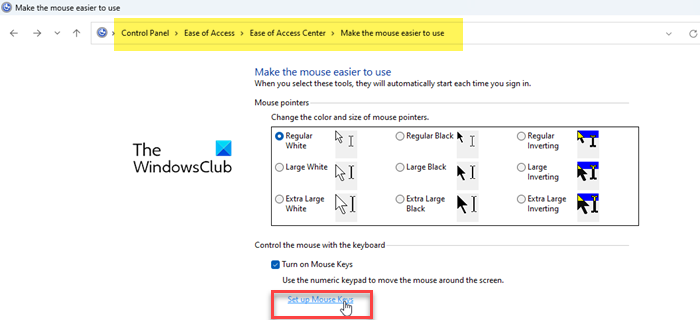
Press Win+R, type ‘control’ in the Run dialogue and press Enter. Windows Control Panel will appear. In the Control Panel window, navigate to Ease of Access > Ease of Access Center > Make the mouse easier to use. Next, click the Set up Mouse Keys link.

Under Other settings, you will see a Display the Mouse Keys icon on the taskbar option, checked by default (indicating that the Mouse Keys icon is visible in the taskbar). Uncheck this option to hide the Mouse Keys icon on the taskbar. Remember to click Apply, followed by OK to apply changes.
![]()
That’s all! I hope you find this useful.
Read: Mouse pointer moves when pressing arrow keys.
How do I turn on the Mouse Keys on Windows 11?
To turn on the Mouse Keys feature, you may visit the ‘Set up Mouse Keys’ section under the Ease of Access Center in the Control Panel. In Windows 11, you can also do this using the Settings app. Press Win+I and navigate to Accessibility > Mouse in the Settings window. Switch the toggle next to the Mouse keys option to the ‘On‘ position. Adjust the Mouse Keys options as required and close the Settings app.
How do you reassign mouse buttons on Windows 11?
You can swap the left and right mouse buttons using the Settings app in Windows 11/10. Open Settings by pressing the Win+I keys. Navigate to Bluetooth & devices and select Mouse. Click Additional mouse settings under Related settings. Check the box for Switch primary and secondary buttons under the Buttons tab in the Mouse Properties window. If you use a Microsoft-branded mouse or keyboard, you may use Microsoft Mouse and Keyboard Center for advanced button reassignment.
Read Next: How to use Windows computer without a keyboard or mouse.
Leave a Reply