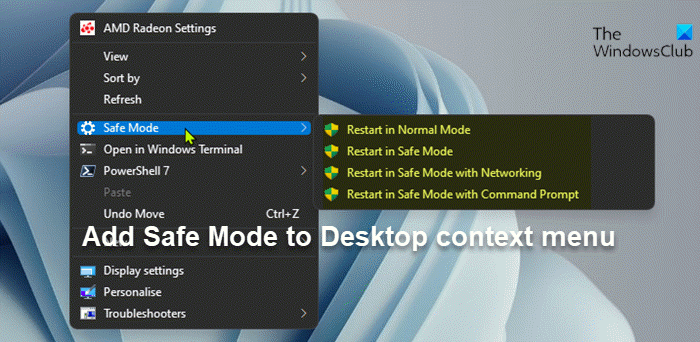
Safe Mode in Windows 11 or Windows 10 essentially starts the operating system in a basic state, using a limited set of files and drivers. If, while in Safe Mode, you do not experience any issues, then it means that default settings and basic device drivers aren’t causing the issue in normal mode on your device. This post will show you how to add or remove Safe Mode to Desktop context menu in Windows 11/10.

You can add Safe Mode cascading desktop context menu with options to restart in Normal Mode, Safe Mode, Safe Mode with Networking, and Safe Mode with Command Prompt in Windows 11/10. PC users can enable F8 key & Boot to Safe Mode, and as well can directly reboot in Safe Mode in Windows 11/10.
Add or remove Safe Mode to Desktop Context Menu
You must be signed in as an administrator to add, remove, and use the Safe Mode context menu. And for Windows 11 users, you will need to click on Show more options to access these options.
Since this is a registry operation, it is recommended that you back up the registry or create a system restore point as necessary precautionary measures.
To add Safe Mode on the Desktop context menu, do the following:
- Press the Windows key + R to invoke the Run dialog.
- In the Run dialog box, type notepad and hit Enter to open Notepad.
- Copy and paste the code below into the text editor.
Windows Registry Editor Version 5.00

[HKEY_CLASSES_ROOT\DesktopBackground\Shell\SafeMode]
"icon"="bootux.dll,-1032"
"MUIVerb"="Safe Mode"
"Position"=-
"SubCommands"=""

[HKEY_CLASSES_ROOT\DesktopBackground\Shell\SafeMode\shell\001-NormalMode]
@="Restart in Normal Mode"
"HasLUAShield"=""

[HKEY_CLASSES_ROOT\DesktopBackground\Shell\SafeMode\shell\001-NormalMode\command]
@="powershell -windowstyle hidden -command \"Start-Process cmd -ArgumentList '/s,/c,bcdedit /deletevalue {current} safeboot & bcdedit /deletevalue {current} safebootalternateshell & shutdown -r -t 00 -f' -Verb runAs\""

[HKEY_CLASSES_ROOT\DesktopBackground\Shell\SafeMode\shell\002-SafeMode]
@="Restart in Safe Mode"
"HasLUAShield"=""

[HKEY_CLASSES_ROOT\DesktopBackground\Shell\SafeMode\shell\002-SafeMode\command]
@="powershell -windowstyle hidden -command \"Start-Process cmd -ArgumentList '/s,/c,bcdedit /set {current} safeboot minimal & bcdedit /deletevalue {current} safebootalternateshell & shutdown -r -t 00 -f' -Verb runAs\""

[HKEY_CLASSES_ROOT\DesktopBackground\Shell\SafeMode\shell\003-SafeModeNetworking]
@="Restart in Safe Mode with Networking"
"HasLUAShield"=""

[HKEY_CLASSES_ROOT\DesktopBackground\Shell\SafeMode\shell\003-SafeModeNetworking\command]
@="powershell -windowstyle hidden -command \"Start-Process cmd -ArgumentList '/s,/c,bcdedit /set {current} safeboot network & bcdedit /deletevalue {current} safebootalternateshell & shutdown -r -t 00 -f' -Verb runAs\""

[HKEY_CLASSES_ROOT\DesktopBackground\Shell\SafeMode\shell\004-SafeModeCommandPrompt]
@="Restart in Safe Mode with Command Prompt"
"HasLUAShield"=""

[HKEY_CLASSES_ROOT\DesktopBackground\Shell\SafeMode\shell\004-SafeModeCommandPrompt\command]
@="powershell -windowstyle hidden -command \"Start-Process cmd -ArgumentList '/s,/c,bcdedit /set {current} safeboot minimal & bcdedit /set {current} safebootalternateshell yes & shutdown -r -t 00 -f' -Verb runAs\""
- Now, click the File option from the menu and select Save As button.
- Choose a location (preferably desktop) where you want to save the file.
- Enter a name with .reg extension (eg; Add-SM-DesktopCM.reg).
- Choose All Files from the Save as type drop-down list.
- Double-click the saved .reg file to merge it.
- If prompted, click on Run > Yes (UAC) > Yes > OK to approve the merge.
- You can now delete the .reg file if you like.
To remove Safe Mode on the Desktop context menu, do the following:
- Open Notepad.
- Copy and paste the code below into the text editor.
Windows Registry Editor Version 5.00

[-HKEY_CLASSES_ROOT\DesktopBackground\Shell\SafeMode]
- Repeat the same steps as above, but this time, save the file with a name with .reg extension (eg; Remove-SM-DesktopCM.reg).
On a final note, if you Restart to Safe Mode with Command Prompt on your Windows 11/10 PC, to return to normal mode, do the following: In the command prompt, type explorer, and hit Enter. Close the Help and Support window. Now, right-click on the solid black desktop. Click on Safe Mode > Restart in Normal Mode.
That’s it on how to add or remove Safe Mode on Desktop context menu in Windows 11/10!
If your Windows computer keeps booting in Safe Mode, it’s likely due to the video resolution. To resolve the issue, ensure your video resolution is higher than 800 x 600 and that the proper video card drivers are installed/updated on the computer.
Related post: How to Add Troubleshooters to Desktop Context Menu in Windows 11
How do I add something to the Windows context menu?

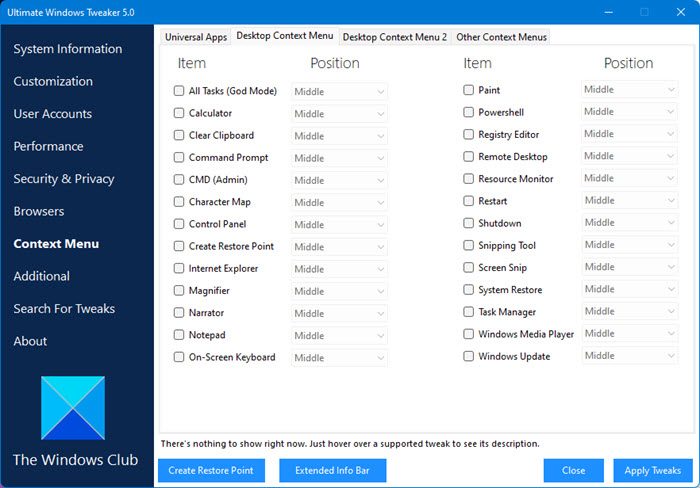
PC users can edit the registry to add any application or item to the Windows context menu. But you can easily achieve the same result using Context Menu Editors to add, remove, edit, and generally manage Context Menu items on your Windows 11/10 computer. You might want to also check out our Ultimate Windows Tweaker for Windows 11, which lets you do such tricks with a single click! That said, always create a system restore point before changing anything in the context menu.
How do I go from Safe Mode to normal mode?
All things being normal, restarting your Windows 11/10 device should be sufficient to exit you from Safe Mode back into normal mode. However, if, for some reason, your system is still booting into Safe Mode on its own after restarting, you can try the following:
- Press the Windows key + R to invoke the Run dialog box.
- Type in mscconfig and hit Enter to open the System Configuration tool.
- In the msconfig window, click the Boot tab.
- Uncheck the Safe boot box.
- Click Apply > OK.
Leave a Reply