In our previous tutorial, we had seen how to search and add Content to Microsoft Sway. Moving a step further, we’ll learn how to add a password to your Microsoft Sway Storyline. Microsoft 365 subscribers (Business, Education, and end consumers) can set a password for their Sways. This helps add more security to your content, as only those who have access to the password can view your work presentation, school report, or personal journal.
Add password to Microsoft Sway Storyline
One of the major benefits of using Sway is its accessibility across a wide range of devices, including computers, tablets, and smartphones. The process is to visit your Sway presentation and then follow these steps:
- Click Share.
- Choose More.
- Click Require a password to view or edit this Sway.
- Add a strong and unique password.
- Remove the password when done.
So, create longer and unique Sways with higher amounts of videos, embedded content, and more security.
Add password to Storyline
To add a password to your presentation content,
Sign in to Sway with your Microsoft 365 account and go to your ‘Storyline’ page.
![]()
From the navigation bar, select ‘Share’ option.

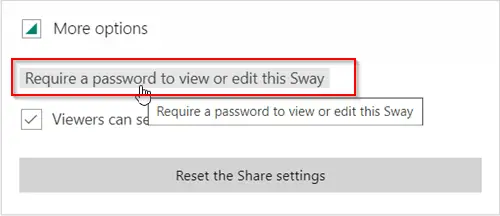
Next, choose ‘More’ options from the menu that appears, and click ‘Require a password to view or edit this Sway’ link.

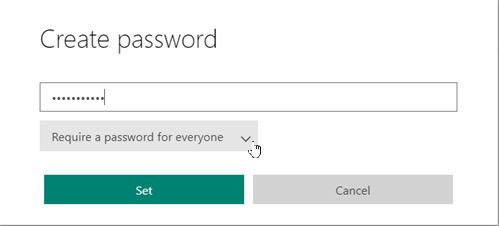
Next, in the ‘Create password’ field that appears, choose a password for your Sway. Make sure it is unique and hard to guess. Keep it at least 8 characters long and use a combination of numbers, uppercase letters, and lowercase letters.
If required, you can toggle between the two options
- Password required to view or edit
- Password required to edit
Now, when you choose to share your Sway, others will be prompted to enter your password to view the file.
Remove the password from your Sway
Like earlier, choose the ‘Share’ icon from Sway’s top navigation bar.

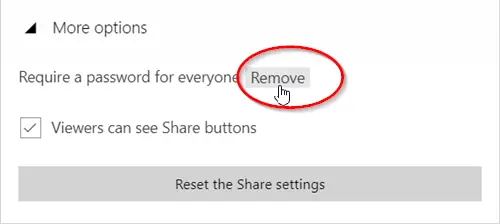
Then, from the menu on the screen, select ‘More options’ > ‘Remove’.
This is how you can add a password to your Microsoft Sway Storyline.
That’s all!
Read next: How to embed content in Microsoft Sway.
Leave a Reply