In the latest version of Windows 11/10, users might not see the Recycle Bin in the Navigation pane of File Explorer. However, you can add it. In this post, we will show you how to remove or add a Recycle Bin to the Navigation Pane of File Explorer in Windows using the Registry Editor or Folder Options.
Recycle Bin is where data gets stored when you delete something from your computer, generally. Previously, the Recycle Bin was visible in the File Explorer navigation pane. However, you are not alone if you cannot find Recycle Bin in the sidebar panel. To solve your problem, we have listed two working methods to help you regain the Recycle Bin in the File Explorer.
Show Recycle Bin in File Explorer Navigation Pane
To add or remove Recycle Bin in File Explorer navigation pane of Windows 11/10, follow these methods-
- Add Recycle Bin using Registry Editor.
- Add Recycle Bin from Folder Options.
To know more about these steps in detail, you should keep reading.
1] Add Recycle Bin using Registry Editor
Registry Editor is handy in many cases, including this one. This in-built tool makes it straightforward to add the Recycle Bin to the File Explorer navigation pane. Whether you want to remove or add it, this utility can do both. Before getting started, you should create a Registry file backup and a System Restore point to be on the safe side.
Now, open Registry Editor. For that, press Win+R, type regedit, and hit the Enter button. You might find the UAC prompt where you need to click the Yes button. After that, navigate to the following path-
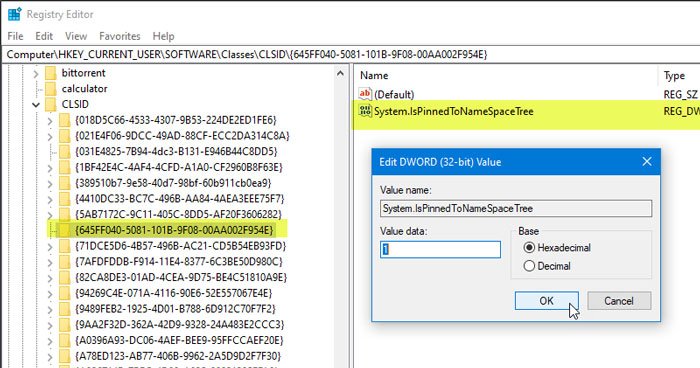
HKEY_CURRENT_USER\Software\Classes\CLSID\{645FF040-5081-101B-9F08-00AA002F954E}
If you cannot find this key, you need to create it. Right-click on CLSID, select New > Key and name it as:
{645FF040-5081-101B-9F08-00AA002F954E}

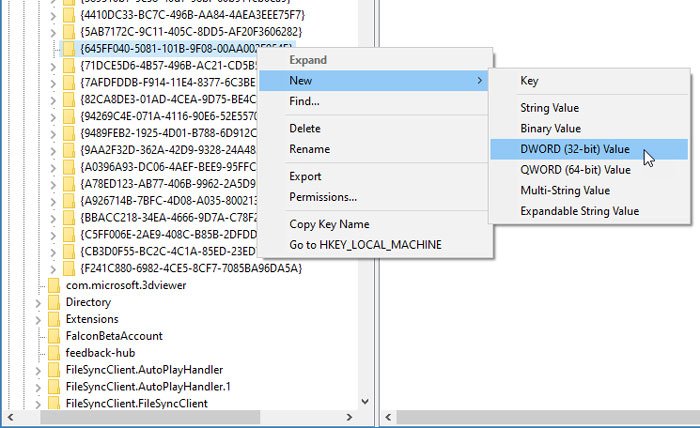
After that, right-click on this key and select New > DWORD (32-bit) Value.
Now, you need to name it as System.IsPinnedToNameSpaceTree.
Following that, double-click on this DWORD Value and set the value to 1.

At this point, if the File Explorer is open, you need to restart Windows Explorer to find Recycle Bin where you want to see.
2] Add Recycle Bin from Folder Options
The Folder Options panel can help you do different things like this one. Although Windows can display Recycle Bin in the sidebar panel in File Explorer, it is not turned on by default. You can enable Recycle Bin from the Folder Options panel. Here is how you can do that.
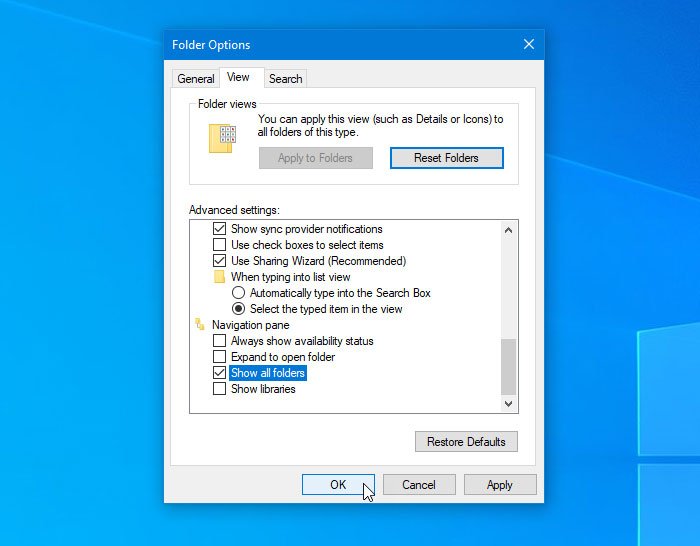
At first, you need to open Folder or File Explorer Options. There are different ways to do that, and you can follow any method that suits your preferences. After that, switch to the View tab. Here you can find a checkbox saying Show all folders under Navigation pane. You need to make a tick in the corresponding box and save the change by clicking the OK button.

You should see the Recycle Bin in the File Explorer navigation pane.
For your information, there is a more straightforward method to add a Recycle Bin in the place where you want to find it. However, that method is the quicker version of the second guide mentioned above.
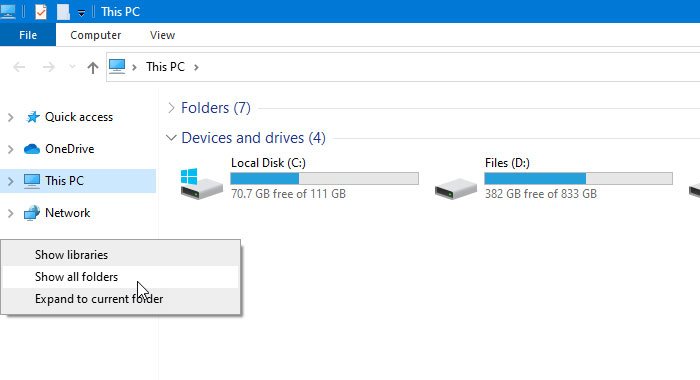
To execute it, you need to open File Explorer on your computer, right-click on the navigation pane, and select Show all folders.

As mentioned in this guide, you need to reverse these changes to remove the Recycle Bin from the File Explorer navigation pane in Windows.
That’s it! I hope you like this post.
Read next: Display Recycle Bin in This PC folder.
Leave a Reply