If you want to add or remove a page number or insert a custom page number in a Word document, you should follow this Word tutorial. Whether you wish to start the page number from a specific digit or hide it completely, you can do everything with the help of this step-by-step guide. It is straightforward, and you do not need a third-party tool.
No matter what change you make, you need to finish the editing of the document first. Otherwise, you may create issues while adding or removing page numbers. If you have already done all the editing, you can follow these guides to make the desired change.
Related: How to remove Slide number from PowerPoint slides.
How to insert page numbers in Word
To add a page number in Word document, follow these steps-
- Open the document in Word.
- Go to the Insert tab.
- Click on Page Number > Bottom of the Page.
- Select a design of page number.
Let’s check out these steps in detail.
First, you need to open the Word document where you want to insert the page number. After that, go to the Insert tab. Here you can find Page Number option in the Header & Footer section. Click on it and select Number > Bottom of the Page.
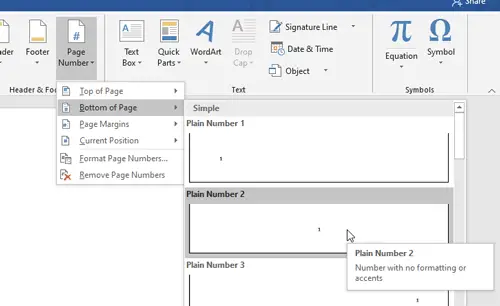
After that, you must select a page number design as per your requirement.
That’s all! Like adding line number, it is straightforward to add page numbers in Word.
Remove page number from a specific page in Word document
To remove the page number from a specific page in Word, follow these steps-
- Select a page number that you want to remove.
- Go to the Design tab.
- Click on Link to Previous button.
- Select the following page number.
- Click the Link to Previous button.
- Select the original page number that you want to delete.
- Hit the Delete button.
To know more about these steps, read on.
Although removing the page number from a specific page in Word is straightforward, you need to break the link between the current page and the subsequent page. It is mandatory because the subsequent page numbers depend on the original page number you want to remove. To do that, select the page number that you want to remove and go to the Design tab. Here you can find Link to Previous option in the Navigations section.
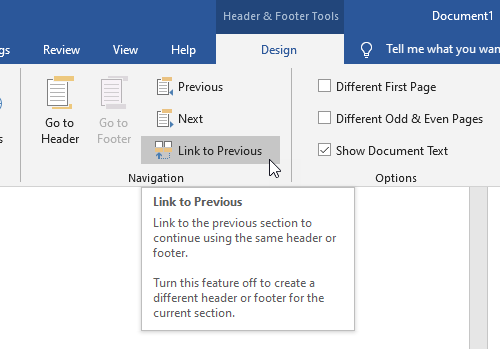
You need to click on this option. Now, choose the subsequent page of the original page, and do the same (click on Link to Previous option).
After that, you can select the original page number you want to remove, and hit the Delete button on your keyboard.
If you do not follow all these steps, you will remove all the page numbers at once.
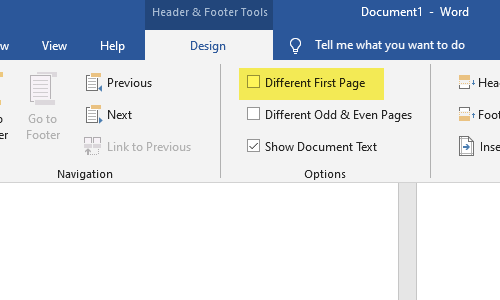
However, if you want to remove the page number of the very first page of your document, you do not need to break the link. Instead, you can select the first-page number, go to Design tab, and make a tick in the Different First Page check box.
Read: Page numbers disappearing in Word
How to insert custom page number in Word
To insert custom page number in Word, follow these steps-
- Right-click on the existing page number.
- Select the Format Page Numbers option.
- Select Start at option.
- Enter a starting number.
Keep reading to know these steps in detail.
At times, you might want to start the page number from a specific digit due to any reason. At such a moment, you can follow these steps. To get started, make sure that you have already inserted the page numbers in your document. After that, right-click on the page number, and select Format Page Numbers option from the context menu.
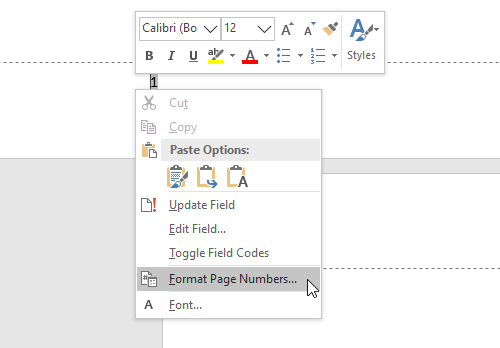
Select the Start at option and set a starting number.
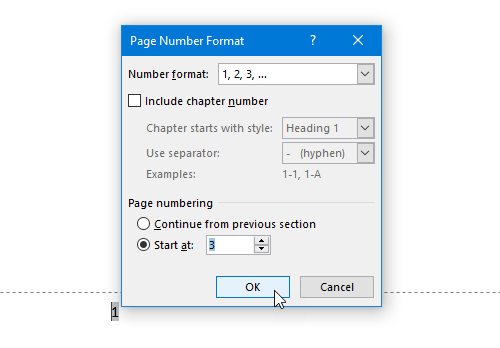
Click the OK button to show the custom page numbers.
I hope these simple tutorials will be helpful for you.
Read: How to insert Footnote and Endnote in Word.
Leave a Reply