In this tutorial, we will show you how to add the Task Manager option in the taskbar context menu in Windows 11. One of the convenient ways to open Task Manager in Windows OS is using the taskbar context menu but Microsoft removed this option in Windows 11. Now, this long-awaited feature can be enabled and used. Earlier, users were expected to get this feature with the first feature drop of Windows 11 that brings the Taskbar Overflow menu, Tabbed File Explorer, etc., but users didn’t get it. Finally, we can enable it with two easy options covered in this post below.
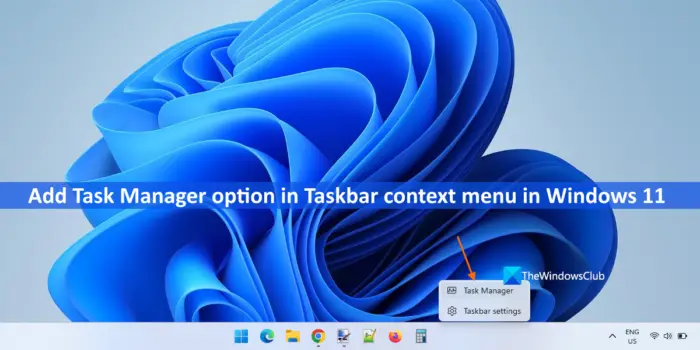
Before you proceed further, note that to enable this feature, you must install the KB5019509 update (OS Build 22621.675 or later) if you haven’t already. This option is already available in Beta and Dev builds of Windows 11 and Microsoft will also start rolling out this option to the Release Preview build of Windows 11. If you want to add this option now in the stable version, then you can force enable it.
NOTE: Windows 11 now offers this feature by default.
Add Task Manager option in the Taskbar context menu in Windows 11
To enable the Task Manager option in the taskbar context menu of Windows 11, you can use the following options:
- Registry Editor
- ViveTool.
Let’s check both options.
1] Registry Editor
The steps to add the Task Manager option to the taskbar right-click menu using Registry Editor in Windows 11 are mentioned below. Creating a Registry backup is advised before making any changes to Windows Registry. Here are the steps:
- Open the Registry Editor
- Access the 4 name Registry key
- Create a 1887869580 key
- Create an EnabledState DWORD value
- Set the Value date of that value
- Create an EnabledStateOptions DWORD value
- Restart your system.
A detailed explanation of these steps is given below.
First, type regedit in the Search box and use the Enter key to open the Registry Editor.
Jump to a Registry key named 4. Here is the path to that key:
HKEY_LOCAL_MACHINE\SYSTEM\CurrentControlSet\Control\FeatureManagement\Overrides\4
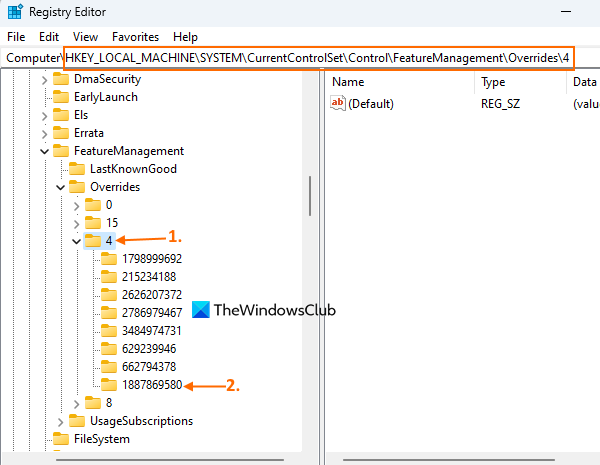
Right-click on the 4 name key, access the New menu and use the Key option to create a new Registry key. After that, set the name to that key as 1887869580.
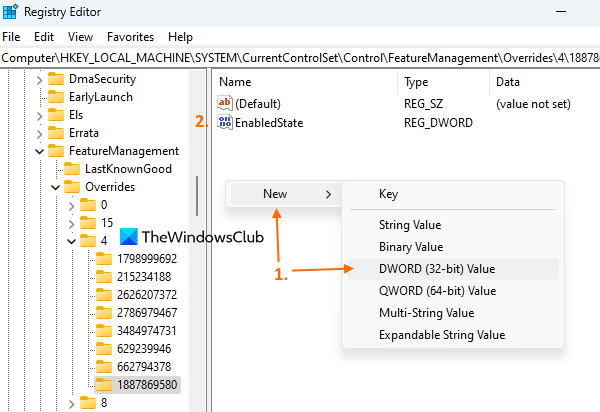
On the right-hand section of that key, create a new DWORD (32-bit) value and rename it to EnabledState.
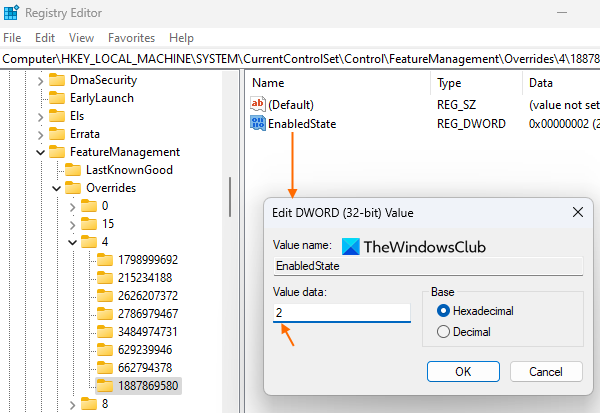
Double-click the DWORD value and an edit box will pop up. Put 2 in the Value data, and use the OK button to close that box.
Now, create another DWORD value on the right-hand section of 1887869580 and rename it to EnabledStateOptions. Its Value data will be set to 0 automatically, you don’t need to change it.
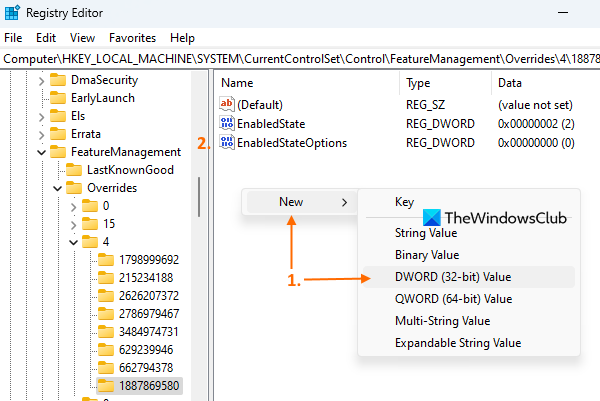
You have to create both of these DWORD values and set their Value data as it is, otherwise, this Registry trick won’t work.
Finally, restart your Windows 11 PC.
After restarting, right-click on the taskbar and you will see that a Task Manager option is available there. Clicking on that option will simply open the Task Manager window.
In case you need to remove the Task Manager option from the taskbar context menu in Windows 11 for some reason, use the above steps. You only need to delete the 1887869580 Registry key (created in step 3) and then restart your PC to apply the changes.
Related: How to enable or disable the Task Manager in Windows
2] ViveTool

ViveTool is a command-line utility that helps to enable/disable the hidden features of Windows 11. You can use it to enable or disable tabs in File Explorer, the desktop Search Bar, the full-screen Widgets option in Windows 11, and more. It can also help you add the Task Manager option in the right-click menu of the Windows 11 taskbar. The steps are as follows:
- Grab the ZIP file of ViveTool from github.com
- Extract the downloaded file in a folder and open that folder
- Right-click on the ViveTool.exe file
- Select the Copy as path option. This will copy the path or location of the ViveTool.exe file to the clipboard
- Open Command Prompt as an administrator
- Paste the copied path of the ViveTool.exe file in the Command Prompt window. Continue the command with enable and id arguments. The complete command would be:
ViveTool.exe /enable /id:36860984
Once the command is executed successfully, restart your computer.
When you want to disable or remove the Task Manager option from the context menu of the taskbar in Windows 11, you can use the above command with disable argument (in replacement of the enable argument). The command would be:
ViveTool.exe /disable /id:36860984
Restart your computer to let the changes take effect.
Also read: How to use the new Task Manager in Windows 11 2022
How do I get Task Manager on Windows 11 Taskbar?
If you want to add Task Manager to your Windows 11 taskbar, then first open the Task Manager window. After that, right-click on the Task Manager icon, and use the Pin to taskbar option. In addition to that, you can also use a Registry trick and/or a third-party tool named ViveTool to add the Task Manager option to the right-click menu of the taskbar in Windows 11. All the steps are covered in this post for both options separately.
Where is the Task Manager option in Windows 11?
The Task Manager option is available in Win+X or WinX menu of Windows 11. You can also open Task Manager using the Search box, Ctrl+Shift+Esc hotkey, and other ways. And, if you are using Windows 11 build 22621.675, then you can also enable and add the Task Manager option in the taskbar context menu of Windows 11. You can read this post for step-by-step instructions on the same.
Read next: Task Manager is not responding, opening or disabled by administrator in Windows.