There are a number of cloud storage options available on the internet, but perhaps one of the most convenient of them is OneDrive. Offered by Microsoft, OneDrive is quite easy to use and provides significant storage space. A little bit of learning might be needed if you have not used a digital storage drive before, but most beginners would be able to get the hang of it in no time. In this post, we will see how to add, upload, store, create, use files, photos & folders in OneDrive.
How to use OneDrive
Microsoft OneDrive is a brilliant application that is specifically optimized for Windows 10. Hence, it gives you a more streamlined and accessible experience than other online storage services that have been presented by other brands. With OneDrive’s simple user interface you can connect all of your data to a single source which you would be able to access from a multitude of devices. The pointers offered above should give you a good idea of the scope of this application and the numerous benefits that it can provide in a world of increasingly digitized information.
Provided below is a list of tasks that can be accomplished using OneDrive to help make storing your files online a lot easier.
Upload photos and files to OneDrive
The mere purpose of OneDrive is to store files online. The process for the same is as follows:

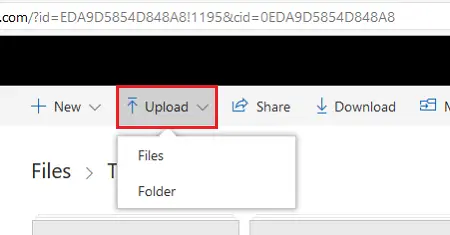
Open the OneDrive website, log in with your Microsoft account and then click on the Upload button. All you have to do now is select the files you wish to store and the process will proceed on its own.
Alternatively, you can drag and drop the files of your choice from the file explorer app. If you have Windows 10, you would have a setting that saves all of your files are stored on OneDrive automatically.
Upload files and folders in OneDrive for Business
OneDrive for Business is the premium digital storage service that Microsoft offers for businesses. It has significantly more storage capacity and is more accessible, all while being just as easy to use as the standard version. The process for uploading files is identical to the standard version, but you have the added option of directly uploading if you are using Google Chrome or Microsoft Edge thanks to their inbuilt upload menus. Browsers such as Firefox and Opera would require you to create a specific folder beforehand.
Create files and folders in OneDrive
Since you would probably store a fair amount of data on your OneDrive, it is important that you learn how to organize the files. Classifying them in folders would be quite helpful.
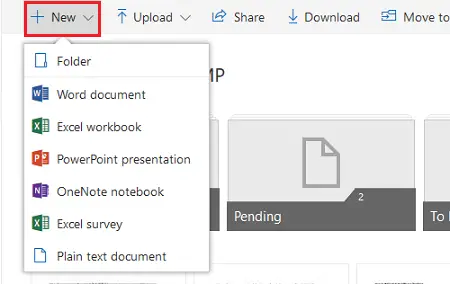
- To create a folder, all you have to do is left-click on the “New” button on the top right corner of the app and click on the “Create Folder” option. Or another file for a Microsoft Office document.
- You can even create standard Microsoft Office files such as Word and Excel by clicking on their respective buttons in the drop-down menu.
Backup your important folders with OneDrive

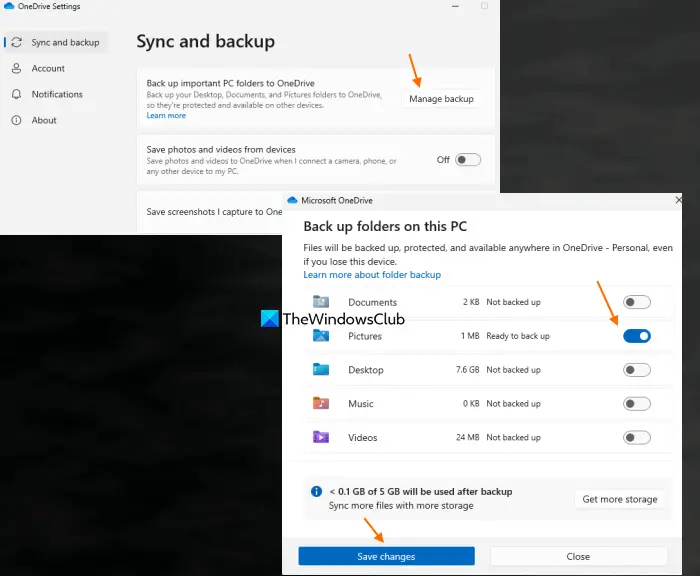
In Windows 11/10, we have standard folders like Documents, Videos, Desktop, Music, etc. If you want, you can back up all these folders to your OneDrive account to automatically save files present in these folders to OneDrive. For this, follow these steps:
- Click on the OneDrive system tray icon available on the taskbar
- Click on the gear icon (or Help & Settings icon)
- Select the Settings option
- The OneDrive Settings window will open. There, in Sync and backup section, click on the Manage backup button
- Click on the buttons available for Desktop, Documents, Pictures, etc.
- Press the Save changes button and the backup process for these folders will start in your OneDrive account.
Later, you can also turn off the backup of these folders to OneDrive. Just follow the above steps and turn off the button available for these folders one by one.
A pop-up will appear prompting you to Where do you want to keep your files– Continue backing up this folder (Recommended), OneDrive only, and This computer only. Select the This computer only option and press the Continue button. It will move files to the local folder again.
Save photos and videos to OneDrive automatically
When it comes to visual media such as photos and videos, OneDrive can automatically sync to the removable storage device they are originally located in.
- Whenever you connect your phone, external hard drive, or whatever other storage devices you are using to your computer, you would get a prompt asking you if you want to sync your files to OneDrive.
- Once you select yes, all photos and videos would automatically get copied to your OneDrive where you can access them using any device.
Save screenshots to OneDrive automatically
A very handy feature offered by OneDrive is the Automatic Screenshot Storage. Ideally, you can only store one screenshot at a time to the clipboard, you would have to paste them to an external program before taking another one if you don’t want to lose them.
After taking the screenshot you will see a prompt much like all the others asking you if you would like to automatically store your screenshots to OneDrive. Select the Save to OneDrive option and a folder will be created and labeled “Screenshots” in your OneDrive account from where you can access the pictures at any time.
Add and sync shared folders to OneDrive
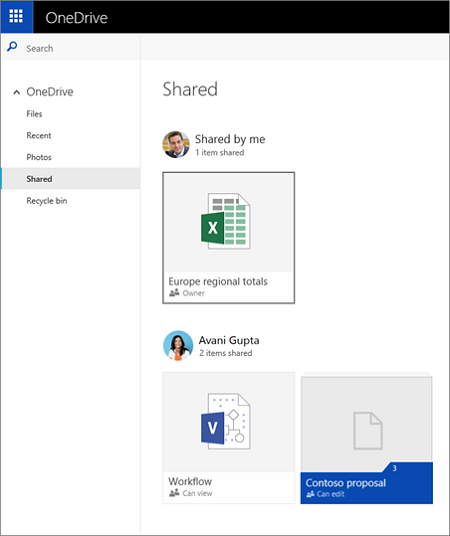
Folder sharing is one of the more useful features offered by online storage services. When someone shares a folder with you using their drive, the folder would appear under the “Shared” section in your app.
- If you want to add this folder to your own drive, click the circle on the top right corner on the icon to make a tick mark appear.
- Then select the “Add to my OneDrive” option from the menu at the top of your screen. This would save a copy of the folder to your own drive.
The shared folders you add to your OneDrive appear in the Files view section on OneDrive online.
How do I create a OneDrive link to upload files?
OneDrive comes with a File Request feature using which you can set a folder where others can upload files via the generated link. For this, access a OneDrive folder, and select the Request files option. Give a name for the files that you are requesting, press the Next button, use the Copy link button, and press Done. People can use that OneDrive link and upload files to that specific folder without a OneDrive account.
How do I change upload settings on OneDrive?
To change upload settings on OneDrive in Windows 11/10 system, open the OneDrive Settings window. Select the Sync and backup section. Now you can turn on/off save photos and videos to OneDrive, save screenshots, pause sync when using a metered connection, Limit upload rate, and more.
Want more? Take a look at these OneDrive tips and tricks.
Leave a Reply