The new Windows 11 has a never seen before extensively customizable widget option. It has some features similar to that in Windows 10 and some not-so-popular features have been removed. The space occupied by the widget is on the left side of the screen, which may cause a hindrance to some users. If you are also finding it tough to work with Windows 11 Widgets, this article will show you how to add or remove widgets from the taskbar on Windows 11.
![]()
Before removing the widget from your Windows 11 display, check out its new time and date display features. Explore the new highlights of your choice using the Windows+W keyboard shortcut. One disadvantage of these widgets is that they are immovable and cannot be resized.
There are three different ways you can use to remove Widgets from the taskbar on Windows 11:
- Through the Settings app
- Using the Taskbar Context Menu
- Via Registry
Let’s see these methods in detail:
How to Add or Remove Widgets from the taskbar on Windows 11

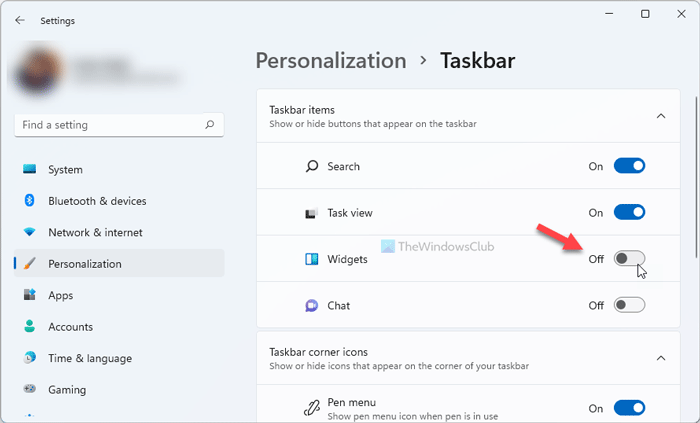
If you want to add or remove the Widgets button on your Windows 11 taskbar, use the Settings app:
- Open the Windows Settings by pressing Win+I.
- Click on the Personalization section.
- Click on the Taskbar tab on the right side.
- Under Taskbar items, turn the toggle switch On or (Off) to add (Remove) the Widgets button on your Windows 11 device.
To add a widget back, simply reverse the changes made.
This post will help you if you cannot add or remove Widgets in Windows 11.
Read: Windows 11 System Requirements.
Show or Hide Widgets icon using the Taskbar Context Menu

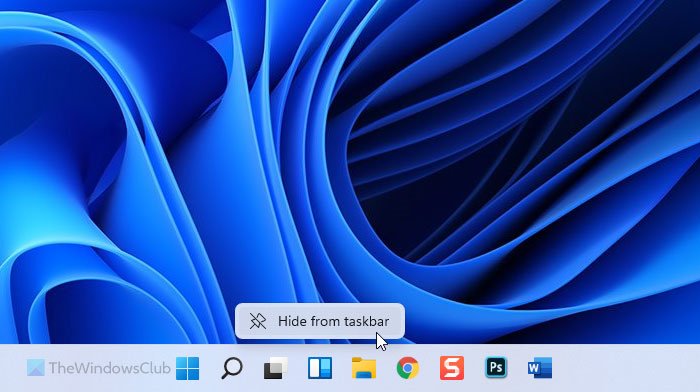
To remove the widgets button using the context menu in Windows 11, follow this procedure:
- Go to the Taskbar and right-click on the Widgets button.
- Select the Hide from taskbar option from the context menu.
This will remove the Widgets button from the taskbar on your Windows 11 PC.
Read: How to check if your PC can run Windows 11?
Remove Windows 11 Taskbar widgets using Registry

You can also tweak the Windows Registry to achieve the same effect.
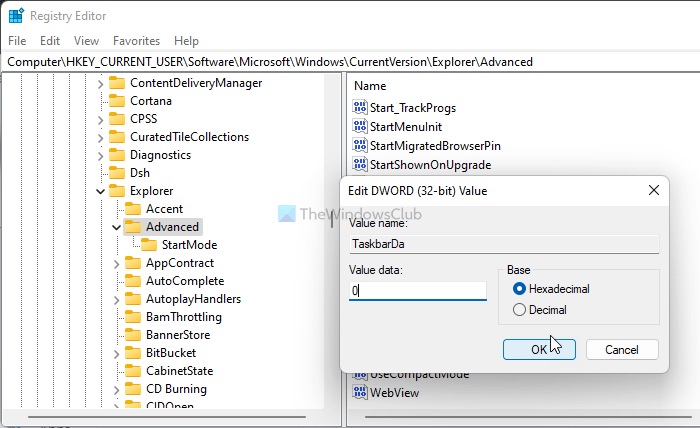
Open Registry Editor and navigate to the following key:
HKEY_CURRENT_USER\Software\Microsoft\Windows\CurrentVersion\Explorer\Advanced
Double-click on the TaskbarDa REG_DWORD value.
Set the Value data as 0.
Click the OK button.
Restart your computer.
If you do not have it, right-click on the Advanced > New > DWORD (32-bit) Value option.
Name it TaskbarDa and give it a value of 0.
The DWORD 32-bit settings for the value are:
- To hide the icon – 0
- To show the icon – 1.
Read: How to disable Widgets in Windows 11 using Registry or Group Policy Editor.
Related: Feeds or Search application is showing high memory usage
How do I remove the Widgets from the Taskbar in Windows 11?
There are three ways to remove or hide the Widgets from the Taskbar in Windows 11: Windows Settings, context menu, and Registry Editor. In the Windows Settings, go to Personalization > Taskbar, and toggle the Widgets button. However, you can also right-click on the Widgets icon and select the Hide from taskbar option.
Related: How to add and customize Widgets in Windows 11.
How do I disable Taskbar Widgets in Windows 11?
To disable Widgets in Windows 11, you need to use the Registry Editor. In the Registry Editor, go to this location: HKEY_CURRENT_USER\Software\Microsoft\Windows\CurrentVersion\Explorer\Advanced and double-click on the TaskbarDa REG_DWORD value. By default, the Value data should be set to 1. You need to enter 0 as the Value data and click the OK button. Then, you must restart your computer to get the change. To completely disable Widgets in Windows 11 you need to use the Registry or Group Policy Editor.
TIP: This post will help you if Widgets are blank or not loading on Windows 11.
Hope you find this post helpful.
Related: How to change Taskbar size on Windows 11.
Leave a Reply