The screen resolution settings of the Windows PC monitor are an important factor to consider while operating a computer. Right screen resolution facilitates the full view of your computer desktop and better display of contents. That is why here we have enlisted some of the best ways to adjust your monitor for better screen resolution in Windows 11 and Windows 10 computers.
By default, Windows 11/10 selects the best display settings considering screen resolution, monitor refresh rate, and color according to your monitor. If there are separate graphics drivers installed on your PC, then you must install the proper and latest drivers also on your system to make its optimum use. The display settings depend on the type of monitor, the display settings for an LCD or a CRT monitor are different.
Before you begin, create a system restore point so that you can always go back if you do not like the changes.
Adjust your Monitor for better screen resolution
LCD monitors are also called flat-panel displays, and currently, they are majorly used. They are far lighter and thinner than bulky CRT monitors, which contain heavy glass tubes. LCD monitors also come in a wider range of shapes and sizes, which include widescreen screens and standard-width screens, with ratios of 16:9 or 16:10 width-to-height for widescreen models and 4:3 for standard-width models. Laptops also use flat-panel displays.
For both LCD and CRT monitors, it’s the dots per inch (DPI) that all matters, the higher it will be, the better and sharper resolution it will give. The resolution you use depends on the resolutions your monitor supports. At higher resolutions, such as 1900 x 1200 pixels, items appear sharper and smaller, so it gives more space on the screen. At lower resolutions, such as 800 x 600 pixels, fewer items fit on the screen.
Windows allows you to increase or decrease the size of text and other items on your screen while keeping your monitor set to its optimal resolution.
Read: How to adjust Desktop Size and Position in Windows
The best display settings for an LCD monitor
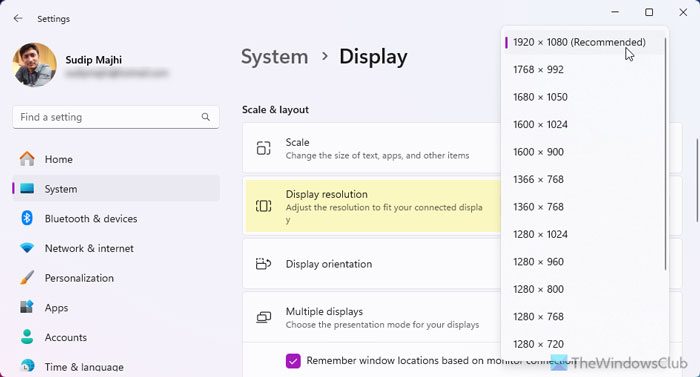
If you have an LCD monitor, check your screen resolution. It is suggested to keep your Monitor resolution to its native resolution to let it give you the best display experience.
To change screen resolution in Windows 11/10, follow these steps:
- Press Win+I to open the Windows Settings panel.
- Make sure that you are in the System tab.
- Click on the Display option.
- Head to the Scale & layout section.
- Find the Display resolution menu.
- Expand the drop-down list and choose a resolution that suits your monitor the best.
However, if you use Windows 8.1/8/7, follow these steps:
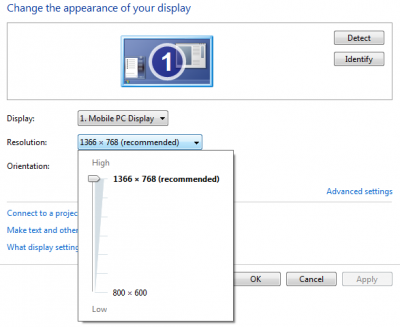
- Right-click on the desktop and then select Screen Resolution.
- Click the drop-down list next to Resolution.
- Check for the resolution marked (recommended).
- This is your LCD monitor’s native resolution—usually the highest resolution your monitor can support.
The monitor’s manufacturer or reseller should also be able to tell you the native resolution for your LCD monitor. (CRT monitors don’t have a native resolution.)
An LCD monitor running at its native resolution usually displays text better than a CRT monitor. LCD monitors can technically support lower resolutions than their native resolution, but text won’t look as sharp, and the image might be small, centered on the screen, edged with black, or look stretched.
If you use Windows 11/10, there is another way to get the best resolution from your monitor. That is by choosing the correct refresh rate along with the resolution. For that, do the following:
- Open the Windows Settings panel.
- Go to System > Display > Advanced display.
- Click on the Display adapter properties for Display 1 option.
- Click on the List All Modes button.
- Select the resolution with the correct refresh rate.
- Click the OK button twice.
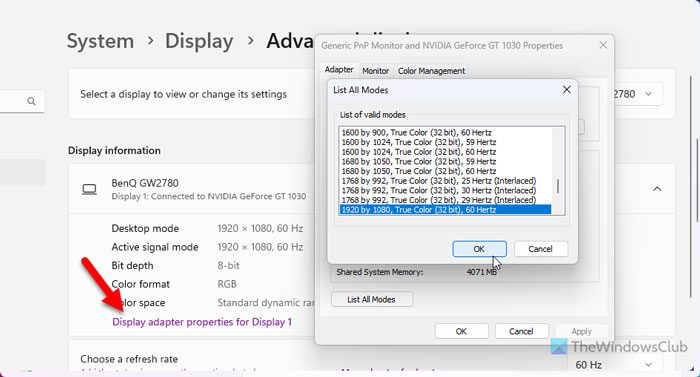
Note: If you have a multi-monitor setup, you need to repeat the same steps for Display 2. On the other hand, the refresh rate should be the same as what the manufacturer asks you to set.
Read: Fix Font size problem when working with multiple apps.
Resolution based on LCD monitor size
| Monitor size | Recommended resolution (in pixels) |
| 19-inch standard ratio LCD monitor | 1280 × 1024 |
| 20-inch standard ratio LCD monitor | 1600 × 1200 |
| 20- and 22-inch widescreen LCD monitors | 1680 × 1050 |
| 24-inch widescreen LCD monitor | 1920 × 1200 |
| Laptop screen size | Recommended resolution (in pixels) |
| 13- to 15-inch standard ratio laptop screen | 1400 × 1050 |
| 13- to 15-inch widescreen laptop screen | 1280 × 800 |
| 17-inch widescreen laptop screen | 1680 × 1050 |
Set the color for an LCD monitor
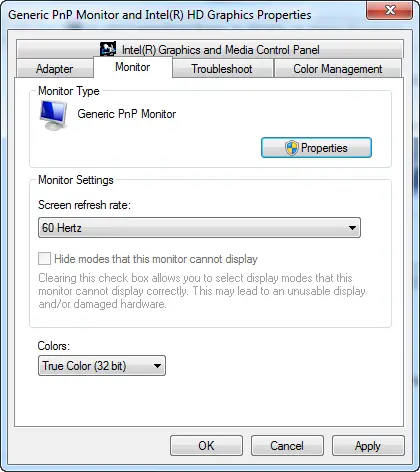
To get the best color displayed on your LCD monitor, make sure to set it to 32-bit color. This measurement refers to color depth, which is the number of color values that can be assigned to a single pixel in an image. Color depth can range from 1 bit (black-and-white) to 32 bits (over 16.7 million colors).
- Right-click on the desktop and then select Screen Resolution.
- Click Advanced Settings, and then click the Monitor tab.
- Under Colors, select True Color (32-bit), and then click OK.
The right display settings for a CRT monitor
For a CRT monitor, it’s important to change the screen resolution to the highest resolution available, which provides a 32-bit color and at least a 72-Hertz refresh rate. If the screen is flickering or viewing the screen is uncomfortable, increase the refresh rate until you are comfortable with it. The higher the refresh rate, the less likely there will be any noticeable flicker.
Read: How to create and set Custom Resolution on Windows.
Resolution based on CRT monitor size
| Monitor size | Recommended resolution (in pixels) |
| 15-inch CRT monitor | 1024 × 768 |
| 17- to 19-inch CRT monitor | 1280 × 1024 |
| 20-inch and larger CRT monitor | 1600 × 1200 |
Set the color for a CRT monitor
Windows colors and themes work best when you have your monitor set to 32-bit color. You can set your monitor to 24-bit color, but you won’t see all the visual effects. If you set your monitor to 16-bit color, images that should be smooth might not appear correctly.
- Right-click on the desktop and select Screen Resolution.
- Click Advanced Settings, and then click the Monitor tab.
- Under Colors, select True Color (32-bit), and then click OK. (If you can’t select a 32-bit color, check that your resolution is as high as possible, and then try again.)
Do remember to always use the best graphics drivers available for your PC – although Windows does have default device drivers in it – but for best results always check the support & download section of the hardware manufacturer’s website of your device manufacturer. Intel, NVIDIA, and ATI are some well-known names in the graphics memory manufacturers list.
This post will help you fix problems after moving to a larger Monitor with a higher Screen Resolution.
How do I improve screen quality in Windows 11?
To improve the screen quality in Windows 11, you must choose the correct resolution first. Then, you should check whether you have selected the correct refresh rate or not. Following that, if you have a graphics card, make sure that the driver is up to date. If not, we highly suggest you update the graphics driver. Even if you have multiple monitors, you should go through all these steps.
How do I fix the resolution on my external monitor in Windows 11?
To fix the resolution on your external monitor in Windows 11, you need to open the Windows Settings panel first. Then, go to the System > Display > Multiple displays. Next, choose the external monitor from the list. If you cannot find the external monitor, click on the Detect button. When it is selected, you can expand the Display resolution list, and choose the correct resolution.
If this works in windows 10, I can’t find it!!
The recommended resolution is this.
18.5″ 1839×1030
19.5″ 1920×1080
21.5″ 2048×1152
23″ 2200×1200
24″ 2560×1440
27″ 3200×1800
30″ 3840×2160
The issue I have is that if I use the recommended resolution the font is so tiny and with my aging eye sight its a strain to read. How can I get a lower resolution (and hence a larger font) but then have the text display sharp rather than blurry?
Good info but left out 17inch LCD monitor.
I have the same prolem, I’m a certified geezer. Right click on your desktop, select screen resolution, click on make text and other items larger or smaller, play with that. If the few fixed offerings don’t appeal, click on custom and dial in your own number.
Hi I need help.I did what was instructed however when I restart my computer it goes back to the big icons again. How can I make it permanent? Thanks
when i write click i get display settings not screen resolution, and when i find screen resolution through display it only gives me three options of resolution leaving my screen not fully fitting my montor and being stretched out.