Adobe Premiere Pro is a premium video editing app used by millions of people all around the world. However, Adobe Premiere Pro keeps lagging or stuttering for some users. In this post, we will discuss this issue and see what you can do to resolve it.
Fix Adobe Premiere Pro lagging or stuttering
If Adobe Premiere Pro video lags or stutters in slow motion during playback, after export, or while editing on a Windows PC, follow the solutions mentioned below to resolve the issue.
- Kill unnecessary applications
- Disable High-Quality Playback
- Turn off Hardware Accelerated Decoding
- Set Optimize Rendering for Performance
- Change Audio Settings
- Clear Media Cache
Let us talk about them in detail.
1] Kill unnecessary applications
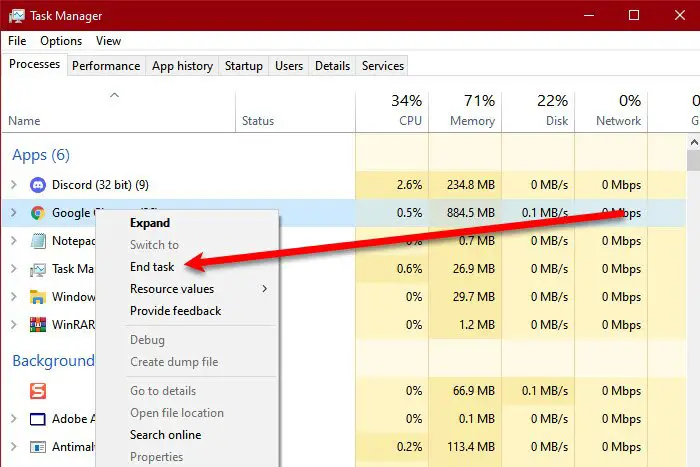
Adobe Premiere Pro is a demanding application and if your system configuration is close to minimum system requirements, you can’t let various applications run in the background. To inspect background apps, open Task Manager (Ctrl + Shift + Esc), right-click on the background process you want to end, and select End Task. Kill every single unnecessary app and then open the photo editing app.
2] Disable Hight Quality Playback
If the High-Quality Playback option is enabled, rendering the video puts a lot of load on the CPU due to which, the system can’t perform perfectly. That is why, we need to disable the feature using the steps mentioned below.
- At the bottom-right corner of the preview window, click on the drop-down menu that says Full and select 1/2 or 1/4.
- Now, play the video and check if the app still lags. In case, video playback is still lagging, we need to disable the High Quality Playback option.
- For that, click on the Wrench icon next to Full and untick High Quality Playback option.
This should do the job for you.
3] Turn off Hardware Accelerated Decoding
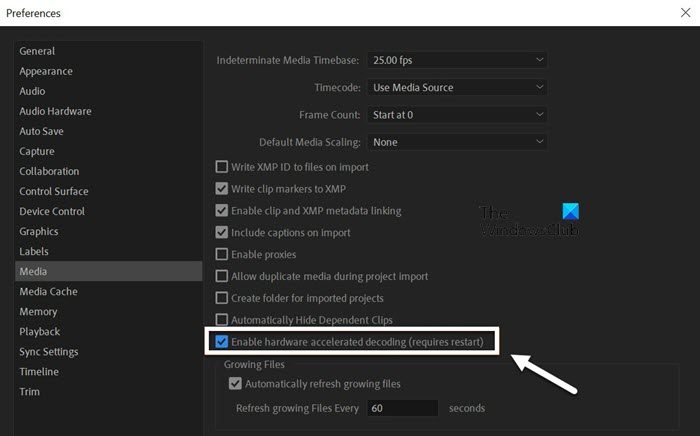
The Hardware-Accelerated Decoding feature allows you to improve the overall performance of a project when dealing with H.264/AVC or HEVC media codec. Sometimes, the app lags when the feature is enabled when one is not working on the mentioned format. That is why, we need to disable the feature from Premiere Pro’s settings. To do the same, follow the steps mentioned below.
- Open Adobe Premiere Pro.
- Click on Edit > Preferences.
- Once the Preferences window appears, go to the Media tab.
- Now, uncheck the box that says Enable hardware accelerated decoding.
- Finally, click Ok.
Check if the issue is resolved.
4] Set Optimize Rendering for Performance
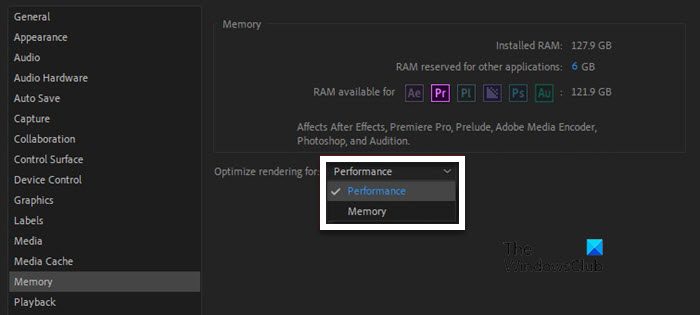
Adobe gives us the option to configure Optimize Rendering for Performance. Doing so will allow Premiere Pro to use all available resources to render the video and sustain its performance. To do the same, follow the solutions mentioned below.
- In Premiere Pro, click on Edit and then select Preferences from the list.
- Now, go to the Memory tab.
- Go to the Optimize rendering for option and select Performance from the drop-down menu.
Hopefully, this will do the job for you.
5] Change Audio Settings
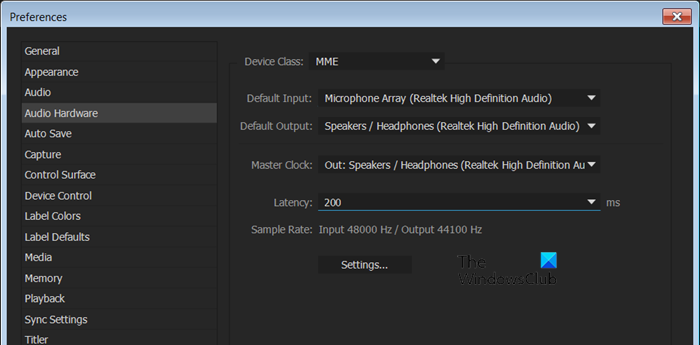
Sometimes, the video that you are editing requires you to use a different Device Class or other audio settings, on some occasions, due to a bug, some formats lag. Whatever the case that you are dealing with, we will change the Audio settings of Premiere Pro to get things right. Follow the steps mentioned below to do the same.
- Go to Preferences in Adobe Premiere Pro.
- Now, once the Preferences window appears, go to the Memory tab.
- Navigate to Device Classes and change it to something other than the one that’s already set, for example, ASIO.
- Now, set the Default Input to None.
- Save the changes you made and close Preferences.
Finally, check if the issue is resolved.
6] Clear Media Cache
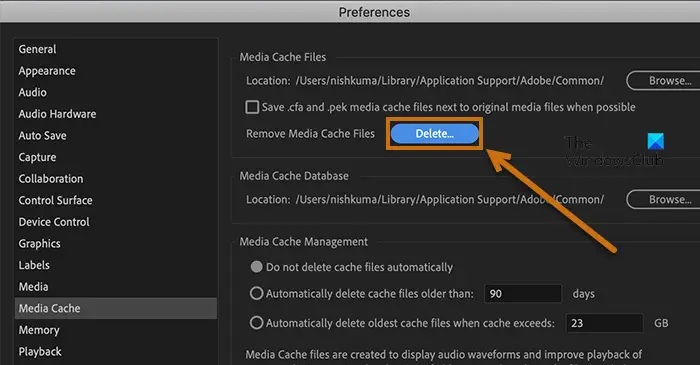
If the media cache of the Adobe Premiere Pro app is corrupted, it will stutter and sometimes even crash. In that case, we will clear the cache and allow it to recreate it. Follow the steps mentioned below to do the same.
- Launch the Premiere Pro app.
- Navigate to File > Preferences > Media Cache
- Click on the Delete button associated with Delete Media Cache Files.
- Delete all the caches.
Close Premiere Pro, and reboot your system to see if the issue is resolved.
That’s it!
Read: Adobe Media encoder not installed in Premiere Pro
How do I fix laggy in Premiere Pro?
If Premiere Pro is lagging when playing a video or even in general, kill unnecessary apps that are running in the background and fighting for resources. If that doesn’t work, disable High Quality Playback. You should also check the solutions mentioned earlier if the issue persists.
Read: Premiere Pro Timeline not working or frozen
How do I run Adobe Premiere Pro smoothly?
If you are a Windows user and want to run Adobe Premiere Pro smoothly, your system should have Intel® 7th Gen or newer CPU with Quick Sync or AMD Ryzen™ 3000 Series/Threadripper 2000 series or newer CPU. Also, you should have Dual Channel Memory – 16 GB of RAM for HD media and 32 GB or more for 4K and higher. Your system should also be equipped with 4 GB of GPU memory for HD and some 4K media and 6 GB or more for 4K and higher.