In order to make efficient use of electrical power, your Windows system manages to turn off the devices that are not currently used. You can configure these settings from the Device Manager. Right-click over the device and select Properties.
Note 1 by Admin: The post has been edited. This Microsoft Community thread says one thing, but we are basing this post on this Microsoft post. Please read the full posts and comments first.
Allow the computer to turn off this device to save power
In the Power Management tab, you have to enable Allow the computer to turn off this device to save power and Windows will turn off the device when not in use so that power will not be wasted. But what if the same option is grayed out:
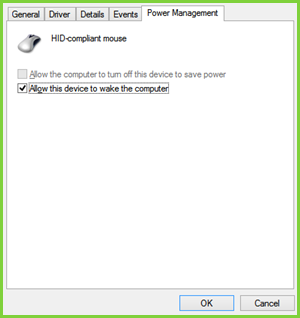
One can see that you can’t adjust the mouse which is an external hardware device, to be turned off / on while not in use.
So, how do you change this setting? Registry manipulation will help you fix this. This fix is applicable to devices supporting Plug-n-Play (PnP) capabilities. Here is how to do it.
Cannot Turn off Mouse to save Power in Device Manager
1] Open Device Manager, by pressing Windows Key + R key combination and inputting devmgmt.msc in the Run dialog box and hit Enter.

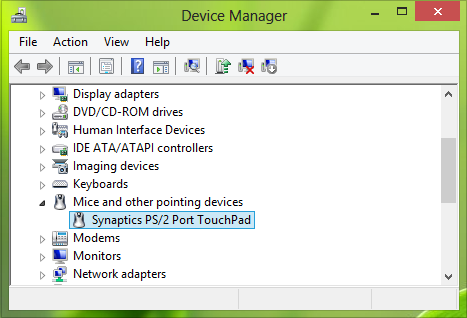
2] In the Device Manager, expand the Mice and other pointing devices, right-click on the device, and select Properties for which you’re facing the issue.
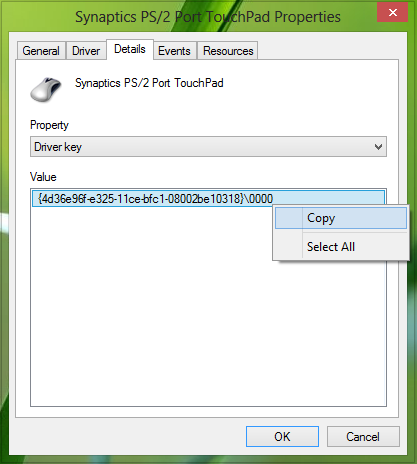
3] Now in the Properties window, switch to Details tab, select the Property as Driver Key. Copy the key as shown below.
The last portion after \ of the Value so copied is device number which is 0000 in our case – but if the option is grayed out, you may see a value of 24.
4] Moving on, press Windows Key + R combination, type put Regedt32.exe in Run dialog box and hit Enter to open the Registry Editor.
5] Navigate to the following location:
HKEY_LOCAL_MACHINE\SYSTEM\CurrentControlSet\Control\Class\Driver Key
Where you have to substitute Driver Key obtained in step 3.

6] In the right pane of this location, you must look for the DWORD named PnPCapabilities.
If the DWORD doesn’t exist, you can create it using right-click -> New -> DWORD Value. Double-click on the same DWORD to modify its Value data.

7] If the value is set at 24, that option gets grayed out. So in the above-shown box, you have input the Value data to 0 in order to allow the computer to turn off the device while it is idle. You may now close the Registry Editor and reboot the machine to make changes effective.
That’s it!
Note 2 by Admin : We’ve updated the post with more details for the convenience of beginners. We also thank Anonymous, whose comments made a valuable contribution to better this post. So, one can conclude that by default, a value of 0 indicates that power management of the network adapter is enabled. A value of 24 will prevent Windows from turning off the device or let the device wake the computer from standby. This Microsoft post also gives you the option to use a Fix It, so we recommend that you use the easy-to-use Fix It to enable or disable network adapter power management on a single computer.
What does Allow the computer to turn off this device to save power do?
The Allow the computer to turn off this device to save power setting lets Windows turn off hardware devices to conserve power when not in use. This is useful for laptops and other battery-powered devices to conserve power..
How to disable Allow the computer to turn off this device to save power in Windows 11?
To disable Allow the computer to turn off this device to save power in Windows 11, open Device Manager, locate your device, expand the device category, right-click on the device, select Properties, and open the Power Management. Uncheck the box next to Allow the computer to turn off this device to save power and click on OK.
You are giving wrong advice. If it’s greyed out, it’s done for a reason such as when the port to which such a device is attached or the device itself doesn’t support correctly suspending or resuming from sleep. Enabling it via the registry can lead to problems with entering or resuming from sleep/hibernation.
^^ It may be also possible that some third-party tool might have greyed out that option. No point of giving wrong advice, we’ve just referenced the solution provided by a Microsoft support engineer itself, mentioned here:
http://answers.microsoft.com/en-us/windows/forum/windows8_1-tms/hid-compliant-mouse-properties-power-management/8e3d16ae-227c-4a70-b296-1734bdf3f98d
The “DeviceNumber” mentioned in that support thread is to be substituted with 0000 or 0001 or whatever the actual device number is. Creating a key actually named “DeviceNumber” isn’t going to do anything. And it only applies to devices that have the PnPCapabilities registry key such as network adapters. Adding it to device classes that don’t have PnPCapabilities will do nothing.
^^ Re-updated the post, thanks for inputs :)
Are you sure it’s 24 and not 0?
Doesn’t work on XP. However System information shows mouse unable to save power. I don’t know why perhaps problems occurr on the motherboard.
^^ Yep, its 24, which is required one. The default value is 0.
^^ It may be hardware problem then.
thanks for reply What is the method used on XP?
well, this not working at least under W10x64 (RTM)
Not working at W10Pro 1607. Still gray on option allow computer to turn of this device.
Thanks. Verified and edited.
This didn’t work for me any other suggestions