If you want to allow or disallow the use of the Offline Files feature in your local area network, here is how you can do that using Registry and Group Policy. If you follow this method, only the host computer will access the Offline Files, and others won’t get the option. That said, the Offline Files feature will be turned on, but it won’t function on your Windows 11/10 PC.
Allow or disallow the use of the Offline Files feature
To allow or disallow the use of the Offline Files feature in Windows 11/10 using Group Policy, follow these steps:
- Press Win+R to open the Run dialog.
- Type gpedit.msc and hit the Enter button.
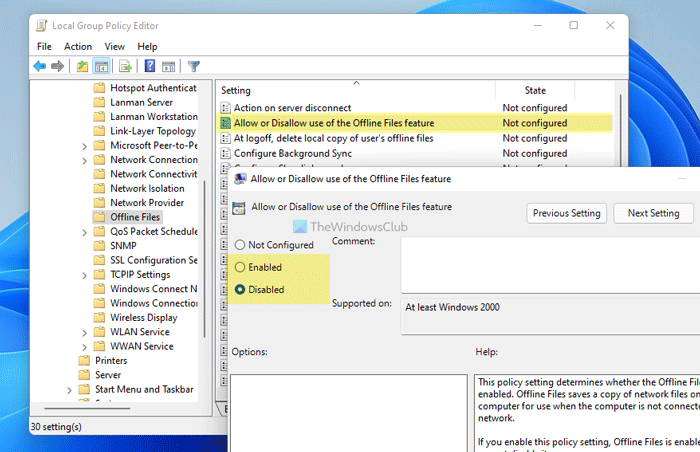
- Navigate to Offline Files in Computer Configuration.
- Double-click on the Allow or Disallow use of the Offline Files feature setting.
- Select the Enabled option to turn on and the Disabled option to turn off.
- Click the OK button.
To learn more about these steps, continue reading.
At first, you need to open the Local Group Policy Editor on your computer. For that, press Win+R to open the Run prompt, type gpedit.msc, and hit the Enter button.
Once the Local Group Policy Editor is opened, navigate to this path:
Computer Configuration > Administrative Templates > Network > Offline Files
Here you can find a setting called Allow or Disallow use of the Offline Files feature. You need to double-click on this setting. Following that, choose the Enabled option to enable the Offline Files feature and Disabled option to disable the Offline Files feature in Windows 11/10.

Click the OK button to save the change.
Turn on or off the use of the Offline Files feature using Registry
To turn on or off use of the Offline Files feature in Windows 11/10 using Registry, follow these steps:
- Click on the Taskbar search box.
- Search for regedit.
- Click on the individual search result.
- Select the Yes option.
- Navigate to Windows in HKLM.
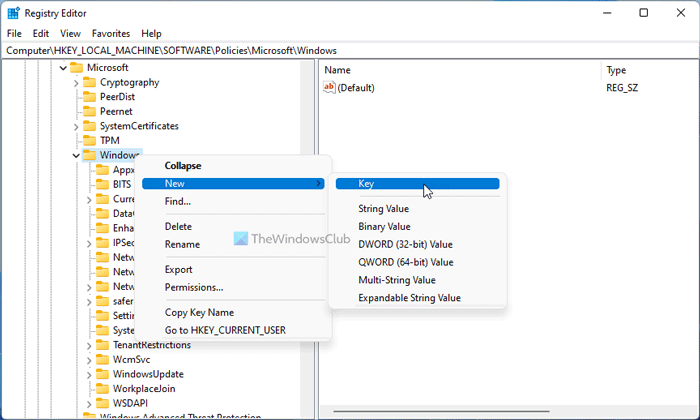
- Right-click on Windows > New > Key.
- Name it as NetCache.
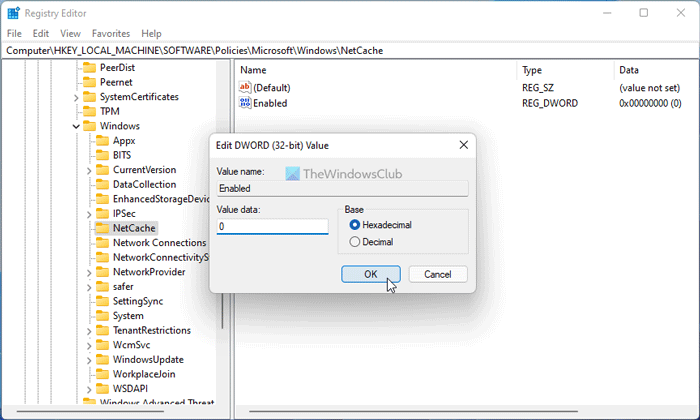
- Right-click NetCache > New > DWORD (32-bit) Value.
- Name it as Enabled.
- Double-click on to set the Value data.
- Enter 1 to enable and 0 to disable Offline Files.
- Click the OK button.
- Reboot your computer.
Let’s check out these steps in detail.
To get started, you need to open the Registry Editor first. For that, search for regedit in the Taskbar search box and click on the individual search result. Then, click the Yes option to open the Registry Editor. Once it is opened, navigate to this path:
HKEY_LOCAL_MACHINE\SOFTWARE\Policies\Microsoft\Windows
Right-click on the Windows key, select New > Key, and name it as NetCache.

Right-click on the NetCache key, select New > DWORD (32-bit) Value and name it as Enabled. Then, you need to set the Value data. For that, double-click on it and enter 1 to enable or 0 to disable the Offline Files feature.

Once done, click the OK button and reboot your computer.
Should Offline Files be enabled?
It depends on your workflow. If you have multiple computers in your local area network and you want to access files across different computers without an internet connection, you should enable Offline Files. For your information, this feature is available in Windows 11 as well as Windows 10.
How do I turn off Offline Files feature?
To turn off or disable the Offline Files feature in Windows 11/10, you can use the Offline Files panel. For that, search for manage offline files in the Taskbar search box, and click on the individual search result. Then, click on the Disable offline files option button. At last, click the Apply and OK buttons to save the change. If you need to turn on Offline Files feature later, use the Offline Files panel, press the Enable offline files button, and then use the OK button.
That’s all! Hope this guide was helpful.