Some users reported that after updating the graphics card driver, the AMD Radeon software no longer works in Windows 11. This can happen if you’re upgrading your old graphics card driver and you have a new GPU installed on your computer. In this article, we will explain why AMD Radeon software won’t open in Windows 11 and how to fix it.

If you are facing trouble accessing the AMD Radeon software on your Windows PC, here are some common solutions that might help. First of all, check if Windows Update is enabled for automatic updates. If not, enable Automatic Updates and repeat the process above after restarting your device. Still can’t open it? Continue reading for more details:
Why does the AMD Radeon software not open?
If you are running Windows 11 with AMD graphics and find that the AMD Radeon software isn’t opening, it might be due to some compatibility issues. It would be wise to check if the graphics driver is up to date as well as to look for other conflicts in the system. The following are some of the causes that may cause this issue:
- The problem is typically caused by faulty graphics card drivers, which can be resolved by rolling back your drivers.
- A similar problem may occur if the version of AMD Radeon Software does not match that of the installed driver.
- You could also experience this issue if you have recently updated Windows and do not have the latest AMD graphics driver installed.
Below are a few solutions you may want to consider:
AMD Radeon software not opening in Windows 11
If AMD Radeon software not opening on your Windows 11/10, you can follow the below suggestions:
- Delete the CN folder in Windows Explorer
- Update AMD Radeon drivers
- Roll back the driver to its previous version
- Install pending Windows update
- Troubleshoot in Clean Boot State
Let’s now see each of them in detail:
1] Delete the CN folder in Windows Explorer
There have been a number of reports that deleting the CN folder from File Explorer helped solved the issue. Here are the steps you can use to test this and see if it works:
- Press the Windows key + I keys to open File Explorer.
- From the left pane, click on This PC and then browse to the following path:
C:\Users\<Username>\AppData\Local\AMD
Note: In the above command line, replace <username> with the actual file name.
- On the next page, right-click on the CN folder and delete it.
- Now close the File Explorer window and see if it works.
2] Update AMD Radeon drivers
This error indicates that your AMD Radeon drivers need to be updated. In order to do this, you can use the AMD Driver Autodetect application. For better results, you should run the AMD Cleanup tool and remove all AMD driver files.
3] Roll back the driver to its previous version
Windows may sometimes update some of the drivers automatically when you install a new version, and that could result in this issue. Some users have reported that they got able to resolve this issue after rolling back the display card driver to its earlier version. As a result, you can get the problem fixed by downgrading the graphics card driver rather than updating it. Here are the steps you can use to do so:
- Right-click on Start and select Device Manager from the menu list.
- Inside the Device Manager window, scroll down to the Display adapters and expand it.
- Then right-click on the adapter causing the issue, and then select Properties.
- On the Driver tab, check if the Roll Back Driver option is enabled.
- When it does, click on it and you may be directed to the correct version.
4] Install pending Windows update
In case none of the above solutions work, you might want to download and install the update manually from the Microsoft Update Catalog and see if it resolves the issue.
5] Troubleshoot in Clean Boot State
Your PC may experience this issue when some programs or services conflict with Radeon Software. In this case, you need to troubleshoot your computer in a clean boot state that only loads the most important programs and files. To perform this procedure, follow these steps:
- Press the Windows key + R to open the Run dialog box.
- Type MSConfig in the text box and press Enter.
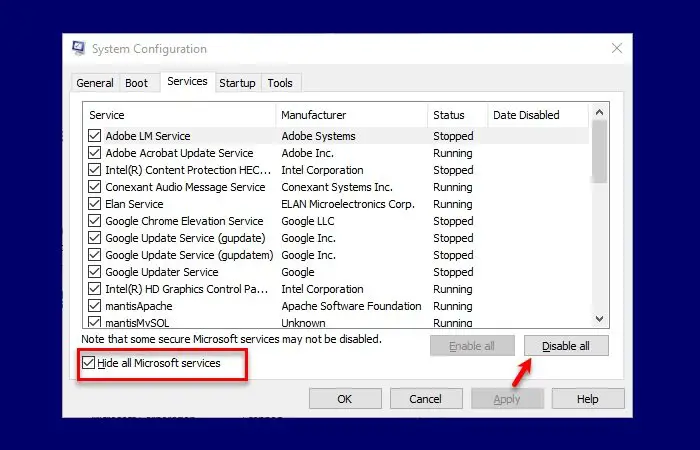
- Navigate to the Services tab in the System Configuration window.

- Select Hide all Microsoft services and click Disable all.
- Click Apply to save the changes.
- On the Startup tab, click the Open Task Manager link. Task Manager should have the Startup tab selected.
- Select each startup service and click Disable to stop it.
- To make the changes take effect, click on OK.
- Now restart your computer and check if it solves the problem. Once that is done, open the System Configuration tool again.

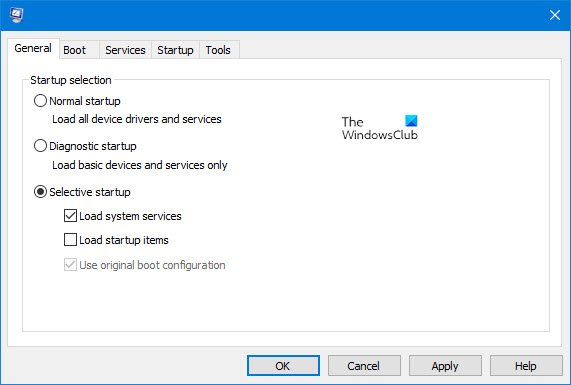
- On the General tab, select the Load system services checkbox.
- You can save your changes by clicking Apply > OK.
- Then restart your computer.
- Having fixed the problem, you can enable the services one by one.
How to fix the AMD driver bug?
If you find a bug in your AMD driver, you should go to the AMD official website and download the latest graphics card driver. After downloading it, uninstall the existing graphics card driver and install the new one manually. You can also use the AMD Bug Report Tool to send the log files back to AMD to help them troubleshoot.
Read Next: Radeon Settings and Driver versions do not match.
Leave a Reply