You may be aware that the command-line version of the Disk Cleanup Utility in Windows offers many more clean-up options. Just earlier today, we saw how we could force Disk Cleanup Utility to delete ALL temporary files, including those temporary files created in the last 7 days.
In this tutorial, we will see how to activate some additional cleaning options and automate the cleanup operation, so that you don’t need to run the Disk Cleanup Utility or Cleanmgr.exe in Windows 11/10/8/7 manually, every time. We will see how to use the Command line version of Disk Cleanup Tool or Cleanmgr.exe with more cleaning options. Use Task Scheduler to run it automatically using sageset and sagerun arguments.
Command-line version of Disk Cleanup Utility or Cleanmgr.exe
To begin, open an elevated command prompt, type cleanmgr /sageset:n – where n can be any integer between 1 and 255.

This switch /sageset displays the Disk Cleanup Settings dialog box and creates a registry key to store the settings. The number denotes the settings which will be stored in the Registry when your run sagerun switch later on – and basically lets you make shortcuts to different stored configurations or schedule automatic cleanup in the Task Scheduler.
In effect the /sagerun:n switch will run the specified tasks that are assigned to the n value by using the /sageset switch.
Let’s begin with executing the following command:
cleanmgr /sageset:1
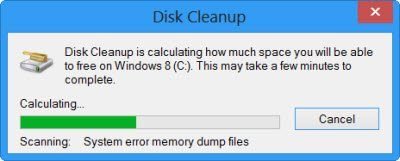
This will open the Command Line version of Disk Cleanup Utility offering many more cleanup options.
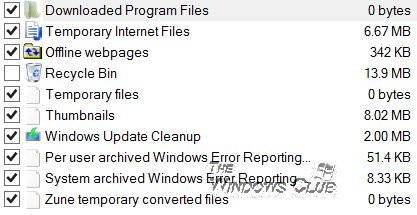
If you have noticed, these are the options available in Cleanmgr.exe when you run it manually.
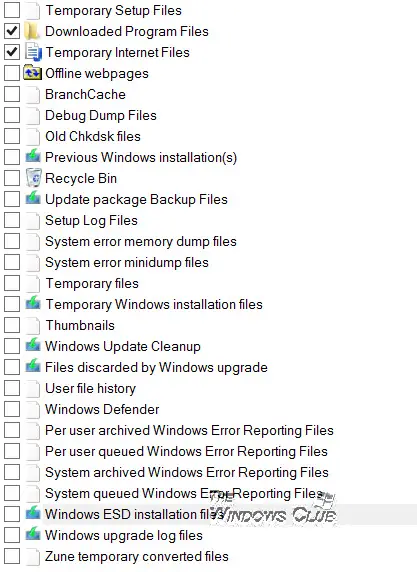
When you open it using sageset, as mentioned above, you will see the following clean-up options.
Command-line version of Disk Cleanup offers more cleaning options
The options offered may vary depending on your system, however.
You may be surprised to see so many options being available and wonder why Microsoft chose not to make accessing them easier!
The options being offered may include:
- Temporary setup files
- Downloaded program files
- Temporary internet files
- Offline web pages
- BranchCache
- Debug dump files
- Old chkdsk files
- Previous Windows installations
- Recycle bin
- Update package backup files
- Setup log files
- System error memory dump files
- Temporary files
- Windows Update Cleanup
- Files discarded by Windows upgrade
- User file history
- Windows Defender
- Per user archived Windows error reporting files
- Per-user queued Windows error reporting files
- System archived Windows error reporting files
- System queued Windows error reporting files
- Windows ESD installation files
- Windows upgrade log files
- Etc.
Select the ones you want and click OK to save them. After you click OK, the settings (selection) will be stored in the Registry for future use. When you schedule it using cleanmgr /sagerun:1 to run through the Task Scheduler, it will take these settings for Disk Cleanup.
If you want to run this “Enhanced” Disk Cleanup Utility right away, type cleanmgr /sagerun:1 in the cmd window and hit Enter.
Alternatively, you could type C:\Windows\system32\cleanmgr.exe /sagerun:1 in a Run window and hit Enter.
The disk cleanup operation will start right away.
TIP: To start the Disk Cleanup Tool with all the options pre-selected, use the /lowdisk switch. That is, open Run box and type the following and hit Enter: cleanmgr /lowdisk
Using the LowDisk switch for CleanMgr
The lowdisk switch is useful if you are running low on storage space on your hard disk. To run it, you have to use the following command to free up space on, say – C drive:
cleanmgr /lowdisk /c
When executed, the Disk Cleanup Tool will open with all the junk file categories selected in the C: drive. You can decide what you want to delete.
To delete all junk files without user intervention, run the following command instead:
cleanmgr /verylowdisk /c
I hope this helps.
Schedule and Automate running of Disk Cleanup Utility
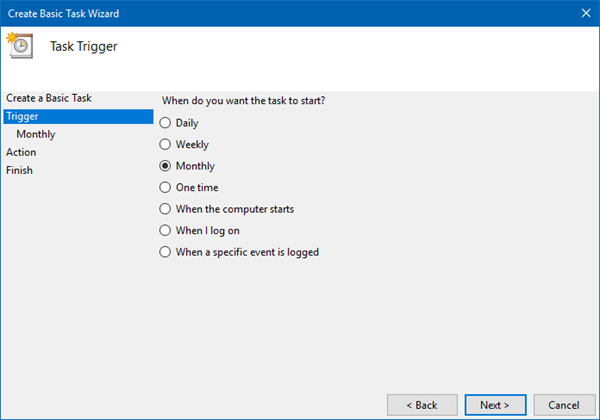
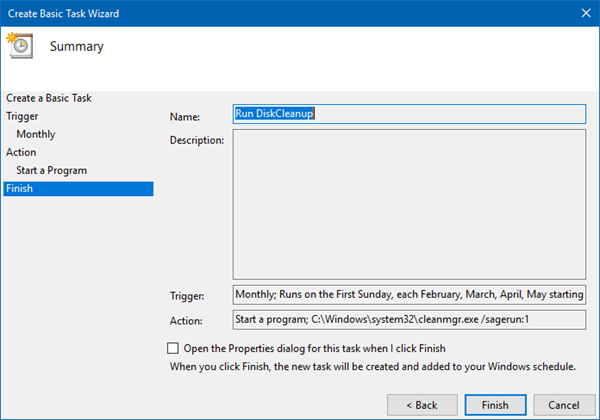
If you would like to schedule Disk Cleanup Utility to run automatically, every once in a while, you can do so using the Task Scheduler. To do so, open Task Scheduler from the Control Panel. This post on How to Schedule a Task in Windows will give you more details about it. Click on Create Basic Task. Give it a name and description.
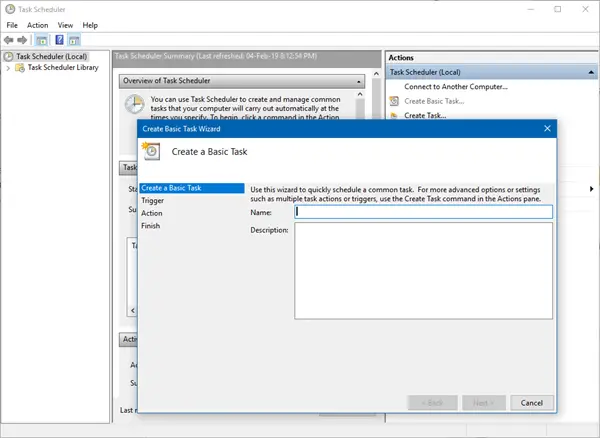
Select the Trigger; in this case the frequency. Click Next.
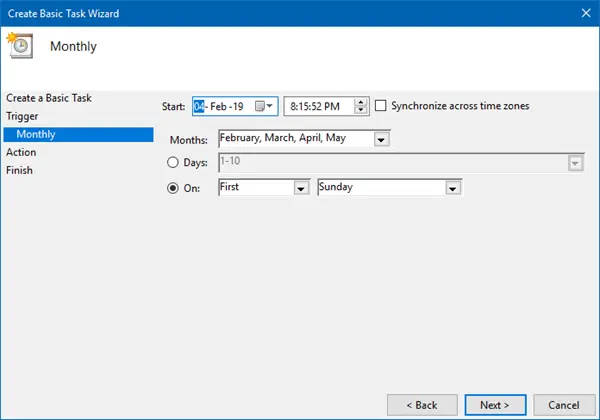
Since we have selected Monthly, fill in the other required details, and click Next.
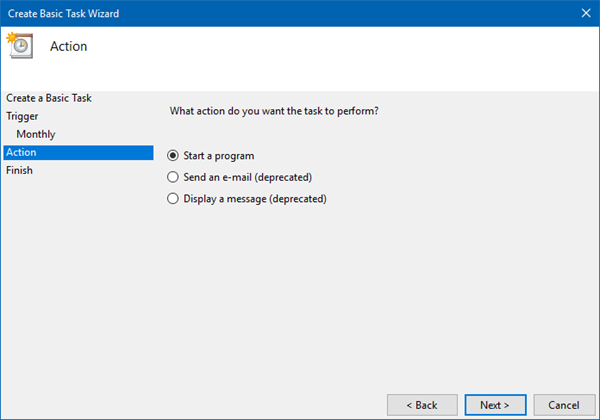
As Action, select Start a program and click Next.
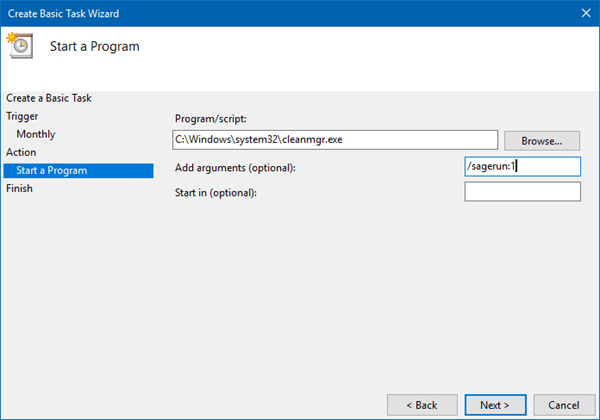
Since we want to run the Disk Cleanup Utility, write C:\Windows\system32\cleanmgr.exe and Add argument as /sagerun:1. As we have saved the disk cleanup setting using the number ‘1’, we are using the same number ‘1’ here. Click Next.
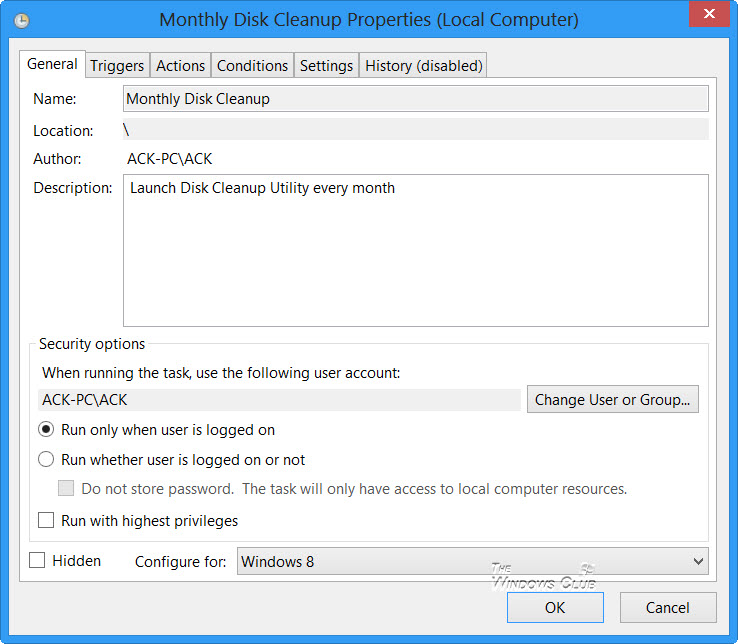
Check the Summary. Select the Open Properties box and click Finish.
The Monthly Disk Cleanup Properties box will open where you will get to see details like Triggers, History, General Settings, Actions, and Conditions.
That’s it!
The Disk Cleanup Utility – with the additional options set – will run every month to keep your disk clean.
useful article, but i still prefer CCleaner over the built-in clean up tool. it cleans better and faster…
Clever but also redundant. There are so many useful and free disk cleaning utilities around, so why go to all this trouble.
There may be some who prefer not to install 3rd-party tools, but instead use the built-in features. :)
People are missing the point that you can configure these sets to be scheduled and clean up exactly what you want. You can even clean Windows Update install files on client PC’s. On a domain with 20,000+ workstations I don’t think manually running CCleaner is viable nor would it be capable of cleaning all areas that build up ‘guff’ in a corporate environment.
Great article! I came here after checking a Microsoft page about automating disk cleanup. Pathetic! This is a brilliant way to AUTOMATE the task of cleaning out all those niggly files, most of which should not have stayed behind anyway. I much prefer this over CC cleaner. Thanx for an excellent post!
How do you automate the SageSet option on 20,000+ workstations? Everything I have read indicates you must run through the GUI first in order to enable the SageRun option.
You can export the sageset registry key once you run /sageset:1 and then deploy it using group policy preferences.
I want to thank Anand for this article. My disk C: was filling up and after much research I found this was due to the winsxs backup files and I needed to clear through the newly installed Windows Update clean via Disk cleanup. However, this checkbox never appeared. Logging on as administrator did not help nor did running cleanmgr as administator by direct command. I finally used the sageset switch above and cleaned up the Windows Update files as well as many other files shown as options in sageset. I gained a massive 7GB in space!
Hi Guys, thanks for the great article, but unfortunatelly it won´t work at me automatically. When I say, that the cleaner should delete Previous Windows Versions, a Window pop up, and informs, that is dangerous blah blah blah. So it cannot run automatical. Have anybody a solution for this?
You’ll have to delete it yourself, which itself is fairly easy. After permanently deleting it you won’t get that popup notification anymore. If you do by some chance, then simply disable the option by deselecting it in the process mentioned in above article.
Thanks for the info. I followed your instructions and was successful in setting up a task to give this hard drive a shave and a haircut on a regular basis. Appreciate your helpful post.
Awesome , thank you
Any details on how to do this? As in, where is it stored?
I just tried this but it doesn’t work. The utility starts and runs, but nothing gets cleaned up. When I open Disk Cleanup to make sure, the Temporary Internet Files (3.93 MB) and Thumbnails (10.0 MB) are still there. I copied the code from this page and put it into the Scheduled Task unaltered. What else might I be missing?