Windows 11/10 includes a feature that allows you to schedule and run Automatic Maintenance on your computer. The task, when run, will carry out a task like security updating and scanning, Windows software updates, Disk Defragmentation, Disk Volume Errors, System Diagnostics, etc., and also includes enterprise-level Network Access Protection scanning and security standards scanning on all enterprise workstations.
In Windows 7 and earlier versions, performance and energy efficiency are impacted to a certain extent, but in Windows 11/10/8, this maintenance activity is designed to run in the background – in a prioritized fashion – with limited user interaction and minimal impact to performance and energy efficiency.
Says MSDN:
Automatic Maintenance automatically stops currently running maintenance activities if the user starts interacting with the computer. Maintenance activity will resume when the system returns to idle status.
Windows Automatic Maintenance
Automatic Maintenance in Windows 11/10 will run daily and will combine all the background maintenance activities, like updating Windows software and apps, attending to Action Center messages, running background maintenance tasks, etc., without negatively impacting performance and energy efficiency. It will allow the user to be in control of maintenance activity scheduling and configuration, too. However, responsiveness of the operating system to users may be reduced when maintenance activity runs while users are actively using the computer.
The process is named MSchedExe.exe, and it is located in the System32 folder. To access Automatic Maintenance, open Control Panel and navigate to System and Security > Security and Maintenance. Here, under Maintenance, click on the small arrow on the right side. This will expose Automatic Maintenance.
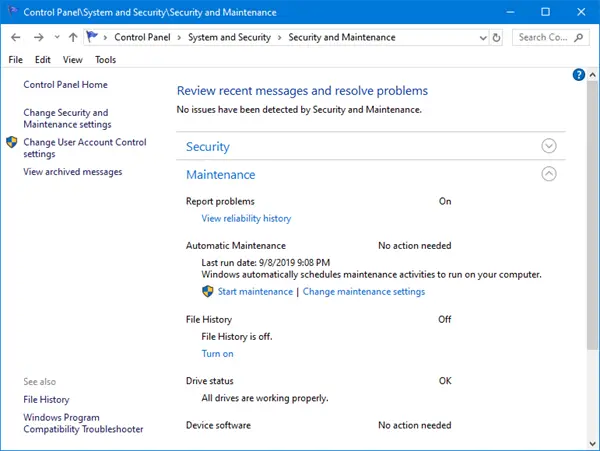
Clicking on Start maintenance will start the task manually right away.
Clicking on Change maintenance settings will open the following window where you can change the settings.
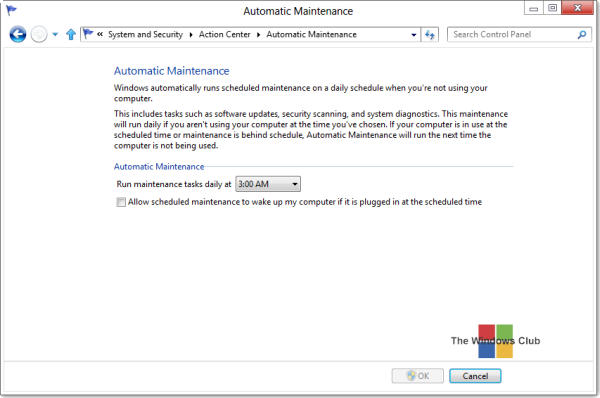
By default, Automatic Maintenance runs in the fully Automatic Mode, i.e., your PC is intelligently scanned during idle time and at scheduled times, without user intervention. The complete task is executed silently, and you will not even notice anything.
If your computer is busy, it will run the next time your PC is not being used.
If your computer is in Sleep mode, while on AC Power, it will be resumed, and the maintenance activity will be carried out using full system resources to execute the task as fast as it can. After completion of the task, the system will be returned to Sleep mode. You will, however, have to check the Allow scheduled maintenance to wake up my computer if it is plugged in at the scheduled time option.
If you wish to change the schedule of this Automatic Maintenance, click on Change maintenance settings, and from the drop-down menu, you will be able to set the timing.
If, for some reason, you wish to start the Maintenance task right away, you can do so by clicking on the Run Maintenance button. This will allow you to run this task at unscheduled times. This is referred to as the User-Initiated Mode.
You can also use the following command in CMD to start it manually:
mschedexe.exe start
To stop the Maintenance job, you can simply move the mouse cursor. If it does not help, then you may click on the Stop maintenance button anytime. The task will be stopped in a few seconds.
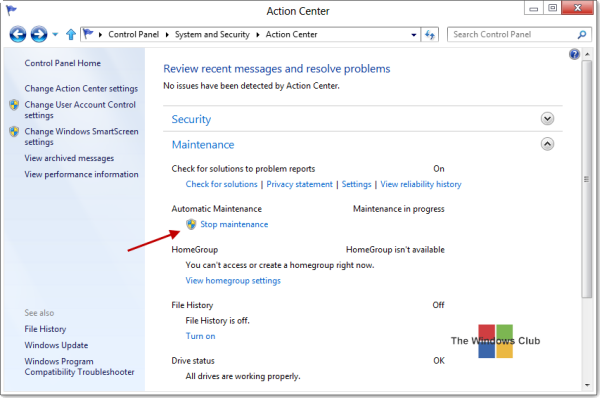
When Automatic Maintenance is being run, you will see its indication in the taskbar icon.
![]()
If you find that this is not being monitored, you may click on Turn on messages about Automatic maintenance.
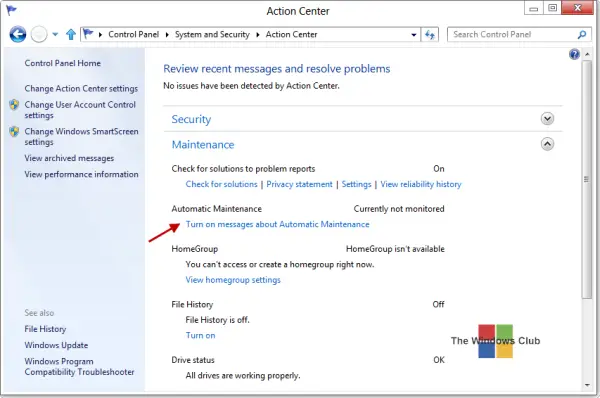
This will let Windows monitor Automatic Maintenance and give you any messages via the Action Center icon in your taskbar.
You can also execute the following commands in Windows Terminal to start or stop Automatic Maintenance:
Start Windows Automatic Maintenance:
MSchedExe.exe Start
Stop Windows Automatic Maintenance:
MSchedExe.exe Stop
Why does Windows 11/10 Automatic Maintenance take so long?
At times, many users find that it runs for hours together with no signs of stopping. If you face this issue, here are a few things you could try:
- Stop Automatic Maintenance manually.
- Run sfc /scannow to start the system file checker. Restart your computer at the end, when you are asked to
- Use CCleaner to clear your PC junk, including your Page file, Prefetch files, etc.
- Disable your start-up items temporarily, including your antivirus software.
- Start Automatic Maintenance manually and see if it helps.
Once done, you may re-enable your start-up items and your antivirus software.
If this doesn’t help, maybe it’s some hardware, possibly RAM, issue.
Read: Maintenance in progress message in Windows
Disable Automatic Maintenance in Windows 11/10
Using Task Scheduler
To disable Automatic Maintenance, you will have to open Task Scheduler > Task Scheduler Library > Microsoft > Windows > TaskScheduler.
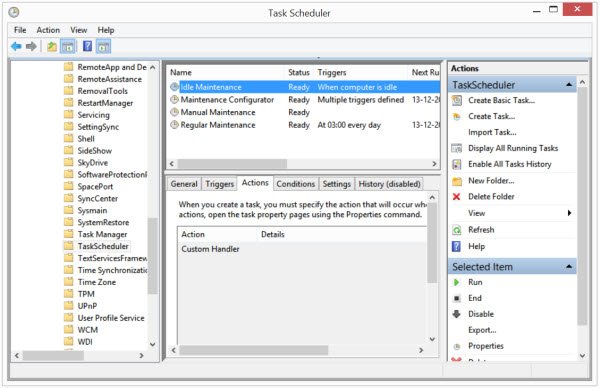
Here, right-click on Idle Maintenance, Maintenance Configurator, and Regular Maintenance and select Disable.
Using Windows Registry
You can also disable Automatic Maintenance in Windows 11/10 using the Registry.
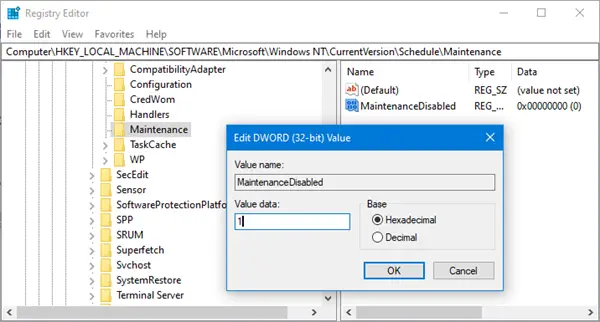
Open Registry and navigate to the following key:
HKEY_LOCAL_MACHINE\SOFTWARE\Microsoft\Windows NT\CurrentVersion\Schedule\Maintenance
On the right side, create a DWORD value and name it MaintenanceDisabled and give it a value as follows:
- 1 – To Disable
- 0 – To Enable
Save and exit the Registry.
TIP: This post will help you if you receive Windows is unable to run Automatic Maintenance message when you try to run it.
Tasks executed by Automatic Maintenance
Automatic Maintenance is designed to address and resolve these issues:
- Resource utilization conflicts
- Deadline scheduling
- Energy efficiency
- Transparency to the user
I have not been able to find out the exact number of system tasks that it carries out, and in the order they are executed – nor is there any way currently, to select or de-select the maintenance tasks – but I am sure Defragmentation, checking for Microsoft software updates, security scanning, system diagnostics, malware scanning, Disk Error Checking, checking Clock or System Time, checking if history, error reports, and logs are currently taking too much disk space – and addressing these issues if required, etc. must be some of the tasks being executed.
When asked about the tasks being run, Dave Dixon of Microsoft replied:
You can see this quickly by typing “schtasks /query” that should list all scheduled tasks for a system.
So, you may open an elevated CMD type schtasks /query and hit Enter. You will be able to see the output of the tasks.
Read: How to list all Automatic Maintenance Tasks in Windows 11
Should I disable automatic maintenance?
If you can do the maintenance work manually, there is no need to turn on the automatic maintenance functionality. However, if you think it will consume some of your valuable time, you can enable automatic maintenance. Whether you use Windows 11, Windows 10, Windows 8/8.1, or Windows 7, you can find the same option on your PC.
How do I schedule Windows automatic maintenance?
To schedule the automatic maintenance on an older version of Windows, Windows 7, you need to follow the aforementioned steps. However, in Windows 11 and Windows 10, things have changed a little bit. Now, you do not need to go to the Action Center. Instead, you can find the same Maintenance option after opening the Security and Maintenance section.
Now, read how to maintain Windows in good running condition.
How can I schedule the Automatic Maintenance using code?
Thanks!
how can I disable this?
How do I disable Automatic Maintenance in Windows 8? It slws down my computer at startup, and I can’t do anything before it stops… I really hate this feature, so please provide me with means on how to stop this pesky thing.
i think there is no way to disable autoatic maintenance… I tried to disable it in the scheduler but after a while it activates itself back to normal and starts annoying the crap out of me. I think the only way to get rid of this is to update to windows 7… or linux -.- who the fuck installed this asshole feature in windows 8? I want to see his face so I can hate him as much as I can.
mate its a good thing, it helps your pc run better and cleans it up without having to run programs like ccleaner, and it runs in the background without you having to do anything, and the person saying it slows their pc down well i think you need to get a better pc, ive got a core i5 processor and 6gb ram and automatic maintanance does not slow my pc down
yes, it is maybe a good thing.. but it starts when I need silence. For example in school or library… the maintenance uses a lot of CPU (i7 laptop) and it starts whenever I don’t use my laptop for few minutes.
I also have an i5 and I can tell you while watching movies with some players, maitanance will come on automatically and freeze the system and the movie will lag. So I know it uses up lots of resources.
how long is AUTO MAINTENANCE sopose to run ? when i click button to stop maintenance nothing happens,im on my computer alot and this is the first time i have ever seen anything in the action center
saying MAINTENANCE IN PROGRESS
The time would depend on your system. but it could be around 5-10 minutes. Give it a couple of minutes to stop, after you press the Stop button.
while i turn of my pc using windows 8,the shut down is prevented by a message containing “The end user” has stoped the turn off,please go back and complete your end task.please help,i am in a fix.
This is the WORST feature ever invented. I bought a brand new PC, fresh clean install of Windows 8.1, patched it all up, and before I install any apps or other software on it I’m waiting for this process to complete. Yeah, it’s been consuming 100% disk and CPU for 7 days NON STOP! When will it complete??? I mean, how badly can the disk be fragmented with only the OS loaded?
What is the point of scheduling sw updates to make use of midnight download data, but then it waits for a time when the “computer is not being used” and downloads even if that is outside of the midnight hours. Do I have to wait up until midnight to start the download? Almighty MS must surely have thought about this. I cannot believe they would be so inconsiderate of their users (sarcasm)
you say it doesn’t make an impact but that’s not true..every time this maintenance kicks in it disconnects me from the Game I am playing…it is very annoying because i have it set to run at 2 am but it runs all damn day long…
it doesn’t slow my i3 down but it DC’s me from the MMORPG i am playing…very annoying auto maint. I know how to clean my PC and I have set it to run at 2 am but it runs at random times it is a stupid feature
I have a 4770K @ 4.2Ghz and a Samsung pro SSD. It slows down my PC and doesn’t seem to do any maintenance. It’s always running unless I stop it and it comes right back. Exactly how much maintenance does a clean install of windows need? Infinity is too long and the PC will not go to sleep without me forcing it to sleep.
How long should maintenance take? Mine has been running since 10:30 last night (almost 12 hours)
In my case it normally lasts for 10-20 minutes. Wait for a couple of hours more and see if it stops. Else you may take a call to stop or disable it.
As I said in my question mine ran for over 12 hours before I turned it off. Anyone have any idea what is supposed to do? And what could happen if it doesn’t run properly?
Your question was simply: How long should maintenance take? Mine has been running since 10:30 last night (almost 12 hours). You did not say that you had stopped it. :)
Anyway see if something here helps you: http://forum.thewindowsclub.com/windows-tips-tutorials-articles/36699-why-does-windows-8-automatic-maintenance-take-so-long.html
Is there any way to switch it off permanently or switch it to “manual”? I use my computer for live audio mixing and recording and if this stuff kicks in it trashes both.
Help, I jacked on my keyboard and now I am running Windows 12.2
does it check registry errors and fix them?
No, it doesn’t.
This is ridiculous. I’ve even changed my virtual memory to double my ram and it’s using 100% of the disk. It stopped yesterday after a restart, but it started today 10 minutes after I ran a fullscreen game which confuses the computer as idle activity. I defrag on my own and have an app that tells you when this kind of maintenance is required. I understand this will help a broad majority of users with very little knowledge of their PCs, but without a way to disable it, gamers and users with heavy performance requirements are taking a hit.
win8.1 pro just creates a new maintenance task schedule that overrides the setting to stop it.
It ran disk cleanup when I was downloading the win10 pro iso and the entire download just
disappeared
psexec -s schtasks
/change /tn “MicrosoftWindowsTaskSchedulerMaintenance
Configurator” /DISABLE
I updated to window 10 and went back to 8 now my windows maintenance service is “unavailable” How do I get it back?
Run System File Checker and DISM – Restorehealth. Search this site for details on it.
Mines done exactly the same! I didn’t like the look and feel of Windows 10 so went back to 8. I’m now wondering what else might be wrong. So far I only see that the Automatic Maintenance wont work.
Love to get more info on this. My experience:
It’s actually much, much worse than just stopping the process. The issue is if you stop the process, it starts again about 5 minutes later. And, it makes your system run at about 50%. Rescheduling the process also doesn’t work since it runs all the time. If I reschedule the process for 2am for example, it simply starts up 10 minutes later anyway.
You can go into Task Scheduler under Microsoft/Windows/TaskScheduler and kill off / disable all of the tasks.. BUT
1. You cannot kill off the main task that restarts it all as if you do, though you are admin, it will tell you “the user account you are operating under does not have permission to disable this task”.
2. If you kill the other 3, and disable them, the re-enable themselves in about 30 minutes.
So, I kill them through task scheduler every 30 minutes. I think I’ll write a service to do this.
AND, (yes, there is more)
One night I thought, “well, I won’t be on this computer for about 48 hours, so if Start Maintenance now, maybe it will shut up for a while”.
search on you tube for “Can’t stop maintenance on Windows8, can’t start it either”
Automatic maintenance is a bloatware, junkware.
Microsoft is full of idiots. All Windows since Vista run a lot of totally unnecessary tasks in the background. I hate when my PC work pointlessly.
The biggest problem with Microsoft’s craps that always run automatically (like superfetch, prefetch, automatic maintenance, automatic update, search indexing, …) is that they
1. shorten the lifespan of the computer by constant usage (it affects especially both the HDD and SSD)
2. increase the power consumption of the computer (the problem is larger when you use a battery powered device, like laptop, notebook)
3. increase the noise of the computer (cooling fans, HDD thrashing)
4. cause performance problems, they waste system resources
5. antivirus programs will scan every time all files that these crap backround tasks read/write, which is another extra waste
So these bloatwares from Microsoft are total waste. They harm your computer and annoy you. Even knowing that my PC is working hard without any reason and benefit, annoys me.
That’s why I hate Windows since Vista. That’s why I went back to Windows XP SP3. It has the least bloatware. If I were use newer Windows, I would have to do a lot of research and investigating, searching all around the internet to find and disable all bloatwares, unnecessary tasks that run in the background. It’s a lot of work to properly configure newer Windows systems.
I want to control my own PC! I want to control what happens. I hate when some retarded developer think they know better than me what’s good for me.
I know this is an old article but the instructions still work like a charm for my WINDOWS 8.1 computer, with one exception. I cannot Disable the Maintenance Configurator – the other two mentioned are easily disabled, but this one won’t allow me to disable it – it says “The user account you are operating under does not have permission to disable this task”. Except my account is an administrative user. I’ve also tried a general Admin administrative user account – no luck either – same message.
This is MY computer – not a work computer with some overarching IT department holding the strings. So can anyone tell me why this would be the case?
It is not true that automatic maintenance has no impact on a small laptop running Windows 8.1. It is not true that automatic maintenance pauses when the user interacts with the computer. lt is not true that it is easy to control or modify automatic maintenance using the Task Scheduler. Anand, did you test these statements?
In Windows 8.1 the Scheduled Tasks list contains hidden tasks to run the
built in disk defragmenter at various times, such as when bringing the
computer out of sleep in the morning. When the defragmenter is running
on a small laptop, it is almost impossible to get work done on the
computer. Even clicking a menu may be delayed by many seconds.
Certainly, video cannot be played.
There must be some way to turn
off automatic defragmentation, or to make it happen at the user’s
desired times.
If I had
designed Windows, I would have made sure that the message pump could
never be dominated by an I/O operation, or by a task that refused to
yield their control. At the very least, defragmentation should
deliberately yield control several times a second, so it does not hog
the computer and make it hang or run very slowly.
hello, everytime I noticed that when I turn of the Intell ethernet Connection device, the automatic maintenance stops also, so it seems it uses the internet connection to do something, while I turned of automatic update, you should say, it doesn’t need the internet, well it does, is automatic maintenance surfing the internet? And what is it doing on the internet? Not one single time it continues when internet connection is turned of.