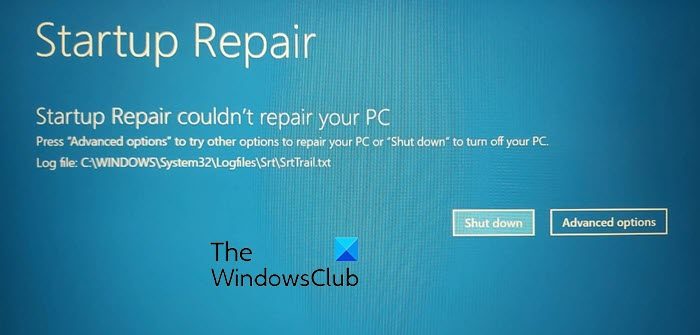
If you are facing problems with your Windows 11 or Windows 10 computer and you or the OS decides to run Startup Repair – and if Startup Repair fails then you may receive a screen with the following message – Automatic Startup Repair couldn’t repair your PC. The full error message reads like this:
Automatic Startup Repair couldn’t repair your PC . Press “Advanced options” to try other options to repair your PC or “Shut Down” to turn off your PC. Log file: C:\Windows\System32\Logfiles\Srt\SrtTrail.txt
How to fix Startup Repair couldn’t repair your PC
If you get into this situation here are a few things you could try. Please go through the entire list first and then decide which of the suggestions may apply in your case and which of these you would like to try:
- Rebuild BCD & Repair MBR
- Run chkdsk
- Run SFC and Use DISM Tool in Safe Mode
- Disable Early launch anti-malware protection
- Disable Automatic Startup Repair
- Restore registry from RegBack directory
- Reset This PC.
Before you begin checking this log file could give you an idea of the error cause:
C:\Windows\System32\Logfiles\Srt\SrtTrail.txt
What is the SrtTrail.txt file?
SrtTrail.txt is a log file that logs down causes that may have caused Automatic Startup Repair to fail or cause a Blue SCreen Stop Error. It is located at C:\Windows\System32\Logfiles\Srt\SrtTrail.txt. SrtTrail.txt does not cause Blue Screens – it is merely a log file that records issues for troubleshooting purposes.
SrtTrail.txt Windows 11/10 Fix
1] Rebuild BCD & Repair MBR
You need to rebuild the Boot Configuration Data file and repair the Master Boot Record file. To do this, click on the Advanced Options and then select Command Prompt. Following that, your system will ask for the password. After entering it, you will find the command prompt right on your screen. Enter the following commands one by one-
bootrec.exe /rebuildbcd
bootrec.exe /fixmbr
bootrec.exe /fixboot
These commands will fix Boot Sector problems. After running these commands, check whether you can start normally or not.
2] Run chkdsk
Checking the Disk for errors might be a good idea. So again open the Command Prompt windows as explained above and run the following command and see if that helps:
chkdsk /r c:
For your information, the command will scan and fix the problems of your C drive only.
3] Run SFC and DISM Tool in Safe Mode
Boot Windows in Safe Mode, open Command Prompt with administrator privilege, and first Run SFC
Then Run DISM to repair the System Image:
DISM /Online /Cleanup-Image /RestoreHealth
This command will use the Deployment Imaging and Servicing Management tool to scan for possible corruption. For your information, this command takes a while to run so do not close the window.
Related: The operating system version is incompatible with Startup Repair.
4] Disable Early launch anti-malware protection
If you have been facing these problems after installing an anti-malware program, this solution will fix it. After clicking on Advanced options, click on Troubleshoot > Advanced options > Startup Settings.
On the Startup Settings page, hit the Restart button.
You will, on restart, see this screen. You need to press the ‘8’ key on your keyboard to select Disable early launch anti-malware protection setting.
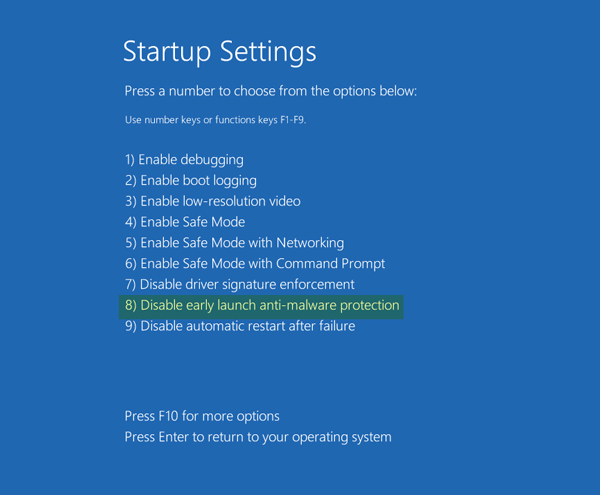
Your system will start that within moments.
Related: How to repair Windows 11 without losing data or programs
5] Disable Automatic Startup Repair
When you have a system drive related issue, the Automatic Startup Repair window opens up automatically during boot. If you think you are in such a situation, you can disable automatic Startup Repair. You need to click on Troubleshoot > Advanced options > Command Prompt and execute the following command:
bcdedit /set recoveryenabled NO
Restart your computer and see.
Related: Windows Automatic Startup Repair not working.
6] Restore registry from RegBack directory
Sometimes, a wrong registry value can create this problem. See if restoring the registry helps you. To do this open the Command Prompt from Advanced options, and execute the following command-
copy c:\windows\system32\config\RegBack\* c:\windows\system32\config
You will be asked whether you want to overwrite all files or only some. Type All and hit the Enter button. Then restart your computer and check whether the problem remains.
7] Reset this PC
This option in Windows 11/10 helps users get factory settings without removing any personal files. Use the Reset this PC option in Troubleshoot menu as the last option.
There are a few other things you could try, and these are related to your hardware actually.
- Unplug and reconnect the hard drive
- Reconnect RAM
- Unplug all external devices.
How do I bypass automatic repair on Windows?
To bypass automatic repair on Windows 11/10, open Command Prompt, type bcdedit /set {default} recoveryenabled No and press Enter. Then, restart your PC. The Automatic Startup Repair should be disabled and you might be able to access Windows 11/10 again.
What happens when Windows Startup Repair Fails?
If Windows 11/10 Startup Repair Fails, then your next option is to try using your Windows 11/10 installation media to fix the boot. You will need to enter a set of commands in Command Prompt to find and resolve issues that might be preventing your computer from booting.
All the best!
Related read: Automatic Startup Repair or Reset PC reboot loop.
As I read your article Andy and was going to comment that it was really very good – I myself, suddenly was having PC issues. I couldn’t get my keyboard to work. It was really strange, but I did think to just re-boot. Well, it took me several minutes to get my PC to re-boot. Finally, it did and then up came CHKDSK checking out the hard drive. I didn’t get any notice of bad sectors but it did repair what was going on.
When I was reading your article, I got to think about all of the issues that I have faced in the past with my PCs. Some of it is not pleasant, either. However, every issue taught me that much more of what happens to computers. Today computer users, especially those that are new to the game, really need this information. I say, why spend hundreds of dollars to have your computer fixed and then to find out it really isn’t fixed – When you can learn to do all of that yourself and it’s FREE!!!
It was an expensive repair, long distance phone calls to Canada, to the tune of about $500, back in Spring 1997. Tech Support sent out a man to change my motherboard. He came and “killed” the motherboard as he was installing. I did get a new PC out of all that and in all honesty, I truly deserve a new one. But, right then and there I decided that for a lot less than $500 – I easily could kill a motherboard myself. LOL
Anywho, it was that incident that started me on the path of computer learning. I think, I have learned fairly well – I have built from scratch 12 computers and repaired for family and friends I don’t know how many times. Every time I would repair or replace and of course built new computers – I learned by reading, asking questions of my computer guru and simply advanced in my knowledge.
Do I know all of the aligroms of how a CPU works or a Memory Module – Nope – But I do know how to check things out and find out what is wrong. Today I decided to re-boot, an old trick I know but it worked and I thought it might since my Windows 10 Pro was upgraded from Windows 7 Pro, so there are still more elements of Windows 7 Pro in my PC. I would have done what I did with Windows 7 Pro, so I thought – Try it. Bottom line, it worked and I am up and running again. I don’t know anything about algorithms or any of that jazz or programming, but I can find my way around a computer. }:O)
easier to format all system or for me
I had a problem with my startup after the latest updates for Windows 10 & my keyboard & mouse were both completely dead. I turned my computer off by pressing the power button & then back on. Then when the Windows logo with the wheel of wait appeared, I turned it off again with the power button. I did the same thing a second time when the logo & wait wheel appeared. Then I turned it on for a 3rd time & let it finish starting up & it actually gave me back my keyboard & mouse & went into a diagnostic, followed by a light blue screen with the option for advanced recovery options. Once I chose advanced, I chose startup repair options & the computer actually gave me a message that said it was Attempting Repairs. After that, when I re-booted, my mouse & keyboard were still working & my startup problem was no longer an issue. Everything is now working as it was before the update. So I say, save your money & try this first.
Thank You very much for your time to bring us a solution!! With the last software windows 10, 1709 actualization my computer present this problem last week and I did a factory reset cuz I didn’t know other way to restore the system I trieded to start in safe mode but didn’t work and tried to repair by command commands and the problem continue. I lost a lot of programs and utilitys of my HP Envy 15. And know I am running 1607 version cuz the last one still having problems.
At method 6 its
copy c:windowssystem32configRegBack* c:windowssystem32config
not
copy c:windowssystem32configRegBack* c:windowssystem32config
Thanks for pointing out the typo.
Just today I had this problem with my Dell XPS 15. I performed all the above mentioned ways to get my laptop start working again.
In my situation Nothing happened by following above mentioned ways. Now my laptop is working perfectly with a small trick i did. I just restored my laptop to the previous settings( the one i had yesterday).
When u get the screen which says that system didn’t start normally or automatic repair fail, go to advance options > advance now u will see a bunch of options…… just select system restore. And follow the instructions. When the windows ask for session selection, I would recommend not to select the latest option because that’s the session where everything went wrong. U can even see what changes happened between 2 sessions. And the best part is IT WON’T REMOVE ANY FILES other than the file(s) that were not at the time of the selected session.