If you want to automatically create a drawing canvas in Word, here is how you can do that. It is possible to create the drawing canvas in Word when inserting AutoShapes with the help of the in-built setting, Local Group Policy Editor, and Registry Editor.

How to automatically create drawing canvas in Word
To automatically create a drawing canvas in Word, follow these steps:
- Open Word on your PC.
- Click on the Options.
- Go to the Advanced tab.
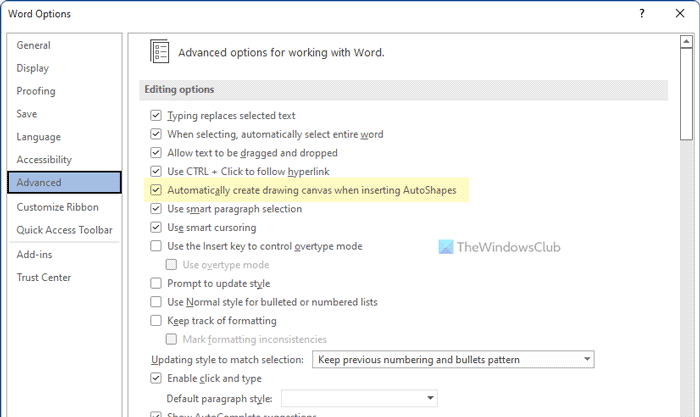
- Tick the Automatically create drawing canvas when inserting AutoShapes checkbox.
- Click the OK button.
To learn more about these steps, continue reading.
First, you need to open the Word Options panel. For that, open Microsoft Word on your computer and click on the Options menu.
Then, switch to the Advanced tab and find the Automatically create drawing canvas when inserting AutoShapes setting.

You need to tick this checkbox to enable the functionality in Word. Finally, click the OK button to save the change.
How to automatically create drawing canvas in Word using Group Policy
To automatically create drawing canvas in Word using Group Policy, follow these steps:
- Press Win+R to open the Run prompt.
- Type gpedit.msc and click the OK button.
- Navigate to Advanced in User Configuration.
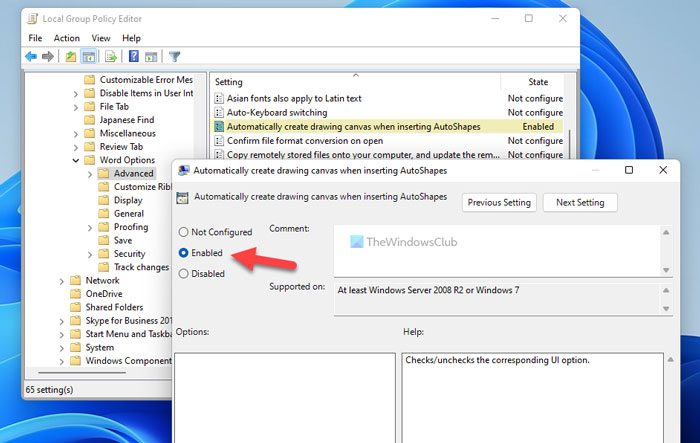
- Double-click on the Automatically create drawing canvas when inserting AutoShapes setting.
- Choose the Enabled option.
- Click the OK button.
- Restart the Microsoft Word app.
Let’s check out these steps in detail.
To get started, you need to open the Local Group Policy Editor on your PC. For that, press Win+R to open the Run prompt, type gpedit.msc, and click the OK button.
Next, navigate to the following path:
User Configuration > Administrative Templates > Microsoft Word 2016 > Word Options > Advanced
Here you can see a setting called Automatically create drawing canvas when inserting AutoShapes. You need to double-click on this setting and choose the Enabled option.

Lastly, click the OK button to save the change and restart the Microsoft Word app to apply the change.
How to automatically create drawing canvas in Word using Registry
To automatically create drawing canvas in Word using Registry, follow these steps:
- Search for regedit and click the search result.
- Click the Yes button.
- Navigate to office > 16.0 in HKCU.
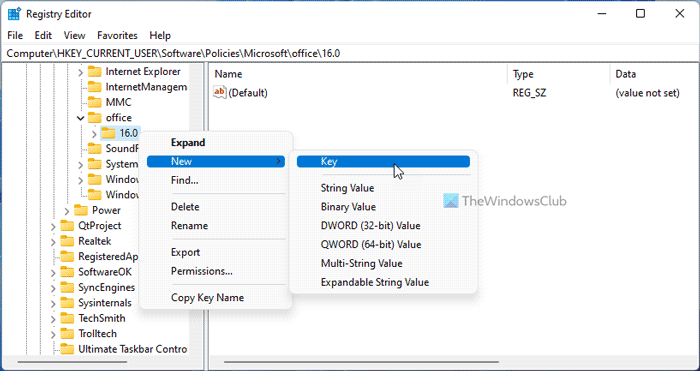
- Right-click on 0 > New > Key and name it as word.
- Right-click on word > New > Key and name it as options.
- Right-click on options > New > DWORD (32-bit) Value.
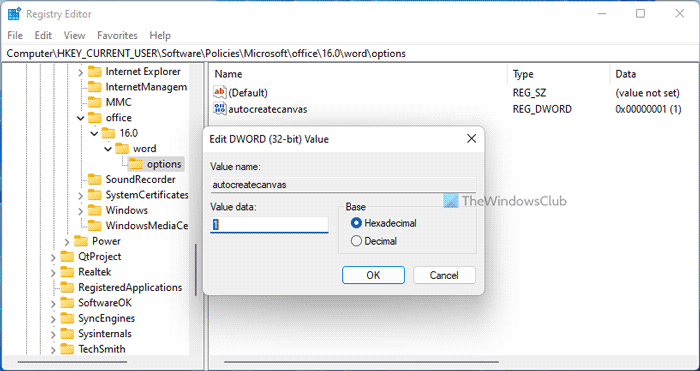
- Set the name as autocreatecanvas.
- Double-click on it and set the Value data as 1.
- Click the OK button.
- Restart your computer.
Let’s delve into these steps in detail to learn more.
For getting started, search for regedit in the Taskbar search box, click on the individual search result and click the Yes button to open the Registry Editor.
Then, navigate to this path:
HKEY_CURRENT_USER\Software\Policies\Microsoft\office\16.0
Right-click on 16.0 > New > Key and name it as word.

Then, repeat the same steps to create another sub-key under the word key and name it as options.
Right-click on the options > New > DWORD (32-bit) Value and set the name as autocreatecanvas.

Double-click on it to set the Value data as 1 and click the OK button.
Next, close all windows and restart your PC.
How do I insert a drawing into a canvas in Word?
To insert a drawing into a canvas in Word, you need to add a new canvas first. To do that, click on the Shapes icon and select the New Drawing Canvas option. Following that, you can draw inside the canvas using the Draw tool in Word.
How do I remove the drawing canvas in Word?
Removing a drawing canvas is pretty straightforward in Word. There are mainly two ways to delete the drawing canvas. First, you can select it and press the Delete button on your keyboard. Second, you can place your mouse cursor right next to the canvas and press the Backspace button on your keyboard.
That’s all! Hope this guide helped.
Read: How to enable or disable LinkedIn Resume Assistant in Word.
Leave a Reply