If you are having endless meetings and appointments, Outlook can automatically end meetings early. You can set this up in the desktop client as well as Outlook.com.
Let’s assume that you work from home, and you have countless appointments and meetings one after one for a very long time. Like most people, you might get exhausted after a couple of meetings. If you have set up meetings with Outlook, there is a way to take a break between two sessions. The desktop client and Outlook.com have the option to end the current meeting early so that you can be ready for the next one.
Automatically end meetings early in Outlook

To automatically end meetings early in Outlook desktop client, follow these steps-
- Open the Outlook app on your PC.
- Click File > Options.
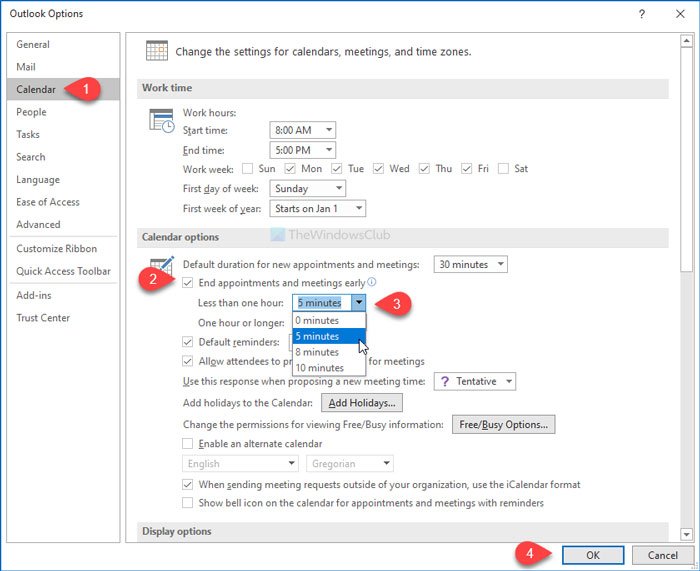
- Go to the Calendar tab.
- Make a tick in the End appointments and meetings early checkbox.
- Select a time.
- Click the OK button.
You will have to open the Outlook app on your computer and click the File option visible on the top-left corner. On the next page, you will get a button called Options.
Click on it to find the Outlook Options window. Now switch to the Calendar tab from the General tab and make a tick in the End appointments and meetings early checkbox.
Following that, you will have to choose a time. At last, click the OK button to save the change.
Automatically end meetings early in Outlook.com

To automatically end meetings early in Outlook.com, follow these steps-
- Click the Settings button.
- Click on View all Outlook settings.
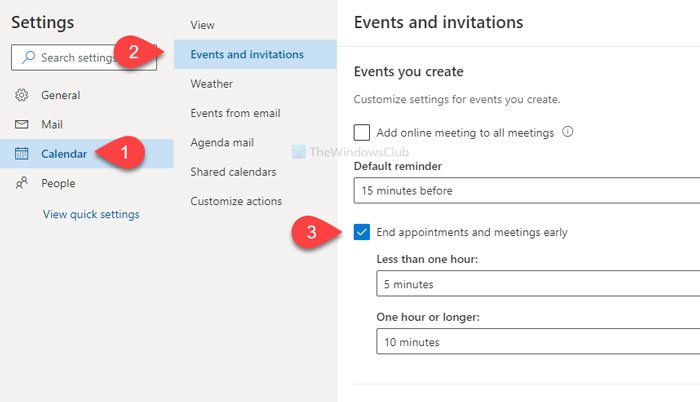
- Switch to the Calendar tab.
- Go to Events and invitations.
- Make a tick in the End appointments and meetings early.
- Select a time and click the Save button.
Open Outlook.com and sign in to your Microsoft account. After that, click on the Settings button visible on the top menu bar on the top-right side. Then, click on the View all Outlook settings option and switch to the Calendar tab.
In the Calendar tab, go to the Events and invitations tab and make a tick in the End appointments and meetings early checkbox.
Following that, select a time from the drop-down list, and click the Save button.
That’s all!
Leave a Reply