Google Chrome is among the most popular browsers right now and with good reason. Google has invested much time and money to make it the fastest and most secure browser ever. Large companies such as Microsoft have adopted Chromium to make their own browsers even better. About 67% of the browser usage share is Chrome alone. That does not include the usage of Chrome on mobile devices.
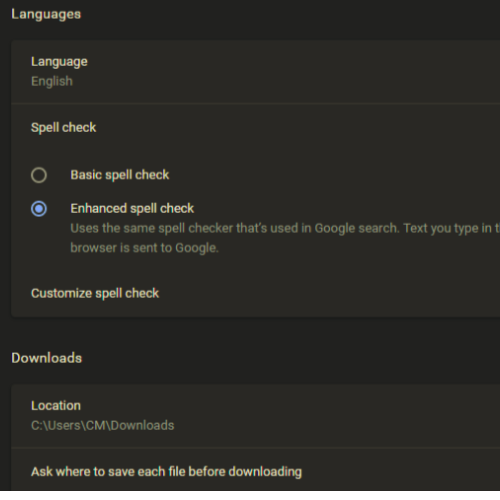
Google Chrome comes with both a basic and enhanced spell checker, the latter of which is powered by the tech used in Google Search. This is a very powerful option that can help you type better and faster while in Chrome.
How to enable Spell Checker in Google Chrome

To enable the spell checker in Google Chrome browser in just a few simple steps follow these steps:
- Startup Google Chrome
- Click on the menu button in the top-right corner. A drop-down menu will appear, showcasing all the different actions that you can perform.
- Locate and click on the Settings option in the drop-down menu.
- Click on the Advanced option in the sidebar, and in the options that appear below it
- Click on the Languages option.
- In the Languages section, click on the Spell Check button, which can toggle whether it is on or off. In our case, we want it turned on, so make sure that it is blue.
- Upon turning on the Spell Check option, two options will show up, allowing you to choose which type of Spell Check you desire to use.
- Click on the Basic or Enhanced Spell Check option based on your needs.
That’s it! You can continue using Chrome and spell check to ensure you get no word wrong.
When you are typing extremely quickly, are an inexperienced typer, or don’t have English as your first language, you will often make quite a few mistakes. This is easily remedied by improving your typing, but having a good spell checker can be extremely helpful. It can ensure that your work can look the best it possibly can, while all you have to do is type out the content.
This guide should hopefully have enabled you to start typing better inside of Chrome and improve your productivity tenfold.
Enable Windows Spellchecker in Chrome browser
To enable this feature in Google Chrome, follow the below steps:
First of all, fire up the Chrome browser.
Now move to the address bar, type the following text, and then hit the Enter key.
chrome://flags/
This will open the flag page and start showing the available flags.
In the search box, type the below command and then hit Enter.
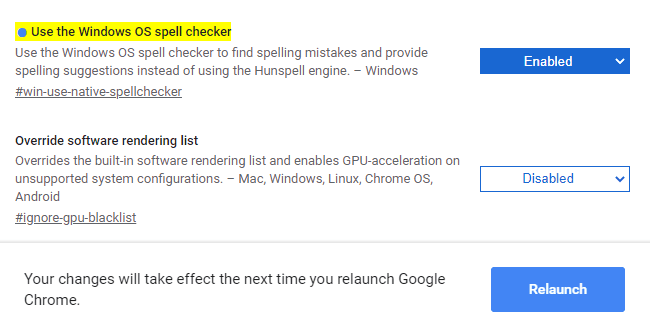
#win-use-native-spellchecker
Alternatively, you can use the below link to open the flag directly –
chrome://flags/#win-use-native-spellchecker
Look for the flag highlighted in the bright yellow at the top of the list, i.e. Use the Windows OS spell checker.
The flag is currently set to the Default mode that indicates the flag is disabled at that time.
To enable it, click on the corresponding drop-down menu and switch the Default option to Enabled.

In addition, to use Hunspell engine, type the given code text in the URL bar and hit Enter –
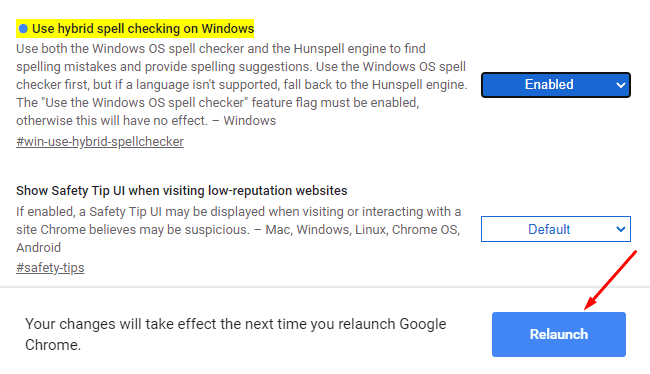
chrome://flags/#win-use-hybrid-spellchecker
Its description says-
Use both the Windows OS spell checker and the Hunspell engine to find spelling mistakes and provide spelling suggestions. Use the Windows OS spell checker first, but if a language isn’t supported, fall back to the Hunspell engine. The “Use the Windows OS spell checker” feature flag must be enabled, otherwise this will have no effect.

Here it would be best if you restarted your browser to apply the changes. So, click on the Relaunch button.