If you are experiencing a problem where the AutoSave feature has stopped working in Excel, Word or PowerPoint, this article will help you to resolve the issue.
The AutoSave feature is one of the best features in Office programs. It enables you to save your data automatically, so you can avoid losing it in case you forget to save it. But what if AutoSave stops working? This can happen for different reasons, such as the Excel workbook, Word document, or PPT being damaged, AutoSave being disabled, problems with Excel installation, etc.
AutoSave not working in Excel, Word or PowerPoint
Here are the methods to fix if the Auto Save feature is not working in Microsoft Office programs like Excel, Word or PowerPoint. While we may have talked about Excel here, the procedure is the same for other Office programs too.
- Ensure that the AutoSave feature is enabled
- Older formats not supported
- Fix corrupted file
- Resave Office Temp files
- Repair/Reinstall Office.
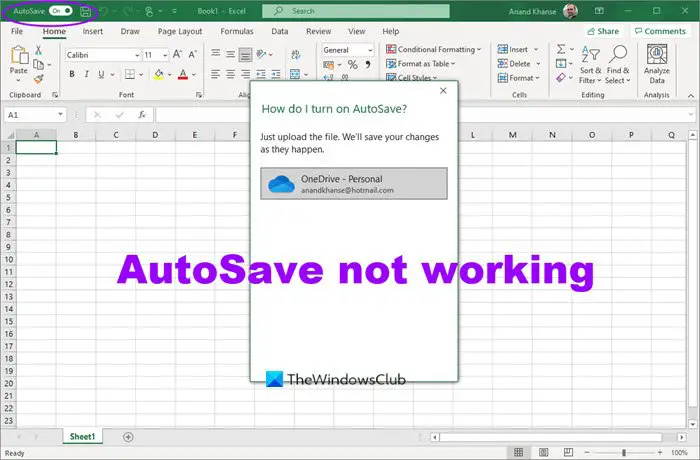
1] Check if the AutoSave feature is enabled
First, you should check that the AutoSave feature is not disabled in Excel. If it is disabled, your Excel files and data won’t be saved automatically.
You can enable it from the top of the toolbar. There, you will see an AutoSave button that you must turn on to save data automatically to your OneDrive account.
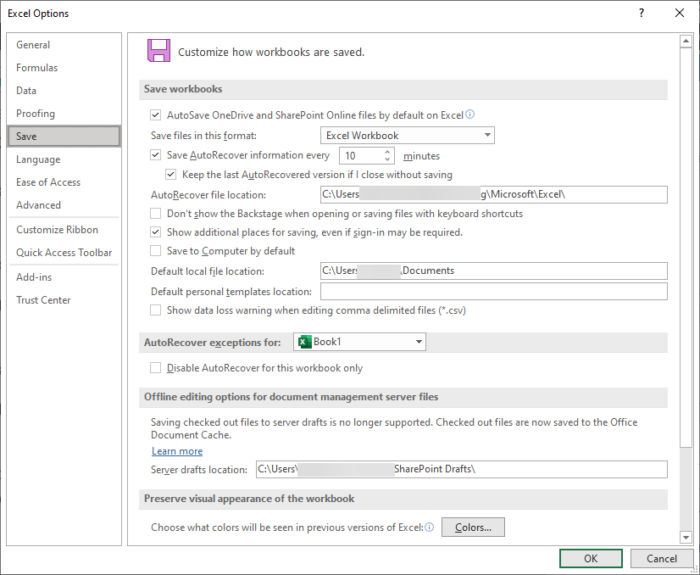
Alternately, you can also go to the File > Options menu, and from the Save tab, enable AutoSave and other related configurations.
You also need to enable Save AutoRecover information every specified minute and enter the auto recover interval. Plus, tick on the Keep the last AutoRecovered version if I close without saving box option too.
If this doesn’t fix the problem, try another method to resolve the issue.
2] Older formats not supported
You should know that the AutoSave feature is not supported in older file formats like .xls, .doc, or .ppt. In this case, you may change the file extension and see if it helps.
3] Fix corrupted file
Your Excel file might be corrupted and thus AutoSave function is not working. So, repair the corrupted Excel file. You can do so by using Excel’s inbuilt repair feature. Here are the steps for that:
- Launch Excel and go to File > Open option and select the file that you want to fix.
- Click on the Open drop-down button and then tap on the Open and Repair option.
- Excel will now prompt you two options including Repair and Extract. You can use the Repair option to fix the corrupted Excel workbook. In case if Repair function doesn’t work, you can use the Extract feature to extract values and formulas from the sheet.
After that, check if this helps in fixing the AutoSave not working issue in Excel.
4] Resave Temp files
If the AutoSave feature is not working in Excel, you can recover your Excel files from temp files. These files are generally present at the following location in Windows 10:
C:\Users\<username>\AppData\Roaming\Microsoft\Excel\
You will see similar folders for Word and PowerPoint here;
C:\Users\<username>\AppData\Roaming\Microsoft\
You can also try looking for unsaved Excel files at another location which is:
C:\Users\AppData\Local\Microsoft\Office\UnsavedFiles
When you find the Excel temp file, resave it with XLS or XLSX extension to recover the workbook.
5] Repair or Reinstall Office
If nothing seems to work in fixing this error, you can reinstall or repair Excel, Word or PowerPoint. A missing component can also cause AutoSave not working error. Hence, you repair the Excel program or choose to reinstall it.
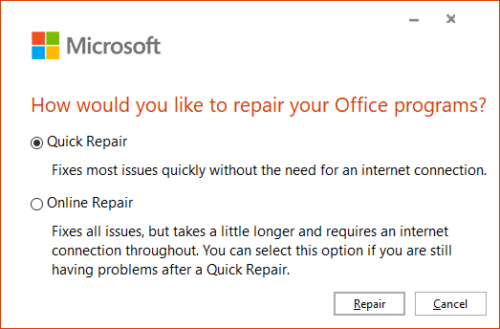
To repair, you can go to the Settings > Apps section, choose the Microsoft Office module, and then click on the Change option. It will ask you to repair the program using two methods which are Quick Repair and Online Repair. Choose one of the two options and click on the Repair button to start repairing Office.
You can also uninstall and then reinstall Microsoft Office and then check whether the AutoSave feature not working problem is still there.
I hope something here helps you.
How do I fix AutoSave in Word?
To fix AutoSave in Word, first ensure your file is stored in OneDrive or SharePoint; AutoSave only works with these cloud services. Then, check that AutoSave is toggled on in the top left corner of the document. Update Microsoft Office to the latest version, as this can resolve common issues.
Why is my AutoSave not working in Excel?
If AutoSave isn’t working in Excel, it may be due to unsupported file features. Ensure the Shared Workbook feature is off, remove any password protections, disable restricted access, and avoid the “Refresh data when opening” option. These steps can help activate AutoSave and ensure your work is automatically saved.
