Generally, high CPU or Disk usage is a common issue on Windows 11 or Windows 10 PCs, with each instance exhibiting unique symptoms and underlying causes; albeit common solutions applies in some cases. This post covers the applicable solutions to Avast Service High CPU and Disk Usage on Windows 11/10.
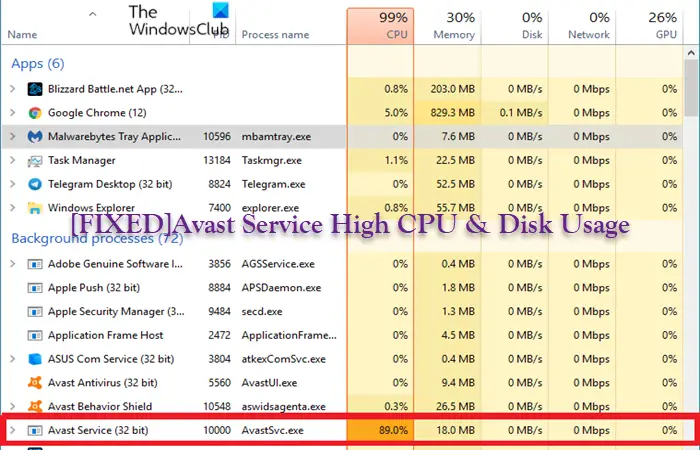
Avast Service High CPU & Disk Usage
If you’re experiencing Avast Service High CPU and Disk usage on your Windows 11/10 PC, you can try our recommended solutions presented below in no particular order and see if the issue is resolved on your device.
- Initial checklist
- Modify Avast Scan Frequency
- Disable Mail Shield
- Troubleshoot in Clean Boot state
- Uninstall Avast Cleanup Tool component and non-essential add-ons
- Disable Avast Updater Notifications
Let’s take a look at the description of the process involved concerning each of the listed solutions.
1] Initial checklist
Before you try the solutions below, you can carry out the following tasks, and after each task see if the Avast Service High CPU & Disk Usage has been restored to normalcy:
- Restart PC. In the course of normal usage of your computer, there will be a buildup of processes and services running in the background even when you have exited a number of programs which can potentially cause the CPU and/or disk usage to spiral out of control. In this case, the easiest way to get the PC in normal operating mode is a simple restart.
- Stop Avast from running at startup or in the background. Avast uses very low amount of RAM and disk usage but gives you high scanning speed and detects malware instantly. However, if you are somehow dealing with Avast service high CPU problem, then you may have to completely stop Avast from running at startup and as well stop Avast from running in the background.
- Stop Avast Screensaver Scanning. In some cases, Avast screensaver causes high CPU usage. So, you can check and stop Avast Screensaver Scanning by right-clicking on any file on the desktop and select Scan file with Avast from the context menu, and in the window that opens with the scans currently running, look for Avast Screensaver scan and click the Stop button
- Update Avast. We cannot overemphasize that an outdated app version will most likely cause problems for you on your PC. So, you can make sure Avast is up to date by running the executable file located in C:\Program Files\AVAST Software\Avast\AvastEmUpdate.exe or by right-clicking the icon on the taskbar and select Update on the context menu or via the Update tab of the PC security software settings – make sure you restart your computer after the update. Also, you can update Windows accordingly to make sure there are no compatibility issues between the OS and the app build/version.
2] Modify Avast Scan Frequency
After the initial checklist and the issue in hand is not resolved, your next line of action can be to modify Avast Scan Frequency – by setting the scan frequency to the maximum, the background checks and monitoring will be disabled and will only run once in a while. Keep in mind that this action will compromise security, but it can ensure that CPU usage will return to normal.
To modify Avast Scan Frequency, do the following:
- Press Windows key + E to open File Explorer.
- Navigate to the directory path below:
C:\Program Files\AVAST Software\Avast
- At the location, check for a file named avast5.ini.
- Open the file with Notepad or any Text Editor.
- Now, insert the text below at the end of the file:
[GrimeFighter] : ScanFrequency=999
- Save and Exit Notepad.
- Restart PC.
If you’re not comfortable with the PC security implications of this solution or it just didn’t help with the issue, you can try the next solution.
Read: Windows Defender is blocking Avast antivirus
3] Disable Mail Shield
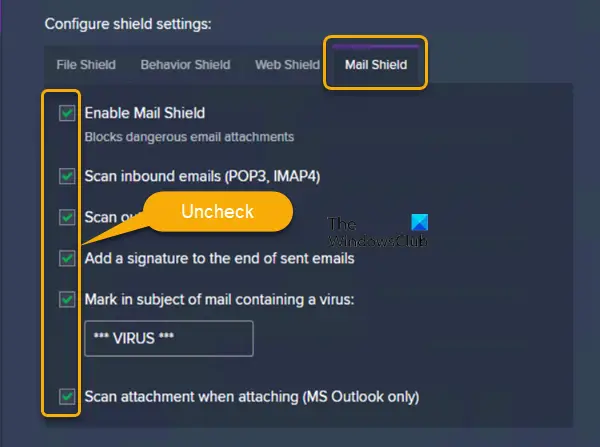
Mail Shield, one of the Avast Core Shields is known in some cases to be the culprit. In this case, to resolve the issue in view, you can simply disable the Mail Shield. To perform this task, do the following:
- Launch Avast.
- Click the Menu button.
- Select Setting > Protection.
- Click Core Shields from the Protection tab.
- Scroll down to the Configure shield settings section.
- Click Mail Shield tab.
- Now, uncheck all the options and click on Indefinitely if Avast prompts for a time period.
- Restart Avast.
If the issue persists, try the next solution.
4] Troubleshoot in Clean Boot state
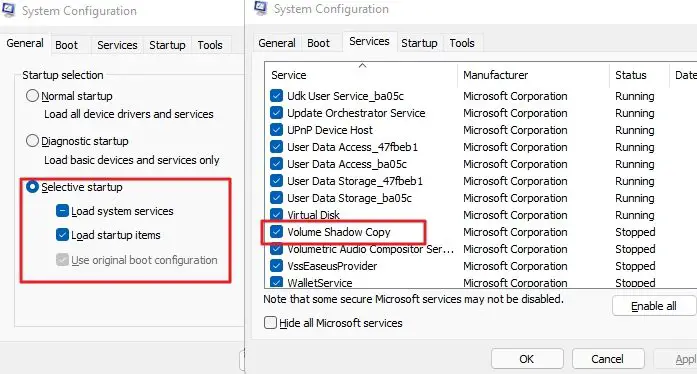
In some cases and usually conflicting third-party programs, processes or services jostling for system resources can spike CPU and disk usage. In this case, you can troubleshoot in the Clean Boot State and see if that helps. If Avast runs smoothly in a Clean Boot state without hogging system resources, then you may need to manually enable one process after the other to identify which processes that are the likely offenders that are causing the issue you’re currently facing; once identified, you need to disable or uninstall the software that uses this culprit process.
5] Uninstall Avast Cleanup Tool component and non-essential add-ons
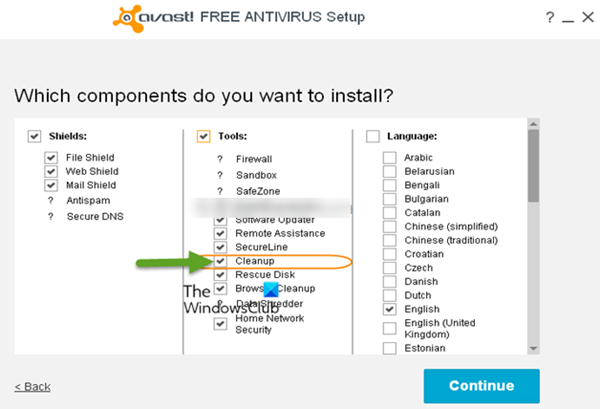
Avast Cleanup tool performs a real-time operation to free some resources allocated by other applications, but besides the tool’s apparent usefulness, it’s known to be a culprit to the issue at hand. This solution requires you to uninstall the Avast Cleanup Tool component and non-essential add-ons that install by default with Avast – these add-ons enhance functionality, but sometimes use up an unnecessary amount of system resources.
To uninstall the Avast Cleanup Tool component, do the following:
- Open Control Panel > Programs and Features > Programs.
- Select the Avast Antivirus entry.
- Click Change and continue when the Setup window appears on the screen
- Next, uncheck the option for Cleanup.
- Click the Continue button. Avast setup will now effect the requested changes.
- Restart PC when prompted.
To uninstall Avast non-essential add-ons, do the following:
- Press Windows key + R to open Run dialog.
- In the Run dialog, type appwiz.cpl and hit Enter to open Programs and Features applet in Control Panel.
- In the applet, right-click on the Avast Antivirus entry in the list.
- Select Uninstall.
- In the window that opens up, click on the Modify option.
- In the next window, uncheck all options except for the Core Shields.
- Finally, click the Change button and wait for the process to finish.
Check if the issue has been resolved. Otherwise, try the next solution.
6] Disable Avast Updater Notifications
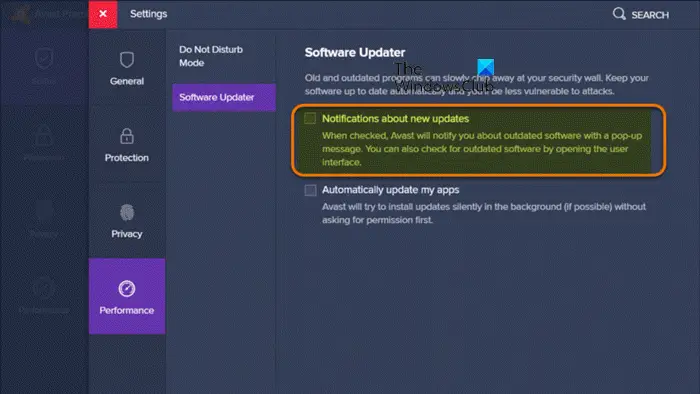
In some cases, the current issue might occur if the Avast Antivirus is trying to send an update notification but due to some sort of glitch the process persists. In this case, to resolve the issue, you can disable the updater notifications. Here’s how:
- Launch Avast.
- Click the Menu icon > Settings.
- Click Performance tab.
- Click Software Updater option from the left pane.
- Now, uncheck the Notification about new updates option.
- Close the window.
That’s it! Any of these solutions should work for you.
Related post: Fix Malwarebytes high CPU and Memory usage
Does high disk usage slow computer?
If your hardware specs are strong enough then high disk usage should not be a cause for concern. If for some reason your PC has a problem with the drives being overworked, this may affect the operating system performance. This issue affects both hard disk drives (HDDs) and solid-state drives (SSDs). To make Avast or most programs installed on your Windows 11/10 PC use less Disk, run Disk Cleanup, Defragment your drive and run ChkDsk, to begin with.
What does high disk usage mean?
High or 100% disk usage means that your disk operations have reached their maximum capacity i.e. it is fully occupied by some or the other Read/Write task. Every hard disk has a specific read/write speed and generally, the sum of the read/write speed is 100mbps to 150mbps. In the case of Avast, the security software performs a lot of real-time operations such as background scanning, virus scanning, computer cleanup, and so on, which can lead to high disk and CPU usage.
Leave a Reply