Every gamer wants to experience smoother and uninterrupted gameplay. A drop in FPS and latency (input lag) are the two most common issues gamers experience while playing video games on a Windows computer. There are many reasons for these two issues, such as overheating, unstable internet connection (in the case of an online game), etc. In this article, we will talk about the best BIOS settings for gaming performance on a Windows PC.

Best BIOS settings for Gaming performance on Windows 11/10 PC
Gaming performance depends on many factors, including software tweaks and computer hardware. Computer hardware plays a major role in making gameplay smoother and better. However, some software tweaks can also help you increase your gaming performance. Here, we will discuss the best BIOS settings for gaming performance on a Windows PC.
There are many tweaks that you can do in your game settings to improve gameplay. In addition, your computer should have supported hardware. Hence, when it comes to BIOS settings, you can tweak your computer BIOS to enhance your gaming performance.
FPS and latency matter a lot when it comes to gaming performance. Hence, you can boost your gaming performance by increasing the FPS and decreasing the latency. The following two BIOS settings will help you increase your gaming performance.
These are the following two BIOS tweaks:
- Disable CPU C-States
- Enable XMP Profile
We will explain these settings for different computers. Before proceeding, let’s discuss what CPU C-States and XMP Profiles are.
C-States are the states when the processor has reduced or turned off the selected functions. Different CPUs support different numbers of C-States. In different C-States, different parts of the processor are turned off. C-States help reduce power consumption. The higher C-States turn off more parts in a processor. By disabling the C-States, you can increase your gaming performance. Do note that, after disabling the C-States, your computer may consume more power.
XMP stands for Extreme Memory Profile. It is an Intel technology that allows users to configure multiple memory settings. XMP profile boosts the speed of the RAM which results in faster data transfer. This ultimately leads to an increase in gaming performance.
Different motherboard manufacturers use different names for this profile. For example, DOCP (Direct Overclock Profile) is an overclocking profile developed by ASUS for AMD motherboards. EOCP (Extended Overclock Profile) is available in some Gigabyte motherboards.
Hence, XMP, DOCP, and EOCP are practically the same.
You can refer to the user manual of your computer or visit the official website of your computer manufacturer to know if your CPU has C-states or not. If it has the C-states, the process to disable them should also be available on the website. Enabling the XMP profile will enhance your gaming experience.
How to enable XMP Profile in BIOS of different computers
Different computers have different methods to enable the XMP memory profile in BIOS. Even different models of the same make of computer may also have a different way of enabling the XMP profile. Here, we have explained the methods of enabling the XMP profile for the computers of the following brands:
- ASUS
- Dell Alienware
- MSI
- Gigabyte
Enable XMP Profile in ASUS
If you have an ASUS desktop or laptop, follow the steps provided below to enable the XMP profile for your RAM:
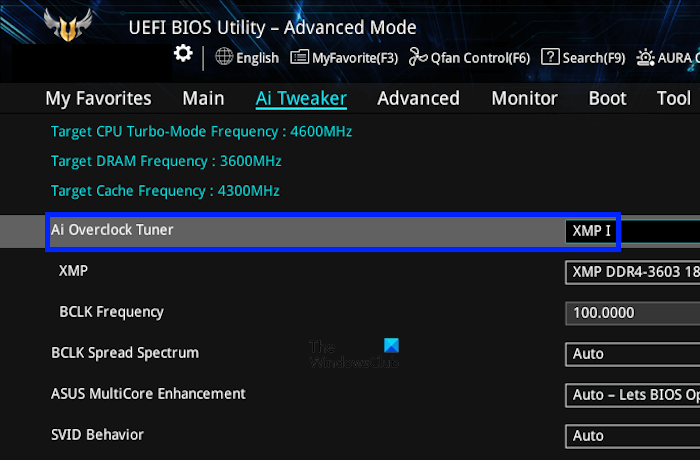
- Enter ASUS BIOS by using the F2 key.
- Press the F7 key to enter the Advanced mode. Or, you can also click on the Advanced mode option on the bottom right side.
- Click Ai Tweaker.
- Select XMP in the AI Overclock Tuner drop-down.
- Save settings and exit.
Enable XMP Profile for your RAM in Dell Alienware
The following instructions will help you enable the XMP Profile for your memory in Dell Alienware.
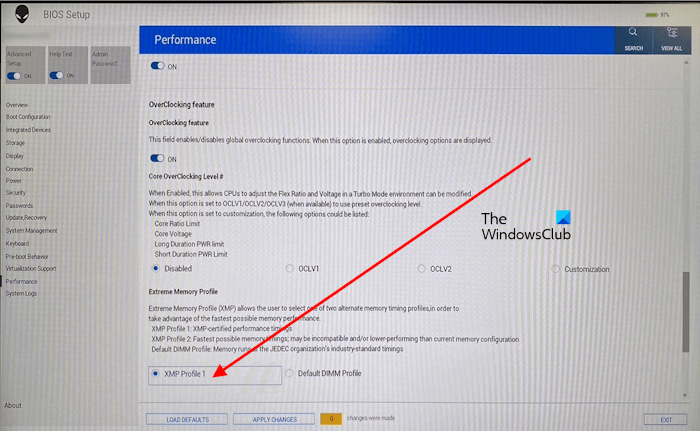
- Enter the Dell BIOS by using the F2 key.
- Go to Advanced > Performance Options.
- Turn on the OverClocking feature if it is disabled.
- You will receive a warning message. Click Yes.
- Select the required XMP Profile under the Extreme Memory Profile section.
- Save changes and exit BIOS.
Enable the XMP Profile in MSI computers
If you have an MSI PC or laptop, the following instructions will help you enable the XMP Profile.
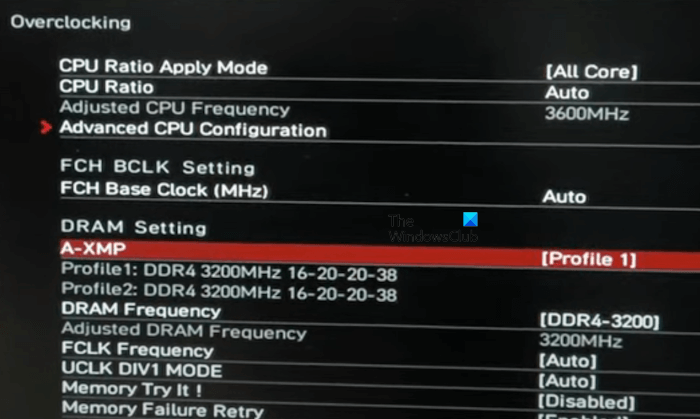
- Enter BIOS.
- Switch to the Advanced Mode by pressing the F7 key or clicking on the required option.
- Select OC from the left side. Here, OC stands for Over Clocking.
- Select the XMP Profile from the right side.
- Save the settings and exit.
Enable XMP Profile in Gigabyte motherboard
Follow the steps provided below:
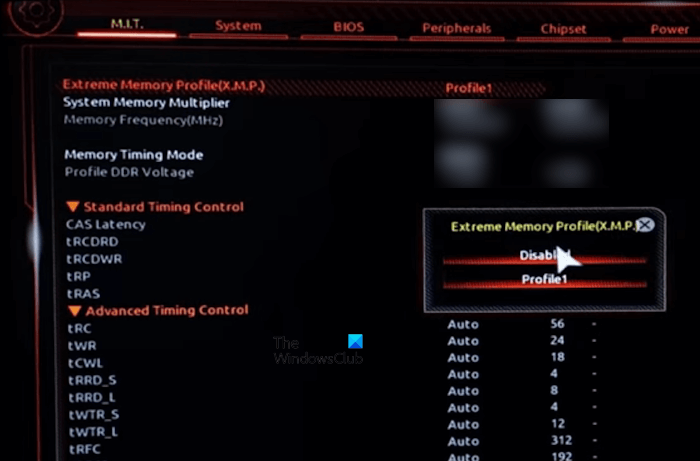
- Enter Gigabyte BIOS.
- Enter the Classic or Advanced Mode.
- Select Advanced Memory Settings under the MIT tab.
- Enable the Extreme Memory Profile (XMP).
- Save changes and exit BIOS.
You can also change the Fan settings in your BIOS for gaming performance. However, it is not required because your computer is programmed to adjust the fan speed according to the CPU and GPU temperature.
That’s it. I hope this helps.
Read: Free Game Booster Software for Windows PC
How to optimize RAM in BIOS?
You can optimize your computer RAM in BIOS by tweaking its various parameters. You should know about this before making any changes. For this, computer manufacturers have created Extreme Memory profiles. You can enable them in your BIOS settings.
Is it safe to enable XMP?
Usually, it is safe to enable the XMP profile in BIOS. The XMP profile is designed by the computer manufacturer to boost the computer’s performance by increasing the RAM speed. It prevents users from making unnecessary changes to different RAM parameters, which can be risky. However, if you experience issues on your system after enabling the XMP Profile, disable it or contact support.
Read next: Best Windows 11 Gaming Settings.