Microsoft Windows Server 2022, released in summer 2021, introduces new features and improvements over Windows Server 2019. This post on Windows Server 2022 Tutorial and Tips will help you configure the OS and make your operating system more efficient to use.

Best Windows Server 2022 Tutorial and Tips
These Windows Server 2022 Tips will help you configure its features and make your operating system optimized:
- Configure the Storage repair speed
- Enable Storage caching on Standalone servers
- Use SMB Compression to quickly transfer your files
- Enable Disk Identification to figure out the health of the disk
- Use Secure Remote Desktop (RDP)
Let us talk about them in detail.
1] Configure the Storage repair speed

When adjusting the storage repair speed, you are setting a priority for the system. Choosing a low repair speed allocates resources to active workloads, while a high repair speed reallocates resources to storage processes. It’s a matter of personal preference, but be cautious not to choose very low or very high repair speeds, as they may not keep up with data changes or could impact production workloads. To configure the storage repair speed, you can follow the steps mentioned below.
- Open Windows Admin Center.
- Click on the drop-down icon.
- Then, select the Cluster Manager option.
- Select the cluster you want to configure.
- Next up, find and click on the Settings icon.
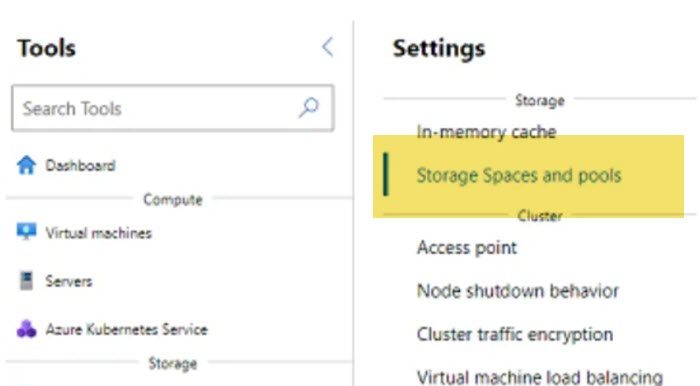
- Go to Storage > Storage Spaces and pools
- Now, simply click on the option for Storage Repair Speed, then select the repair speed you want to use.
This will do the job for you.
2] Enable Storage caching on Standalone servers

In Windows Server 2022, Microsoft now allows storage caching for Windows Storage Spaces even on standalone servers, enabling the use of an HDD as a capacity tier and an SSD as a high-speed tier to boost storage performance. To get this feature working, you need Failover Clustering, at least one SSD, and one HDD. Let us see how to enable Storage caching on Standalone servers.
- Open PowerShell as an administrator.
- Use the following disk to list down your drives.
Get-PhysicalDisk | Select-Object FriendlyName, MediaType, CanPool
- After listing all the drives, we need to install the Failover Cluster using the commands mentioned below.
Install-WindowsFeature -Name Failover-Clustering –IncludeManagementTools
- Next up, we need to install Storage Bus Cache, for that, run the command given below.
Import-Module StorageBusCacheEnable-StorageBusCacheUpdate-StorageBusCache
- Run the following command to check to make sure that the Bus Cache is created.
Get-StorageBusCache cmdlet.
- We need to create a storage pool using the command mentioned below.
$PhysicalDisks = (Get-PhysicalDisk -CanPool $True)New-StoragePool -FriendlyName Pool1-StorageSubsystemFriendlyName "Windows Storage*" -PhysicalDisks $PhysicalDisks
- To complete the process, create a 50 GB non-resilient volume on the MyPool storage pool.
New-Volume -FriendlyName "MyVolume" -FileSystem ReFS -StoragePoolFriendlyName Pool1-ResiliencySettingName Simple -Size 50GB
You can go to learn.microsoft.com to learn more about Bus Cache with Storage Spaces on standalone servers.
Read: How to set up Branch Cache in Windows Server
3] Use SMB Compression to quickly transfer your files

SMB Compression aims to compress network traffic flowing to and from SMB file shares. It makes it easier and quicker to transfer SMB files. However, it does put a lot of load on a CPU, so if your computer lacks processing overhead, we recommend you not use this feature. But if you have ample processing resources, follow the steps mentioned below to enable SMB Compression in the server.
- Open the Windows Admin Center.
- Now, connect to your Windows Server 2022-based file server.
- Next, click on Files and file sharing.
- Switch to the File shares.
- Select the file share you want to configure.
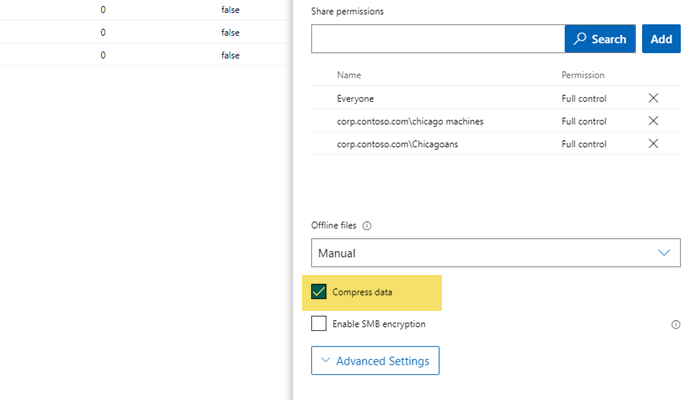
- When the Share Permissions pop-up appears, scroll down, and tick the Compress Data checkbox.
After enabling the feature on the server, we need to configure the client as well. For that, open PowerShell as an admin on your client device and then run the following commands one by one.
New-SMBMapping -LocalPath -RemotePath -Compress Network Traffic $True
New-SMBMapping -LocalPath “F:” -RemotePath “\ServerNewData” -CompressNetworkTraffic $True
Note: Replace ‘F’ with the drive letter you want to map to the Data share on a server and ‘ServerNewDatawith’ RemotePath.
This will do the job for you.
4] Enable Disk Identification to figure out the health of the disk

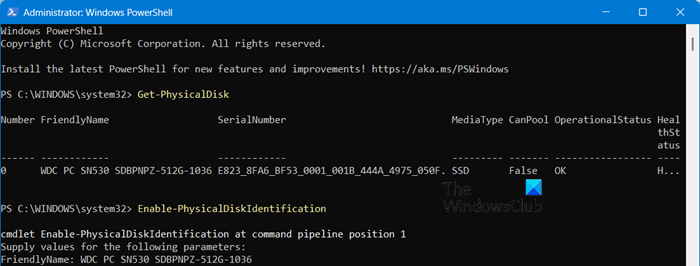
If you suspect that one of your disks is not working or having some health concerns, one of the easiest ways to confirm is by running Get-PhysicalDisk cmdlet in the admin mode of PowerShell. If you check the Health column, you will get to know what is the current health of your device.
However, it is not easy to identify which disk is problematic, so that, you can replace it. To make it easy, we can illuminate the LED attached to your drive. Use the commands mentioned below in the elevated mode of PowerShell to do the same.
$Disk = Get-PhysicalDisk | Where-Object {$_.HealthStatus -ne ‘Healthy’}
$Name = $Disk.FriendlyName
Enable-PhysicalDiskIdentification $Name
After identifying the disk, run the below command to disable this feature.
Disable-PhysicalDiskIdentification $Name
If you get an error when trying to do the same, there is an alternate method that you can try. Here, we are going to Get-PhysicalDisk first, copy the Friendly Name name, and paste it somewhere. Then, run Enable-PhysicalDiskIdentification, it will ask you to enter the Friendly Name, paste the text you copied earlier, and hit Enter.
5] Use Secure Remote Desktop (RDP)
When using RDP (Remote Desktop Protocol), ensure it is not open to the internet. Change the default port, restrict access to specific IP addresses, enforce strong password policies, enable two-factor authentication, keep software updated, configure advanced firewall settings, enable network-level authentication, and set an account lockout policy.
These were some of the best tips, tricks, and setting configurations that you should implement.
Read: WSL Tips and Tricks: Things to do with WSL
How do you optimize Windows Server 2022 performance?
To optimize Windows Server 2022 performance, use Disk Defragmenter and Storage Optimizer to optimize your storage, also, it is recommended to automate defragmentation. Then, if you are going to configure multiple nodes of this server, you should consider adding a few extra GBs of memory as that can go a long way.
Read: Windows 11 Tips and Tricks
What is Windows Server 2022 used for?
Windows Server 2022 is an operating system developed by Microsoft as part of the Windows NT family. It serves various purposes in enterprise environments. You can create various users and roles, configure Active Directory, deploy Web servers, create Hyper-V VMs, and do lots of other things.
Leave a Reply