Windows File Explorer provides a variety of ways to organize the contents of files and folders of the system. Windows users can use some efficient styles to view the contents of the file system as per the user’s requirement. One may opt to display the file picture in large size thumbnails or may prefer to set the icons of files and folders in a small or medium size list. However, while setting up the different styles for the file and folder icons, some Windows users have come across the weird problem of black squares showing up behind the file or folder icons. Even refreshing the File Explorer multiple times is of no help and the black square appears to be a perpetual issue.
![]()
Black background behind File or Folder icons on Windows desktop
While the black squares or boxes behind the folder icons look unsightly, the problem is not a major issue, and it is just a graphical glitch that will not cause any damage to the content of folders and files. The cause of this visual glitch problem can be, corrupted system files or outdated thumbnail caches. The graphical flaws can also occur if users are using an outdated graphics driver. In this article, we explain some solutions to fix the black background problem behind the folder icons in Windows 11/10.
Before you proceed, right-click on the desktop, select Refresh and see if it makes the black boxes fo away. If it doesn’t, Restart Explorer and see. Finally, restart your PC and see. If nothing helps, follow these suggestions.
1] Use Disk Cleanup to remove Thumbnail files
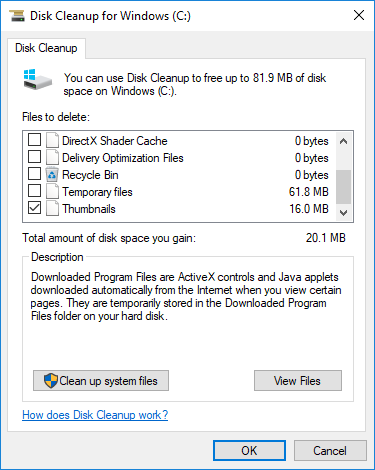
Using the Disk Cleanup tool is one way of fixing the black background problem behind the folder icon by deleting all the Thumbnail files on your disk.
Go to Search bar and type Disk Cleanup. Select the C: drive to clean up from the drop-down menu and click OK.
After the scanning is complete, select the files you want to delete.
Make sure you select the box with the option Thumbnails under Files to Delete section and click on Ok.
In the confirmation box, click on Delete files to permanently delete the files.
Restart the system.
Related: Icons turn black in Windows.
2] Reset Thumbnail Cache
![]()
Users can delete Thumbnail Cache manually to solve the black square background problem behind the folder icon. Alternatively, you could simply use our freeware Thumbnail Cache Rebuilder to reset the cache.
Follow the below steps to manually delete an outdated thumbnail cache.
Go to File Explorer and navigate to View tab. Select the option with Hidden items to display all the hidden files and folders.

Go the following path-
C:\Users\<username>\AppData\Local
Make sure you give your actual username in the field <username>. Now search and locate the filename “IconCache.db”. Right click on the file and click on Delete.
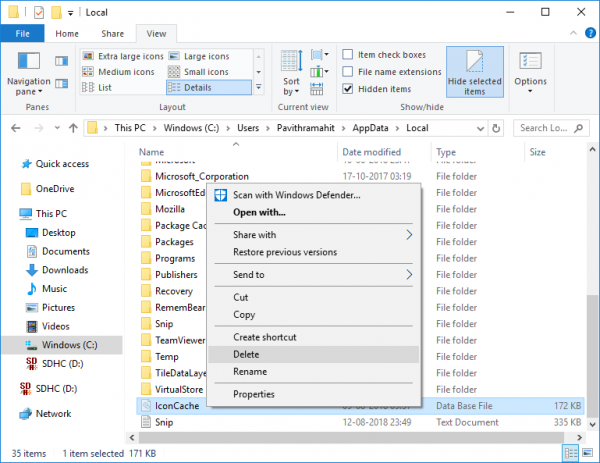
Next, go the following path-
C:\Users\<username>\AppData\Local\Microsoft\Windows\Explorer
Select all the files and delete them.
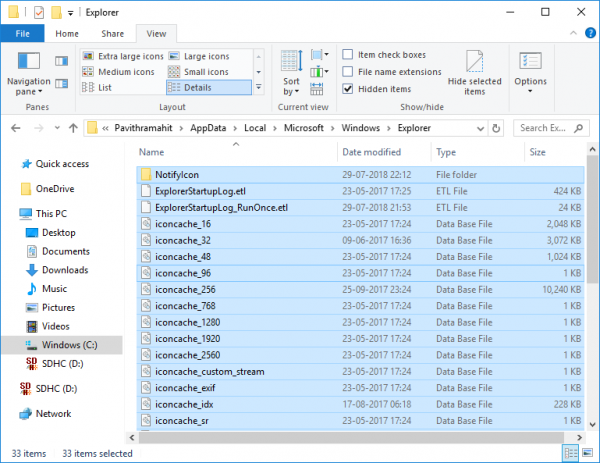
If you are prompted with the window saying that “The files are in use and cannot be deleted”, select the option with “Do this for all current items” and click on Try Again. If you receive an error message, click on Cancel to close the window.
Restart your system.
TIP: FixWin 11 for Windows 11 lets you reset the thumbnail cache. You will find the fix under the System fixes tab.
3] Update Graphics Driver
In Windows 11, to update Graphics Drivers, do the following:
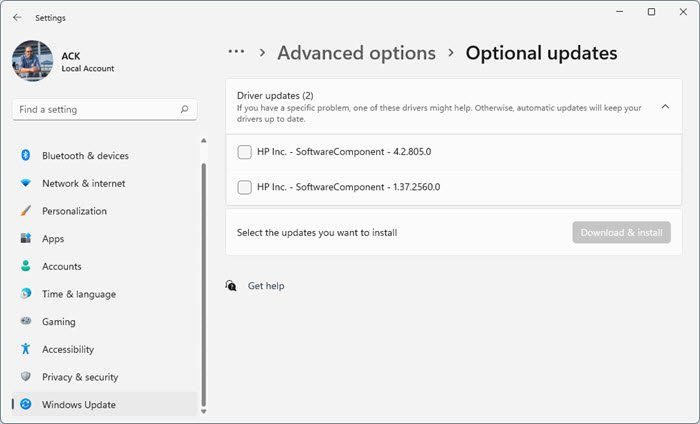
- Launch Windows Settings
- Select Windows Update from the left side
- Click on Advanced options on the right side
- Select Optional updates on the right side
- Expand Driver updates to see if any Graphics or other driver updates are available.
To update Graphics Drivers, using Device Manager, do the following:
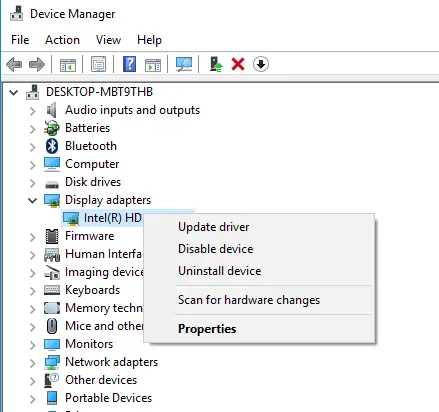
- Click on Display Adapters and expand the section.
- Right-click on the graphics card and click on Update driver from the drop-down menu.
- Click on “Search automatically for updated driver software” in the Update Driver pop-up window to install the latest updates.
Some of you may want to use free Driver Update software or tools like AMD Driver Autodetect, Intel Driver Update Utility or Dell Update utility to update your device drivers. NV Updater will keep NVIDIA Graphic Card Driver updated.
I am sure that one of these suggestions will help you.
Read: VirtualBox displays Black screen and not Booting guest OS.
Windows 10 has a dark themed UWP File Explorer app built in. You need to create a new shortcut on the desktop and either copy and paste (or type) this into the location box:
explorer shell:AppsFolderc5e2524a-ea46-4f67-841f-6a9465d9d515_cw5n1h2txyewy!App
Click Next and give it a name, like Explorer or Dark Explorer. Then click Finish and double click the new icon and you have the hidden dark UWP File Explorer.
Next major update of Windows 10 will have a proper dark Windows File Explorer.
Covered here – https://www.thewindowsclub.com/universal-touch-optimized-file-explorer-windows-10 :)