Outlook enables users to block or unblock senders from sending emails in just a couple of clicks. However, certain domain entries that appear in the Blocked Senders list might go missing when you check the Blocked Senders list in Outlook Web App.
Blocked Senders entries are missing in Outlook
When the blocked senders’ entries in Outlook are not visible, the missing entries may not be moved to the Junk E-mail folder or not filtered when the email client is not running. So, if you don’t see the entries for blocked senders in your Outlook Web App, add @ sign at the beginning of the Blocked Senders domain entries. This fixes the issue. Here’s how it’s done!
- Go to the Home
- Switch to Delete section under Home
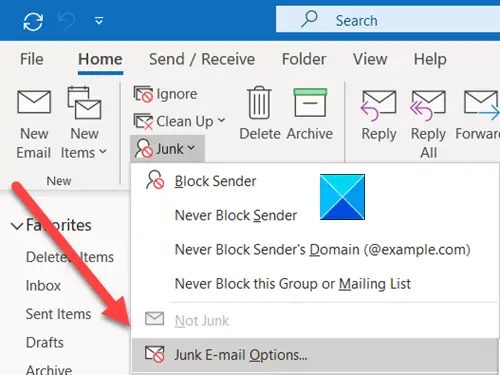
- Hit the Junk drop-down list.
- Select Junk Email Options
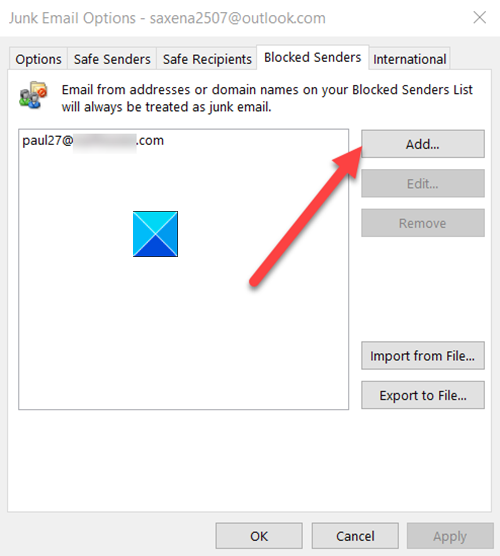
- Switch to the Blocked Senders
- Select Add.
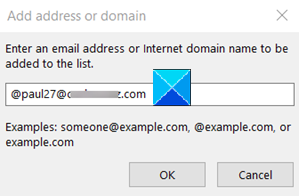
- Enter the email address (include @ sign at the beginning of the entry).
See the steps below for more detailed instructions.
To add a Blocked Senders domain in Outlook, go to the Home tab (located in the upper-left corner).
Under the Delete section of the Home tab, hit the Junk drop-down list.

Then, from the list of options displayed, choose Junk E-mail Options.
In the new window that opens, switch to the Blocked Senders tab.

Next, select the Add option.

Enter an email address or an Internet domain name to be added to the list. Don’t forget to include an @ sign at the beginning of the entry if you want it to also appear in your Outlook.
In the end, select OK, hit the OK button and then, exit the Junk E-mail Options dialog box.
Your issue should be resolved!
That’s all there is to it!