If you find that your Bluetooth mouse is connected but does not work on Windows 11/10, this post may help you. Sometimes, a Bluetooth device shows a healthy connection with your computer but does not work. If this issue occurs on your computer, the first thing that you should do is restart your computer. In some cases, restarting the device solves the issue.
If restarting the device does not help, try the troubleshooting methods explained in this post. But before you proceed, we recommend you check the following points for your Bluetooth mouse:
- It should be completely charged.
- If it runs on a non-rechargeable battery, make sure that the batteries are not drained or dead. Replace the batteries if they are drained out.
- Make sure that your mouse should not be out of range.
- Does this mouse work on another PC? Does another mouse work properly on this PC?
Bluetooth mouse is connected but does not work on PC
If you find that your Bluetooth mouse is connected but does not work on Windows 11/10 then take these steps to get rid of the problem:
- Turn Off and On the Bluetooth.
- Toggle the Airplane mode.
- Run the Bluetooth Troubleshooter.
- Remove the Bluetooth device from Devices and Printers and add it again.
- Check in Clean Boot State.
Wireless Mouse not working in Windows 11/10
1] Turn Off and On the Bluetooth
Windows 11
Windows 11 users can easily turn the Bluetooth on or off from the Quick Settings menu. Simply click on the area of the Taskbar where Wi-Fi, sound, and battery icons are available and click on the Bluetooth button.
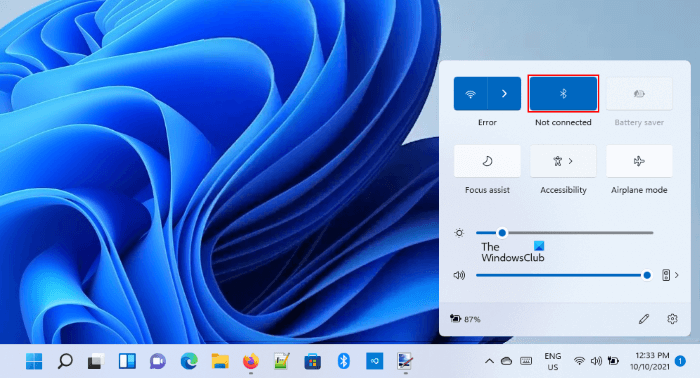
You can also turn the Bluetooth on or off from Windows 11 Settings. The steps for the same are listed below:
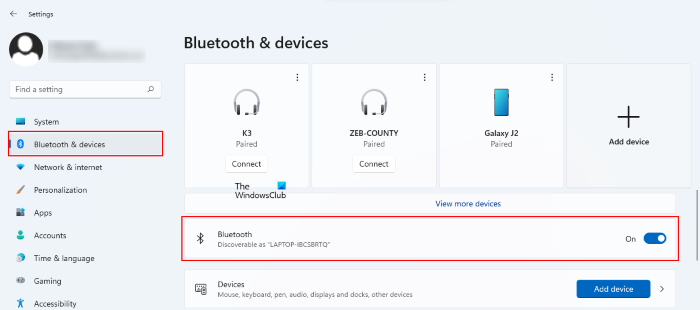
- Right-click on the Windows 11 Start menu and select Settings.
- In the Settings app, select Bluetooth & devices from the left pane.
- Now, click on the Bluetooth button to turn the Bluetooth on or off.
Windows 10
The first step that you should do is toggle the Bluetooth of your system. The steps to do so are listed below:
- Right-click on the Start menu and select Settings to launch the Settings app.
- Click Devices.
- Click Bluetooth & other devices on the left pane.
- You will see a toggle switch under Bluetooth on the right pane.
- Click on it to turn Bluetooth Off. Wait for a few minutes and click again to turn Bluetooth On.
Check whether you can use your mouse or not.
Read: Bluetooth keyboard paired but not working on Windows
2] Toggle the Airplane mode
In Windows 11, you can easily toggle the Airplane mode from the Quick Settings menu. If the button to toggle the Airplane mode is not available there, you have to customize the Quick Settings menu. Alternatively, you can also turn the Airplane mode on or off from Windows 11 Settings app.
Some Windows 10 users were able to use their Bluetooth mouse after toggling the Airplane mode of their system.
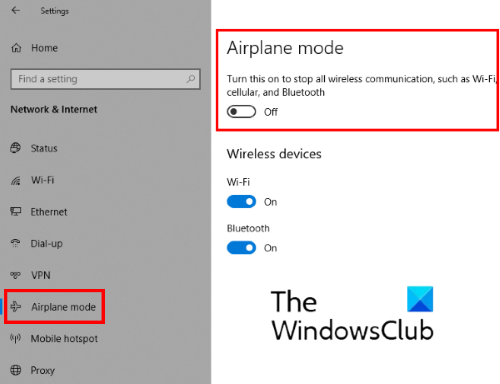
The below steps will help you with that:
- Launch the Settings app.
- Click on the Network & Internet option.
- Select Airplane mode from the left pane.
- On the right side, you will see a toggle switch under the Airplane mode. Click on it to turn the Airplane mode On.
- Wait for a few minutes and click again on the same button to turn Off the Airplane mode.
Alternatively, you can turn the airplane mode on and off directly by clicking on the Notifications button.
After toggling the Airplane mode, check if the Bluetooth device works.
3] Run the Bluetooth Troubleshooter
You can also try to run the Bluetooth Troubleshooter and see if it helps.
The steps to launch the Bluetooth Troubleshooter on Windows 11 are listed below:
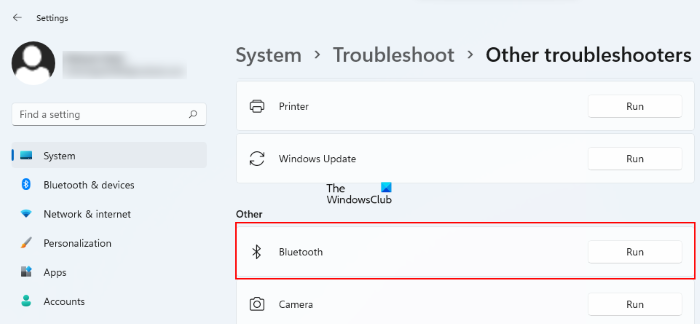
- Press Win + I keys to launch the Settings app.
- Select System from the left pane and scroll down the right side till you see the Troubleshoot tab.
- Once you find the Troubleshoot tab, click on it.
- Now, click on the Other troubleshooters tab.
- Click on the Run button next to the Bluetooth. This will launch the Bluetooth troubleshooter on your Windows 11 computer.
The following steps will guide you on how to run Bluetooth Troubleshooter on Windows 10:
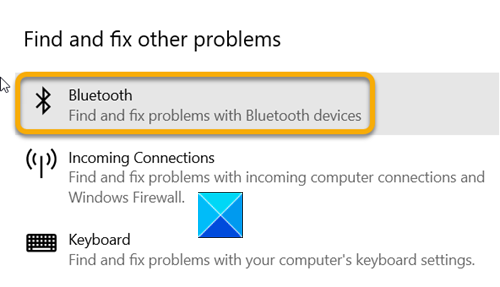
- Launch the Settings app.
- Click on the Update & Security.
- Select Troubleshoot from the left pane.
- Click on the Additional Troubleshooters link on the right side.
- Scroll down the list and find Bluetooth. Once you find it, click on it, and then click Run the Troubleshooter.
The troubleshooter will fix the Bluetooth problems on your device. After the troubleshooting is completed, check whether the problem is fixed.
4] Remove Bluetooth device from Devices & Printers and add it again
If the above methods did not solve your issue, you can try removing your Bluetooth mouse and adding it again. You can remove a Bluetooth device from your computer via:
- Settings app
- Control Panel
How to remove a Bluetooth device via the Settings app
Windows 11
The following steps are for Windows 11 users:
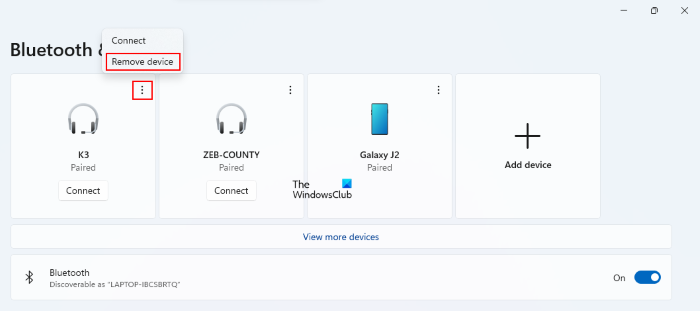
- Launch the Settings app.
- Select Bluetooth & devices from the left side.
- Find your device there and click on the three vertical dots, and select the Remove device option. Click Yes in the popup window.
Windows 10
The following steps will help you remove the Bluetooth device from Windows 10 via the Settings app:
- Launch the Settings app and click on the Devices.
- Select Bluetooth & other devices from the left side.
- Select your device from the list of Bluetooth devices and click on the Remove device option. Confirm by clicking Yes in the popup window.
How to remove a Bluetooth device from the Control Panel
Now, let’s see the process to remove a Bluetooth device from the Control Panel. The steps that we will describe here will be applicable for both Windows 11 and Windows 10 computers:
If the above methods did not solve your issue, you can try to remove the Bluetooth mouse and add it again. The steps to do this are listed below:
- Press Win + R keys and type Control Panel. After that click OK. This will launch the Control Panel.
- Switch the View by mode to Category.
- Click View devices and printers. You will find this option under the Hardware and Sound section.
- Right-click on your Bluetooth mouse and select the Remove device option. Click Yes.
- After removing the device, click Add a device button. You will find this button on the top left side in Devices and Printers.
- After that, Windows will start searching for all the available Bluetooth devices. Select Your Bluetooth mouse from the list and click Next.
This will reconnect your Bluetooth mouse with your computer. Now check if the mouse is working or not.
5] Check in Clean Boot State
If none of the above methods helped you, try to Clean Boot your system. After that disconnect your Bluetooth mouse and add it again. If it works, then some 3rd-party process is interfering with your device. You need to isolate and eliminate it.
How do I fix my Bluetooth mouse not working?
If you start facing an issue where your Bluetooth mouse does not work properly or disconnects randomly, first, you should check if the mouse batteries are expired or dead. If yes, replace the batteries. Another reason for this issue is the corrupted or outdated drivers. Therefore, we suggest you update your Bluetooth mouse drivers from the Device Manager.
We also suggest you check the Power Management settings of your Bluetooth mouse and stop Windows from turning off your device to save power.
Why is my mouse connected but not working?
If you have a wired mouse, ensure the wire is not damaged. You can also check whether or not your mouse has malfunctioned by connecting it to another USB port or computer.
If you are using a wireless or Bluetooth mouse, check if its battery is drained. Also, check if you have accidentally turned on the Airplane Mode. Turning on the Airplane mode automatically turns off the Bluetooth.
Read this if your Bluetooth Mouse scroll is not working.
To fix the issue, you can try the troubleshooting methods described in this article or reset your mouse settings to default.
I hope this helps.
Related post: Bluetooth devices not showing, pairing or connecting.