With all the modern working environments, the need to keep different devices for work and personal use has almost been eliminated. Having the same device for work and personal use not only lets you work from anywhere but also lets you switch from work to personal accounts easily. This entire setup is called Bring Your Own Device or BYOD.
If you implement BYOD policies in your company, you will save some real money. Also, your employees will feel more comfortable working from their existing laptops or mobiles. In this post, we’ve covered how to set up Bring Your Own Device on Windows 11/10.
Bring Your Own Device Setup and Settings
Windows 11/10 comes with built-in functionality to accommodate your work and school accounts. You can quickly set them up and start using your email and other applications with those accounts.
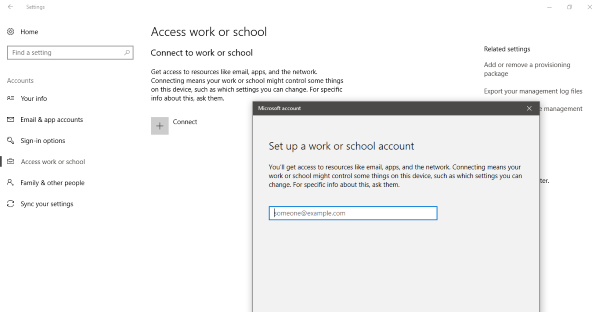
To set up a Work or School account, go to ‘Settings’ and then open ‘Accounts’. Now choose ‘Access work or school’ from the left menu.

Hit the Connect button and wait for a pop-up window to load. Enter the email address associated with your work/school account. Remember that this option only supports accounts using Office 365 or other business services from Microsoft. Once you are logged in, you can take benefit of all the features of your Work/School Account.
You can follow these steps if you want to sign in with any other account.
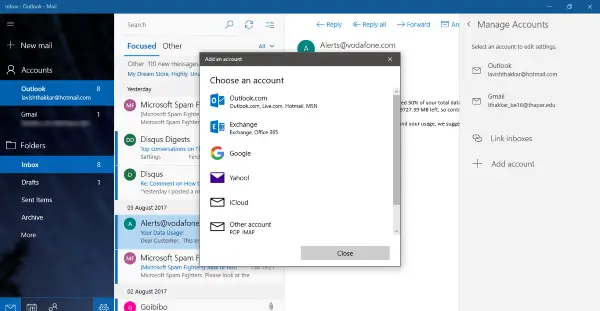
Open the’ Mail’ application to set up an email for your Work account. Click the ‘Settings’ icon and select ‘Manage Accounts’ from the menu. Now hit the ‘Add Account’ button and select the account type.

In this case, it is a custom domain Google Account. So, select your account type and log in using your credentials. You can easily switch between inboxes by selecting the desired account from the left panel. You can also write emails from any of your personal or work accounts. The Windows Mail app works amazingly well and makes it a lot simpler to manage different accounts.
Similarly, you can access your events and important meetings from the Calendar application. The account you added using the Mail app will automatically show up here in the Calendar app. Or you can manually add accounts in the Calendar app as well.
That’s was how to set up your computer with your Work accounts. You can add as many of these accounts and enjoy the benefits of BYOD. But we have not implemented BYOD completely. To do so, you may have to ask for the Wi-Fi password at your workplace and connect your computer to that network. And if your company provides you with VPN credentials, you can also set up a VPN by going to ‘Settings’ and then into ‘Network & Internet.
Implementing BYOD on Windows 11/10 is pretty straightforward and basic, and we believe everyone should use it instead of having two devices.
What are the risks of BYOD?
The last includes data theft, malware, legal issues, lost or stolen devices, insufficient employee training, and more. So if the devices are not set up properly, and employees do not know how to use them, it can result in a significant compromise.
What happens if a BYOD device is stolen?
If a device is stolen, not only does it risk personal data, but it also risks corporate data. The best approach is to remote wipe the device and change all credentials related to the account. Apart from that device can also be further restricted from connecting to the corporate network.
Leave a Reply