When trying to use the Camera app on our Windows computers, we encountered an error saying that the Camera is reporting that it is blocked or turned off. This is a very peculiar issue as nobody remembers the last time they manually blocked their camera. In this post, we will discuss this issue and see how it can be resolved.
Your camera is reporting that it is blocked or turned off by a switch or button on your device. Please unblock it or turn the switch on to use it.

Fix Camera is reporting that it is blocked or turned off in Windows 11
If you encounter Camera is reporting that it is blocked or turned off message on your Windws 11/10 PC, follow the solutions mentioned below.
- Remove the camera cover
- Switch on the camera
- Enable disabled camera
- Reboot the computer
- Check if the camera is disabled in Settings
- Repair or Reset the Camera app
- Update or reinstall the Camera driver
Let us talk about them in detail.
1] Remove the camera cover

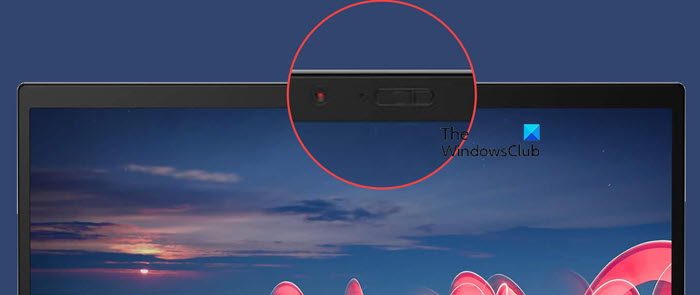
A lot of modern laptops have a lid that covers the camera for added privacy. For example, Lenovo’s Thinkpad has a shutter that one has to open to access the camera. Therefore, you should have a look at your laptop and if there is a cover, go ahead and remove it. Then, open the Camera app, and you will not encounter the same issue.
Read: Camera missing or not showing in Device Manager
2] Switch on the camera
If there is a physical switch to turn on and off your camera, you should see if it’s turned on when you get a pop saying that the camera is turned off. Mostly, this button is found in privacy-centric laptops, but there are some external webcams as well that possess this button. There are some devices, which doesn’t have a physical button to turn on the camera, instead, they rely on keyboard shortcuts that are exclusive to that OEM. So, you can do some research to figure out if there are any shortcuts for your device.
3] Enable disabled camera

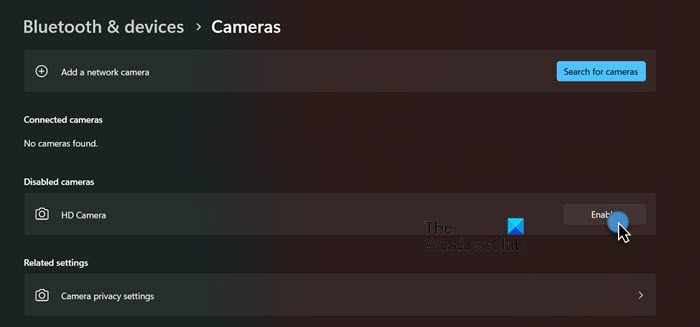
Furthermore, having multiple cameras or a history of using several cameras may result in the one you are attempting to use being disabled. To turn it back on, go to Settings > Bluetooth & devices > Camera. Under Disabled camera, click on Enable icon associated with the camera you want to enable.
So, go ahead and turn the camera on, and see if the issue is resolved.
4] Reboot the computer
Sometimes, Windows can’t detect that you have removed the covering around the camera and throws the same error. To resolve it, go ahead and reboot the computer. Once your computer starts again, check if the issue is resolved.
Read: How to disable Camera using Group Policy or Registry Editor?
5] Check if the camera is disabled in Settings

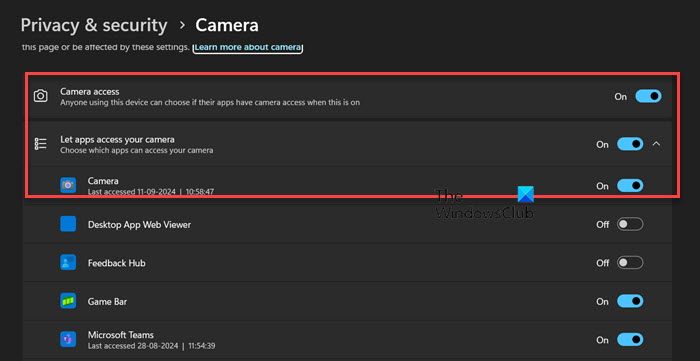
There is a privacy setting in Windows that allows you to disable both the camera and microphone of your computer, which are enabled by default. If it is disabled when you start the Camera app, you will be asked to enable it, in case, you don’t do that, you will encounter the error message in question. To resolve it, we go to the same settings panel and enable the camera. Follow the steps mentioned below to do the same.
- Open Settings by searching it out of the Start Menu.
- Now, go to Privacy & Security from the left panel.
- Scroll down and from App permissions, click on Camera.
- Enable the toggle for Camera access and Let apps access your camera.
- Additionally, enable the toggle for the Camera as well.
Finally, open the Camera app and see if the issue is resolved.
6] Repair or Reset the Camera app

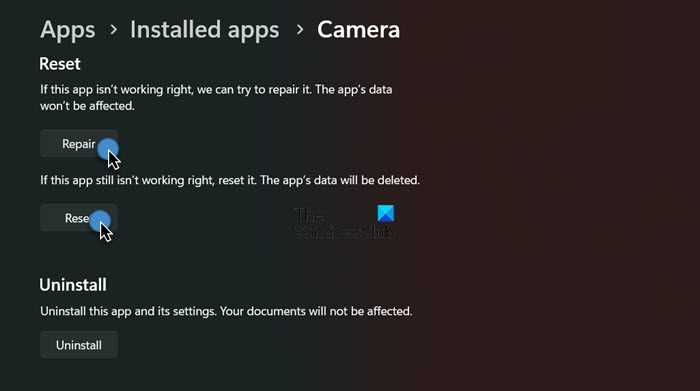
There is a possibility that there is nothing with your camera or the privacy setting of your computer, but the Camera app is corrupted or misconfigured. Hence, we are going to repair the app and if that is to no avail, we will be resetting it. Follow the steps mentioned below to do the same.
Windows 11:
- Open Settings.
- Go to Apps > Installed apps.
- Search for “Camera”.
- Click on the three dots and click on Advanced options.
- Scroll down and click on Repair.
- Check if the issue is resolved, if not, click on Reset.
Windows 10:
- Go to Settings.
- Navigate to Apps > Apps & features.
- Look for the Camera option, click on it, and then on Advanced options.
- Click on Repair and if the issue persists, click on Reset.
Hopefully, this will do the job for you.
7] Update or reinstall your camera driver
In this solution, we will first try updating the camera driver to the latest version to negate the possibility of incompatibility and bugs. In case, updating is to no avail, uninstall the camera driver and then install the latest version from the manufacturer’s website. Now, check if the issue is resolved.
Read: Laptop Camera not working in Windows 11
Hopefully, you will be able to resolve the issue by virtue of the solutions mentioned earlier. In case, the issue persists, contact your laptop’s manufacturer as there can be a manufacturing defect or malfunctioning camera.
Read: Camera not working in – Surface | Skype | OneDrive | Discord | Google Meet | Chrome or Edge | Webex | Zoom | OBS | FaceTime | Lockdown browser.
How do I give permission to my camera in Windows 11?
To alter your camera permissions and give it to an app, go to Settings > Privacy & settings > Camera (from App permissions). Now, enable the toggle for Camera, Let apps access your camera, and finally the app that you want to give permission to your camera.
How do I turn my camera back on Windows 11?
To turn your camera back on, hit Win + S, type “Manage Camera”, and open the app. Go to the camera you want to enable and click on Enable. This will turn the camera back and your issue will be resolved.
Read: Fix Microphone or Camera access is denied in Clipchamp.
Leave a Reply