If your Camera is showing a Lock icon on your Windows laptop, then this post will help you fix this issue. There can be a few reasons for this problem. It might be possible that your antivirus program is blocking the camera, you have incorrectly configured the privacy settings for your camera, etc.
![]()
Camera showing Lock icon on Windows laptop
Use the following fixes if your Camera is showing a Lock icon on your Windows laptop. This issue might be frustrating because you cannot use your laptop camera to join meetings.
- Check the privacy settings
- Check for a camera switch or button on your device
- Run the Camera Troubleshooter
- Rollback camera driver
- Update or reinstall your Camera driver
- Check your antivirus
- Troubleshoot in a Clean Boot State
Let’s start.
1] Check the privacy settings
If your camera shows a Lock icon on your computer, then it might be possible your camera privacy setting is not enabled. Follow these steps to check this.
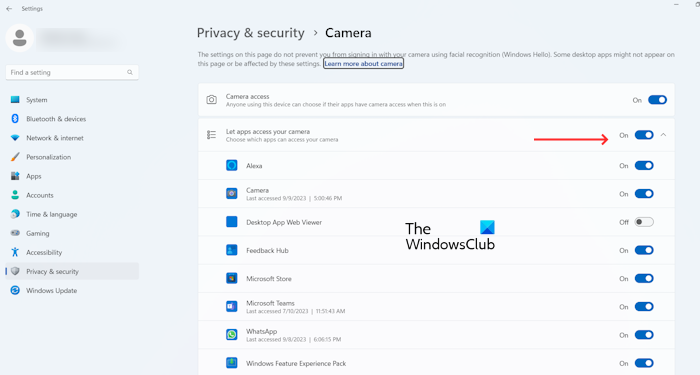
- Go to the Settings.
- Select Privacy & security.
- Scroll down and click on the Camera.
- Then turn on the switch for the required apps to allow camera access.
Check if the issue persists or not.
2] Check for a camera switch or button on your device
Some laptops have a physical button through which the camera can be turned off and on directly. If it is off, your camera screen may show a lock icon. Check the Function keys on your laptop. If there is such a Function key, you will see a Camera icon on the key. Simply press that key and see if it fixes the problem. You have to use that key along with the Fn key.
For example, on my laptop, the camera can be turned on or off by using the Fn + F10 keys.
3] Run the Camera Troubleshooter
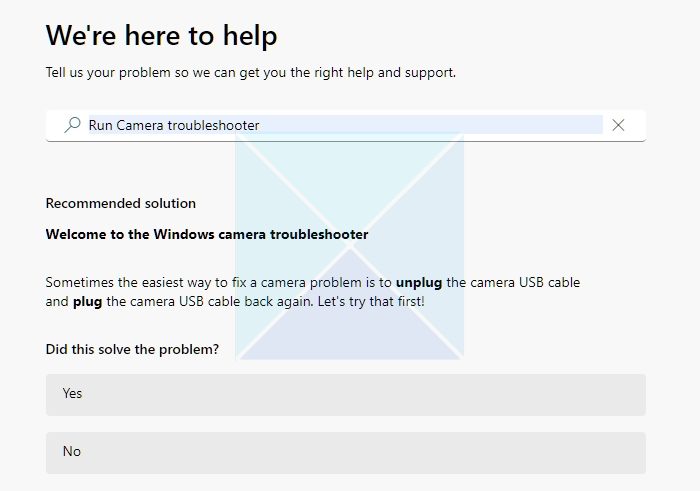
You can also try to fix this problem by running the camera troubleshooter. You can use the Camera Troubleshooter by using the Get Help app. The troubleshooter is an wizard that will help you resolve the issue. When you launch it, you will be asked some questions. Select the right answer based on the issue you are experiencing.
4] Rollback camera driver
When Windows installs updates, it also updates some drivers (if the update for them is available). A new version of the Camera drover may be installed on your system, due to which this issue is occurring. If this is the case with you, you can roll back your camera driver to install its previous version.
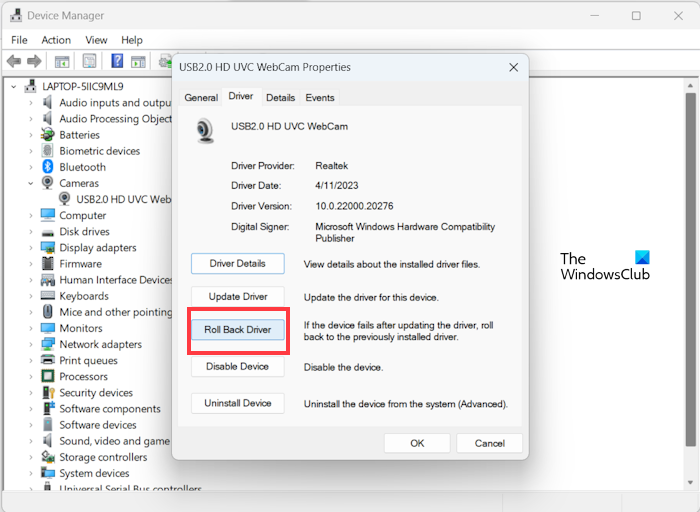
- Open the Device Manager.
- Expand the Cameras branch.
- Right-click on your camera driver.
- Select Properties.
- Select the Driver tab and then select Roll Back Driver option (if available).
- Follow the on-screen instructions to roll back your camera driver.
After rolling back the driver, open the Camera app again and see if it works this time.
5] Update or reinstall your Camera driver
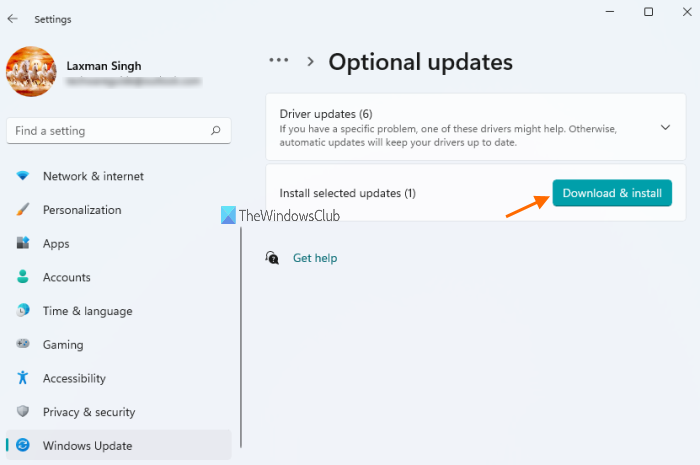
If the rolling back option is greyed out or the issue is not fixed after rolling back your camera diver, updating or reinstalling it can help. You can use the Optional Updates page in your Windows 11/10 Settings to update your camera driver (if an update for the same is available there).
Alternatively, you can also install the latest version of your camera driver from the manufacturer’s website.
If this does not work, reinstalling the camera driver can help. Go through the following instructions to reinstall your camera driver:
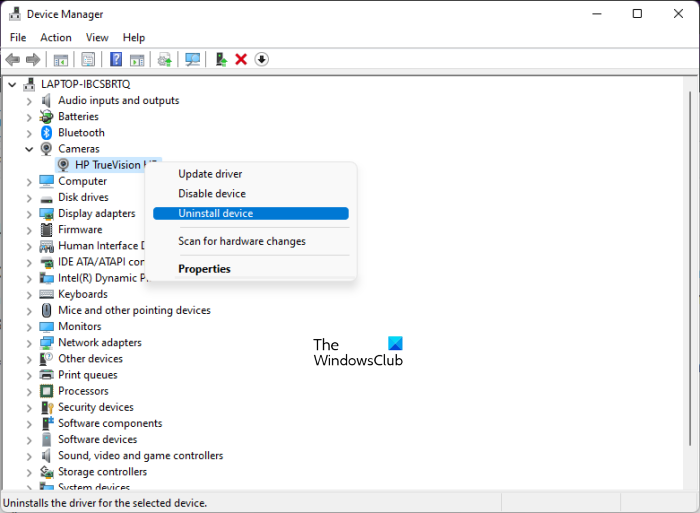
- Go to the Device Manager.
- Expand the Cameras branch.
- Right-click on your camera driver and select Uninstall device.
- After uninstalling your camera driver, restart your computer.
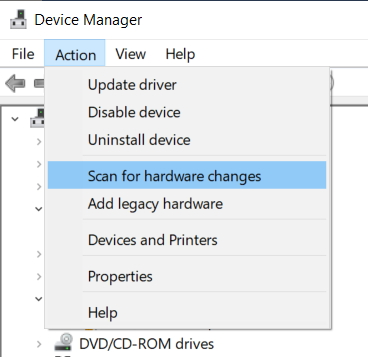
Windows will automatically install the missing driver on restart. Alternatively, you can also scan for hardware changes to install the uninstalled drivers.
6] Check your antivirus
Possibly, it also happens when your antivirus blocks access to your camera. You can check this by temporarily disabling your antivirus software. If this works, your antivirus is calling the conflict. In this case, you must contact your antivirus vendor support to change the settings to unblock the camera.
7] Troubleshoot in a Clean Boot State
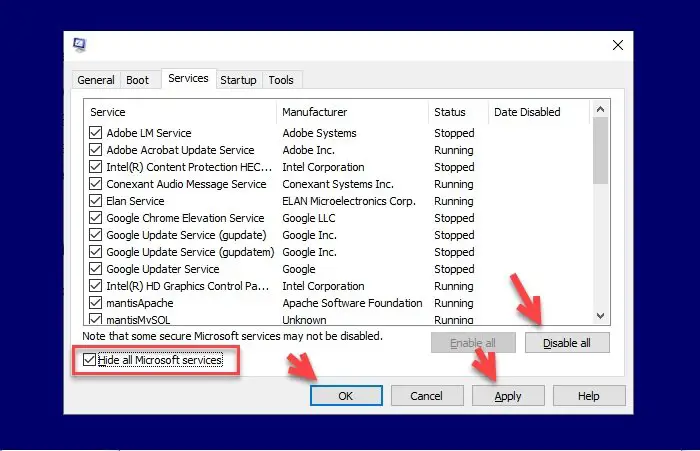
One possible cause of this error is a conflicting third-party application or service. Some third-party apps start automatically when you start your system and keep running in the background. Such apps can sometimes conflict with Windows Services and other applications due to which problems occur. This may be the case with you. You can check this by troubleshooting in a Clean Boot state. This action will start your computer with only Microsoft Services.
After entering the Clean Boot state, open your camera and see if it works or show a lock icon this time too. If your camera is not showing the lock icon, this means a third-party application or service is responsible for this error.
Now, you can identify the problematic third-party application or service. To do so, enable some of your startup apps by using the Task Manager. Now, restart your computer and launch the Camera app. If it shows the lock icon, this means that one of the apps you have just enabled is the culprit. To identify it, disable the enabled apps one by one and restart your computer every time you disable an app. After restarting your computer, launch the camera. When the problem disappears, the app that you have just disabled is the culprit.
I hope the above solutions help you to fix your issue.
How do I enable my camera?
When you open the Camera app, Windows will automatically enable your camera. However, if your camera is disabled, check if there are any special Function keys on your laptop or not. Also, check your camera privacy settings.
Why is there a camera icon on my lock screen?
The camera icon on your lock screen is similar to the Learn about this picture feature in Windows 11/10. When you hover your mouse cursor on this icon on your lock screen, it will show you the information on the Windows Spotlight wallpaper on your lock screen. Windows 11/10 shows it by default. If you want to remove the camera icon from your lock screen, you have to turn off Windows Spotlight for the lock screen in your Windows 11/10 Settings.
Read next: Webcam keeps freezing, crashing or lagging in Windows.
Leave a Reply