On a Windows computer, we can install different fonts. Many websites offer free fonts you can install on your Windows computers for personal and commercial use. If you do not require a particular font, you can uninstall it from Windows Settings. Alternatively, you can delete that particular font file from its default location. But some users have reported that Windows displayed an error message while deleting a particular font file. In short, they cannot delete the font files from their Windows 11/10 computers. This article lists possible solutions to fix this problem.

The complete error message is as follows:
Font file cannot be deleted because it’s in use.
This issue could occur if the font file is a system font. In this case, you will see the following message:
Font file cannot be deleted because it is a protected system font
If it is a system font, you should just drop the idea of deleting it.
Cannot delete Font files in Windows 11/10
If you cannot delete the non-system font files and get this error message Font cannot be deleted because it is in use while deleting the font files on Windows 11/10, you can try the following fixes:
- Uninstall the font from Windows 11/10 Settings
- Check permissions for the font file
- Disable the Details pane
- Stop Windows Font Services temporarily
- Delete the font file from Windows Registry
- Start your system in Safe Mode
Let’s see all these solutions in detail.
Font cannot be deleted because it is in use
1] Uninstall the font from Windows 11/10 Settings
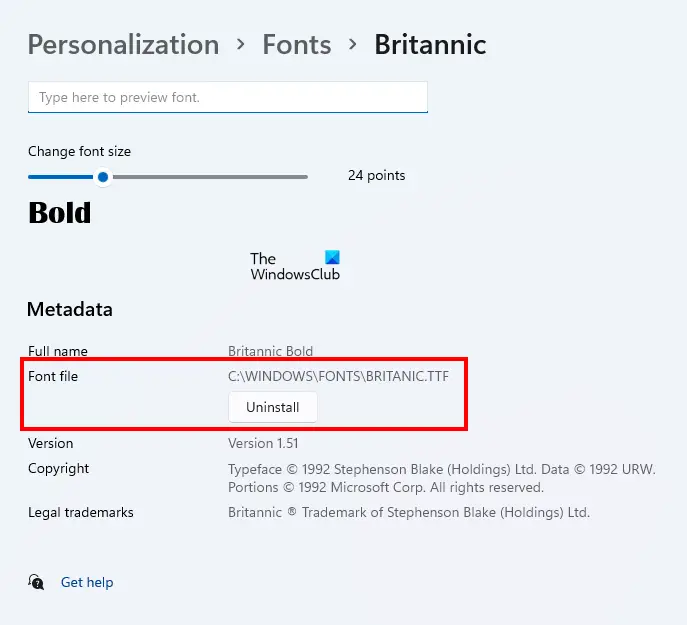
The first thing that you should try is to restart your computer and then, without opening any program, uninstall the font via Windows Settings. If this works, you need not do further troubleshooting described in this article. Uninstalling a font from Windows 11/10 Settings is simple. Open Windows 11/10 Settings and go to “Personalization > Fonts.” Select your font and you will be able to uninstall it.
Uninstalling the font from Windows Settings will also delete it from its default location.
2] Check permissions for the font file
Check if you have full permission for the font file or not. The following steps will help you with that:
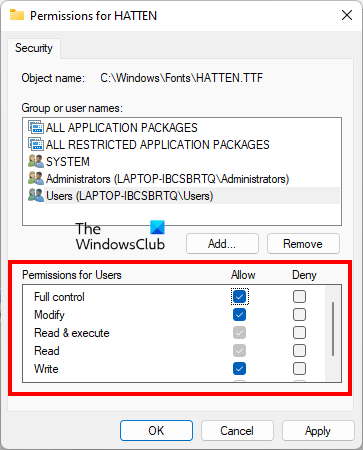
- Right-click on the font file that you are unable to delete.
- Select Properties.
- Go to the Security tab.
- Select your username from the Group or user names section. If your username is not there, select Users.
- Full Control should be allowed for your username or Users. If not, click Edit.
- Now, select your username or Users and select the Allow checkbox next to Full control.
After enabling the Full Control for your font file, check if you can delete it. If not, try other fixes.
3] Disable the Details pane
This trick has resolved the issue of many users. It may also work for you. Disable the Details pane and then delete the font file. By default, the fonts are installed in the following location in Windows:
C:\Windows\Fonts
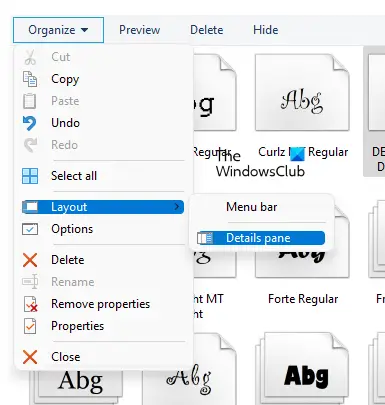
Navigate to the above location and then go to “Organize > Layout.” You will see that the Details pane is checked by default. Click on the Details pane option to uncheck it. This will disable the Details pane. After disabling it, you should be able to delete the font file.
4] Stop Windows Font Services temporarily
Windows is showing you the message that the particular font file is in use, that’s why it cannot be deleted. Here, you can do one thing. Stop the Windows Font Services temporarily and then delete the font file. If you will be able to do so, start the Windows Font Services again.
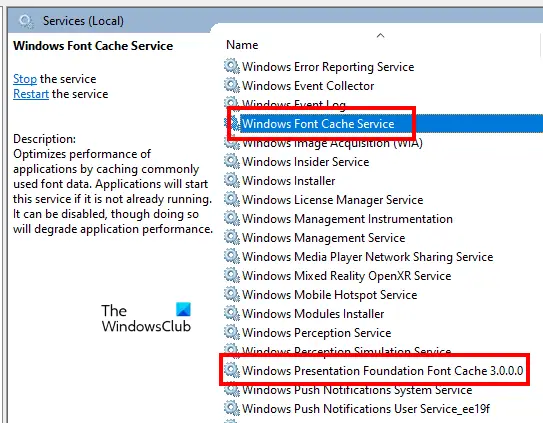
The following steps will guide you on this:
- Open the Run command box by pressing the Win + R keys.
- Type services.msc and click OK. This will launch the Services Management window.
- Locate the following two services and stop them. To do so, right-click on the service and select Stop.
- Windows Font Cache Service
- Windows Presentation Foundation Font Cache 3.0.0.0
- Restart your computer.
- Now, delete the font file.
- If the font file is deleted successfully, open the Services window again and start the two Windows Font Services again. To do so, right-click on them and select Start.
- Restart your computer again.
5] Delete the font file from Windows Registry
You can also delete the font files from Windows Registry. The Registry is the database of your Windows operating system. Therefore, follow the steps mentioned below carefully as any mistake can lead to serious errors. It will be better if you create a System Restore Point or backup your Registry.
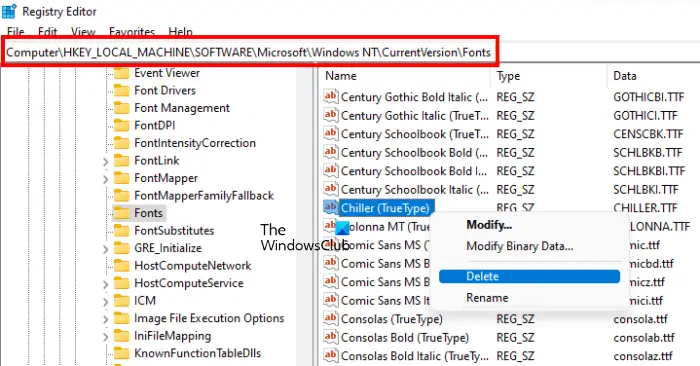
Open the Run command box and type regedit. Click OK. Click Yes in the UAC prompt. This will open the Registry Editor.
Now, copy the following path, paste it into the address bar of the Registry Editor, and hit Enter.
HKEY_LOCAL_MACHINE\SOFTWARE\Microsoft\Windows NT\CurrentVersion\Fonts
All the fonts are listed there in alphabetical order. This will help you locate your font file easily. When you find your font file, right-click on it and select Delete. Close the Registry Editor and restart your computer.
6] Start your system in Safe Mode
If none of the above solutions worked for you, you can delete the font files in the Safe Mode. When you start your system in Safe Mode, all the startup apps, add-ons, etc. remain disabled. Windows Safe Mode is usually used for troubleshooting purposes. According to the error message, the font file cannot be deleted because it is in use. Such types of problems can be fixed in the Safe Mode.
Start your system in Safe Mode, then go to the location where your fonts are located. Now, right-click on the font that you want to delete and click Delete. Click Yes in the confirmation window. The file should get deleted this time without showing the error message. After deleting the font files in Safe Mode, start your system in Normal Mode.
Read: How to fix corrupted Fonts in Windows.
How do I delete protected system fonts in Windows 11?
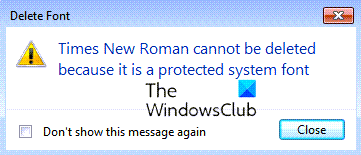
If you try to delete a Windows system font, you will see a message – Font cannot be deleted because it is a protected system font. It is best not to delete system fonts, but should you wish to then you need to take ownership, boot into Safe Mode and then use the Registry method described above in this post.
How do I delete TTF files in Windows 11/10?
A TTF file is a True Type Font file. To delete a TTF file, go to its default location, then right-click on it, and select Delete. The default location of the TTF file is:
C:\Windows\Fonts
If you get an error while deleting the TTF file, you can try to uninstall it from Windows 11/10 Settings. If this does not work, you have to try some troubleshooting methods that we have provided in this article above.
Can I delete font files after installing?
If you do not require the installed font, you can delete it. To do so, open the default install location of fonts on your computer, right-click on the font that you want to delete, then select Delete. Alternatively, you can uninstall the same font from Windows 11/10 Settings. Doing so will also delete that particular font from its default install location.
I hope the suggestions in this post helped you delete the font file.
Read next: Fix Font size problem when working with multiple apps.