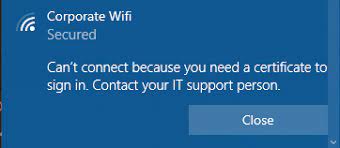
When trying to connect to WiFi, if you receive a Wi-Fi certificate error message — Can’t connect because you need a certificate to sign in to WiFi, then this post will help you resolve it. Some of the users have reported getting this all of a sudden i.e. Windows was already connected to the same WiFi, but the browser then stopped working. It is important to note that the issue doesn’t lie with the browser. Instead, the problem is with the configuration of your WiFi.
Can’t connect because you need a certificate to sign in to WiFi. Contact Your IT support person.
Why does the Wi-Fi Certificate Error happen?
The issue is also limited to the Business environment where the WiFi is set up such that for every connection the server issues a certificate that is used for authentication. If the server doesn’t know the issuer or the client doesn’t know the server certificate or the certificate has changed, then the problem will occur.
The error can occur for reasons such as changes in WiFi security protocols when the time on the PC is out of sync or the network adaptor has an issue. All of these will invalidate the secure connection or any certificate that was used to connect to the WiFi connection.
Can’t connect because you need a certificate to sign in to Wi-Fi
We have a few solutions that will help you to fix this problem occurring on your Windows 11/10 PC. These are:
- Configure Windows Network Profile
- Fix Time and Time Zone
- Ensure Windows Time Service is Automatic
- Reset Network Adapter
- Connect with IT support
Let’s see how to use these solutions to fix your computer’s Windows WiFi certificate error.
1. Configure WiFi Security Profile
If the WiFi Provider or the router you were connected with has changed its security settings, you will need to change accordingly. Especially if the Network is hidden, and you had manually configured it.
Before going ahead, find out the security type that is configured by the admin on the router or the access point. I am assuming you already know the SSID or the Network Name and the password.
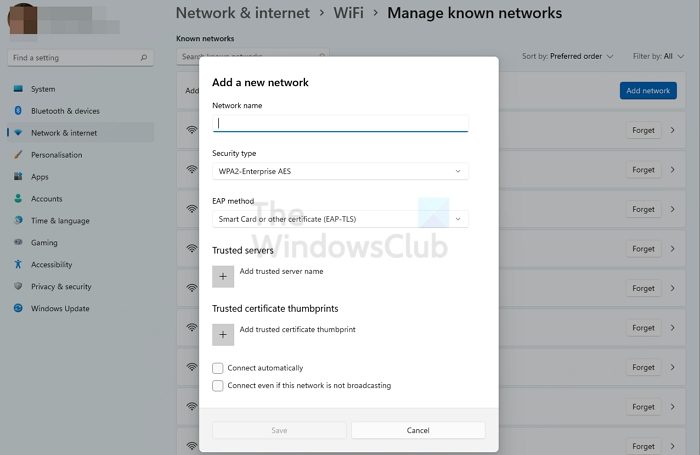
- Open Windows Settings using Win + I
- Click on the Network and Internet option
- First, click on the Forget button next to the network which was earlier used
- Done that, click on Add Network button to open Add a new network window
- Make sure to set the Security type as WPA2-Enterprise and the Encryption type as AES.
Once done, you will need to select the EAP method, Add a trusted server name, and Add the certificate thumbprint. When you’ve done that, connect to the network, and check if this works.
Related: Windows was unable to find a certificate to log you on to the network
2. Fix Time & Time Zone
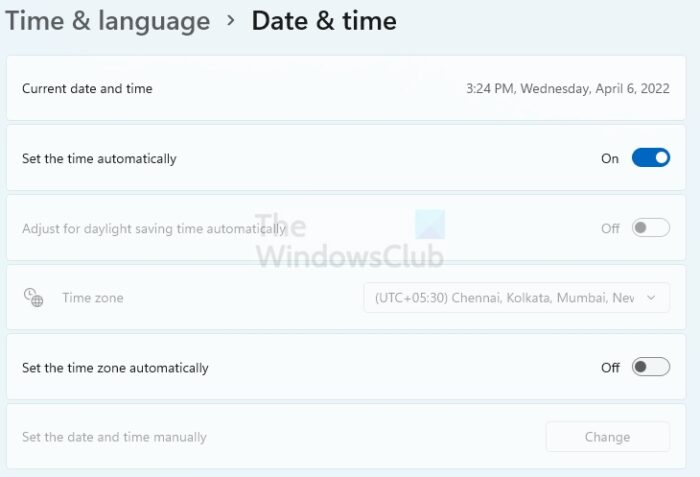
- Right-click on the Start button and click on Settings
- Select Time & Language.
- Disable and then enable both Set Time Automatically and Set Time Zone Automatically.
Once you do this, restart the computer for the changes to take effect.
Now see if the problem is resolved or not. If not, you will need to set things manually. Sometimes, the discrepancy can occur due to the difference between the regional time and the PC settings.
Fix: Can’t connect to this network WiFi error in Windows
3. Ensure Windows Time Service is Automatic
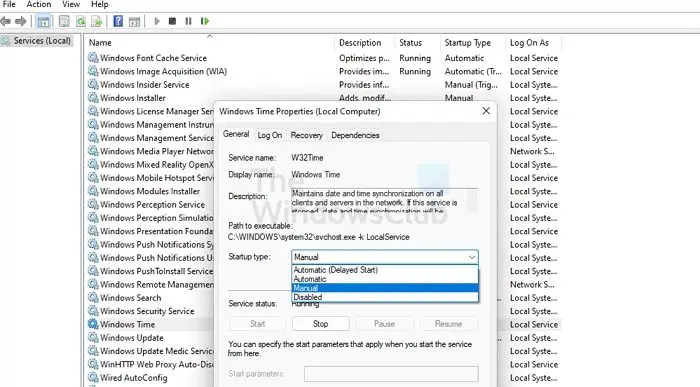
Windows offers a Time Service that maintains date and time synchronization on all clients and servers in the network. If this service is stopped, date and time synchronization will be unavailable. If this service is disabled, any services that explicitly depend on it will fail to start.
- Open Run prompt and type services.msc and press the Enter key
- It will open the Services window and locate Windows Time.
- Right-click on the Windows Time service and then click on Restart.
- If that doesn’t resolve the issue, right-click on the Windows Time Service once again.
- Go to Properties. Here, you need to make changes to the Startup type. Change it to Automatic from Manual.
- Confirm that the changes have been made by clicking on OK.
This will hopefully fix the Windows WiFi certificate error on your system.
Read: This server could not prove that it is its security certificate is not valid at this time
4. Reset Network Adapter
The below steps will help you how to reset the network adapter that will help you to fix the WiFi certificate errors in Windows.
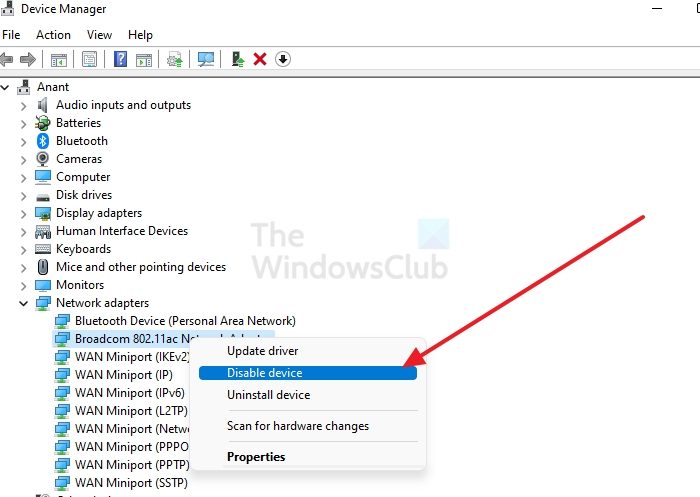
- Right-click on the Windows Start (Windows icon on the extreme bottom left).
- Select Device Manager.
- Scroll down to Network adapters from the list. Click on the arrow sign to expand it
- You will see a list of adapters mentioned.
- Right-click on the WiFi network adapter.
- From the drop-down menu, select disable and then re-enable them to reset the network adapter.
If this doesn’t work, you can run the Network Troubleshooter
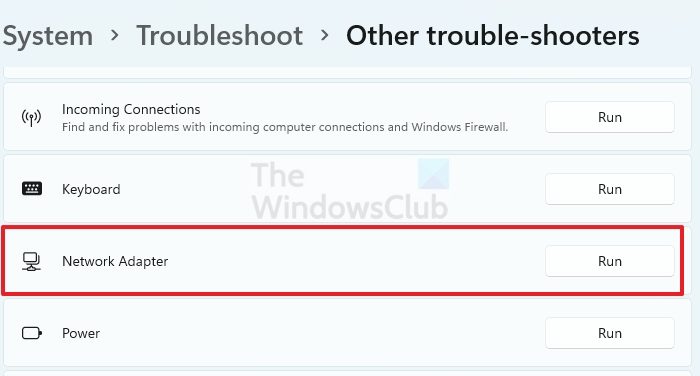
- Open Windows Settings using Win + I
- Navigate to System > Troubleshooters > Other troubleshooters
- Locate Network Adapters and click on the Run button next to it
- Once done, you will be able to
Make sure you restart your computer for the changes to take effect.
5. Connect with IT support
If none of these work, it would be best to connect with the IT team and get it resolved. If something has changed on the IT end, chances are you will be notified about it. However if not, then it’s best to get resolved by a professional team.
Read: What are Root Certificates in Windows?
Various reasons can lead to the popping up of the WiFi certificate error in Windows. Likewise, different solutions can resolve the issue with ease. Try all of these methods and see if the problem is fixed or not. However, if the problem persists, contact a professional right away!
Where are WiFi certificates in Windows?
Like all other certificates, WiFi certificates are stored in the local machine certificate store. You can use Certificate Manager to check out both user and computer certificates.
How do I find my WiFi certificates?
Windows stores all certificates in one place, and they can be viewed using the certmgr.msc. You can launch it using the Run prompt, and once it opens, locate Enterprise Trust and you should be able to view the certificate there. In other cases, you will be able to see it in the Trusted Root Certification.
Leave a Reply