This post offers fixes to resolve the issue where users can’t connect to a Hyper-V virtual machine (VM) running on a Windows Server or client host machine. The suggestions presented in this post are applicable depending on the instance of the error message you have received.
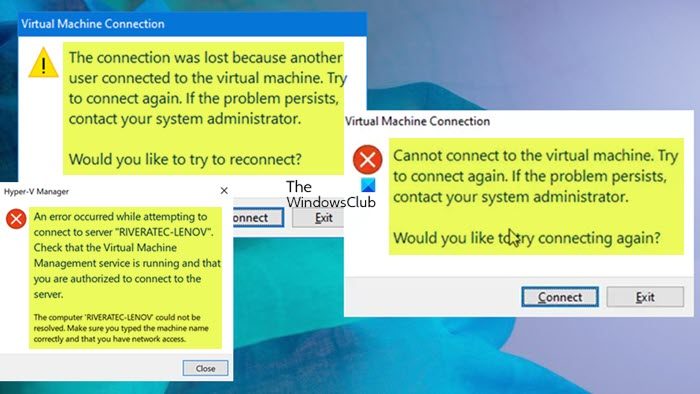
When you try to connect to a virtual machine (VM) in Microsoft Hyper-V Manager, you may receive the following error messages:
Error message 1
Virtual Machine Manager lost the connection to the virtual machine because another connection was established to this machine. Try to connect again. If the problem persists, contact your system administrator. Would you like to try to reconnect?
Error message 2
Cannot connect to the virtual machine. Try to connect again. If the problem persists, contact your system administrator. Would you like to try connecting again?
Error message 3
An error occurred while attempting to connect to server <Name>. Check that the Virtual Machine Management service is running and that you are authorized to connect to the server. The computer <Name> could not be resolved. Make sure you typed the machine name correctly and that you have network access.
Below are some of the possible reasons why you can’t connect to a virtual machine in Hyper-V.
- The VM is turned off.
- The VM is running on a different host server than the one you’re trying to connect to.
- The connection between the host server and the VM was interrupted.
- The wrong network adapter is selected.
- The network adapter is not attached to the correct virtual switch.
- There’s a problem with the network adapter in the VM.
- There’s a problem with the physical network adapter.
Read: The VMware Authorization Service is not running
In a typical scenario, the user has 2 Hyper-V 2012 R2 hosts, and they each have about 5 VMs on them. On one of the hosts, the user can connect to every single VM via Hyper-V Manager. On the other host, the user can only connect to the VM in Hyper-V Manager IF the machine is part of the domain. If the machine is not part of the domain, then the user receives the Error message 2. In another instance where 2 user accounts exist named User1 and User2. User1 isn’t configured in SCVMM anywhere while User2 is a member of a self-service user role in SCVMM and is the owner of a VM. Now, User1 logs on to a Windows client and connects to the SSP where they authenticate as User2, and the VM owned by User2 is selected from the list, and click the Connect to VM button, the Error message 1 above is displayed.
Can’t Connect to Hyper-V Virtual Machine
If you’re unable or can’t connect to Hyper-V Virtual Machine and you receive any of the error messages shown above, then our recommended fixes will help you resolve the issue.
- Initial checklist
- Reboot the VM
- Run the MOFCOMP command
- Store user credentials
- Remove old iSCSI/SCSI controllers/connections
- Enable IPv6
- Change Windows Security settings
- Turn off the Enhanced Session Mode Policy
Let’s see these mentioned fixes in detail.
Read: Virtual machine could not be started because the hypervisor is not running
1] Initial checklist
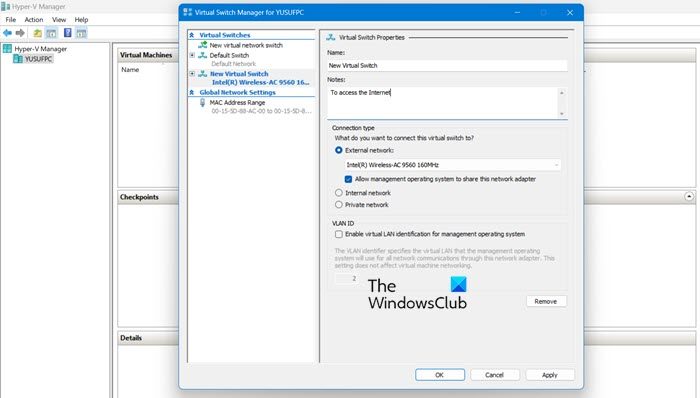
Suppose you’re having trouble connecting to a virtual machine in Hyper-V Manager. In that case, you can carry out the following pre-checks or tasks (in no particular order) and see if anything helps before you proceed further.
- If you’re authorized to connect to the server, ensure that the Virtual Machine Management service is started and running in Windows Services Manager. This mainly applies to Error message 3.
- Ensure that the virtual machine is turned on and that you use the correct credentials.
- Check the Hyper-V Manager settings to ensure that you’re connecting to the proper virtual machine.
- If you’re using an HTTP or HTTPS proxy server to connect to the Internet, ensure that your proxy settings are correct in Internet Options > Connections > LAN Settings.
- Make sure to enable connections in the Hyper-V Manager. To do this, open Hyper-V manager and select the server. In the right pane, click on the hypervisor’s name to open the Hyper-V settings window. In the left pane of this window, click on Virtual Machine Connection to open the VM connection settings in the right pane. Now, checkmark the Enable VM Connections option and click OK to save the changes.
- Update the Network adapter driver.
- Make sure to create a Virtual (external) Switch to allow remote access to Hyper-V VM from LAN & Internet. Once created, in the Hyper-V Manager right-click the virtual machine and go to Settings > Network Adapter > Virtual switch. Select the external switch you created. Click OK to save VM settings.
Read: Fix Error applying Virtual Switch Properties changes in Hyper-V
- Check the VM’s settings to ensure that remote management is enabled. You can also set up a port forwarding rule on your gateway (for instance, a wireless router) to access your virtual machine remotely from any place on the planet. You can restore the listener configuration by running the following command: winrm invoke Restore winrm/Config.
- If the VM is running on a remote server, ensure that you have network connectivity to that Hyper-V server.
- Make sure the Virtual Network Manager is correctly configured. In Hyper-V Manager, under Actions in the right pane, select Virtual Network Manager. In Virtual Network Manager, ensure that the virtual machine’s network adapter is connected to an external or internal network.
- Ensure the VM is not running on a different host server than the one you’re trying to connect to.
- Restart the Hyper-V Manager service.
Read: Error 0x80370102, Virtual machine could not be started
- Recreate the virtual machine.
- Reset the network adapter.
- Make sure the Integration Services components are updated. Connect to the VM, and then follow the instructions in Update integration services for a Linux virtual machine or Update integration services for a Windows virtual machine.
- If you’re running Docker in WSL 2, you can disable the WSL 2-based engine. Wait for the docker desktop to recreate/mount the DockerDesktopVM, then re-enable the WSL 2-based engine, and enable it in your distro.
- If you’re using Hyper-V Manager to connect to a virtual machine on another computer, then make sure the Virtual Machine Connection tool is installed on the computer you’re using to connect to the virtual machine. You can find this tool in the Administrative Tools folder.
- If you’re connecting to a remote virtual machine, make sure Remote Desktop connections are allowed through the Windows Firewall.
- Check the event logs for any errors that might be related to the problem.
Read: Fix Hyper-V Virtual Machine stuck in Stopping State
2] Reboot the VM
You can reboot the VM by right-clicking and selecting Turn off from the context menu and not the Shutdown option. Afterward, you can start the VM again. Strange but reportedly that worked to resolve the issue in a certain case. Otherwise, you can reboot the host machine and see if that helps resolve the Can’t Connect to Hyper-V Virtual Machine issue.
Read: The Virtual Machine Management service encountered an error while configuring the hard disk
3] Run the MOFCOMP command
This fix worked for some affected users that encountered the Error message 3. To run the MOFCOMP command, do the following:
- Open Command Prompt in elevated mode.
- In the command line interface, copy/paste the command below and hit Enter.
MOFCOMP %SYSTEMROOT%\System32\WindowsVirtualization.V2.mof
- Exit the CMD prompt after the command executes.
Read: Virtual machine could not initiate a checkpoint operation, Error 0x800423F4
4] Store user credentials
This fix applies specifically to Error message 1 given above. The error can occur because the credentials for the user account logged on to Windows (User1) are passed through instead of those used to authenticate to the SSP (User2).
According to Microsoft documentation, by default, the Do not store my credentials radio button is selected which causes this behavior. In this case, to resolve the issue, select the radio button Store my credentials on the login page of the SSP. When you add/store a password to the virtual machine, it allows the VM to be connected, and then you can type in the password for the user, and it will not kick you off.
Read: Hyper-V Virtual Machine stuck in Starting State
5] Remove old iSCSI/SCSI controllers/connections
Reportedly, as it concerns Error message 2, the issue was caused by an old iSCSI connection that would not reconnect as the NAS they pointed out was no longer available. They were in a “reconnecting” pending state which was interfering with Hyper-V VM connections. In this case, the applicable fix is simply deleting all old, unused, and unassigned iSCSI/SCSI controllers or connections, and then rebooting.
Read: Hyper-V Mouse input not captured in Windows
6] Enable IPv6
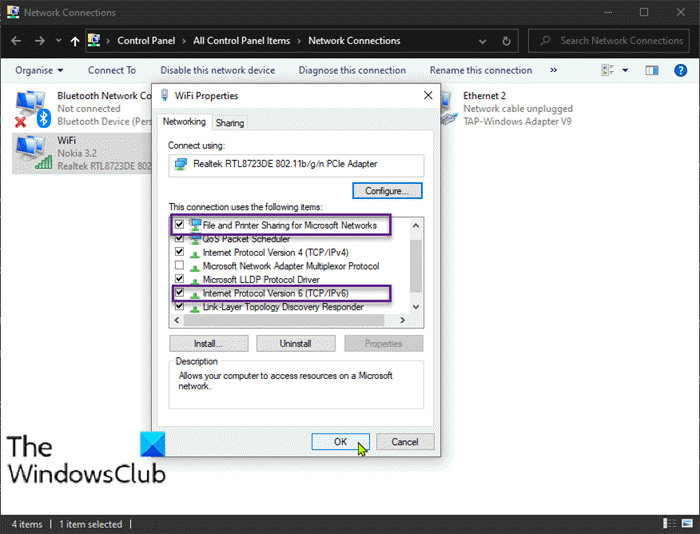
It appears Hyper-V requires IPv6 to be enabled all of a sudden. In a known case by an affected user, while pinging the Hyper-V server, for no particular reason, the user reportedly pinged both ‘server’ and ‘server.local’ and noticed that the ‘server’ returned an IPv4 response, whereas the ‘server.local’ returned an IPv6 response and the user was able to connect to the server.local but trying to connect to the server failed with the Error message 3.
In the case whereby you still cannot connect, you can edit your Hosts file and point to 127.0.0.1.
7] Change Windows Security settings
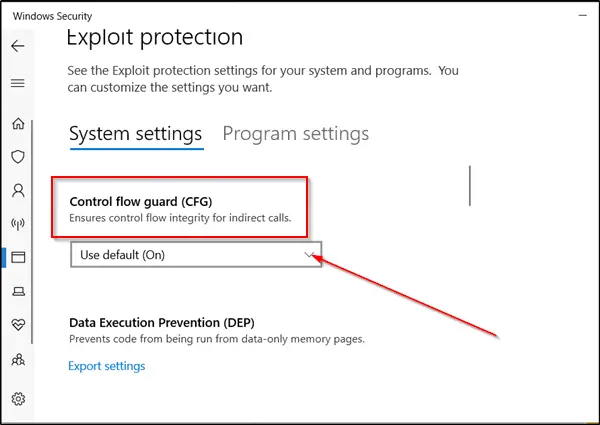
Some affected users that received Error message 3, were able to resolve the issue by changing the Windows Security settings. Here’s how:
- Open Windows Security.
- Select App & Browser control.
- On the page that opens, click Exploit protection settings at the bottom.
- Next, switch to the Program settings tab.
- Next, locate C:\WINDOWS\System32\vmcompute.exe in the list and expand it.
- Next, click Edit.
- Scroll down to Control Flow Guard (CFG) and uncheck the Override system settings option.
- Next, run the
net start vmcomputecommand in PowerShell admin mode. - Start Hyper-V Manager as administrator.
8] Turn off the Enhanced Session Mode Policy
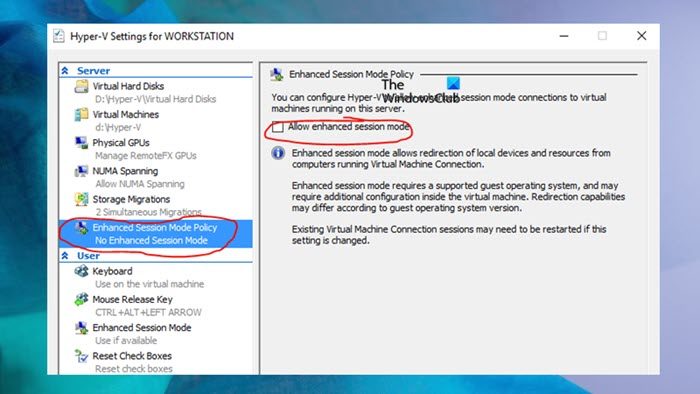
This fix also specifically applies to Error message 1 as shown above. To perform this task, follow these steps:
- Open the Hyper-V Manager.
- Select Settings in the right-hand pane.
- Now, select Enhanced Session Mode Policy in the left-hand pane.
- Next, uncheck the Allow enhanced session mode option.
- Click the OK button to save changes.
I hope this post helps! If not, you may contact Microsoft Support for any additional assistance.
Related post: VMconnect.exe application error; Cannot connect to the virtual machine
How do I enable the internet on my virtual machine?
To enable the Internet on VirtualBox, follow these few simple steps:
- Ensure the internet connection is turned on.
- Turn OFF the Virtual Machine.
- Open the network settings of the Virtual Machine.
- Enable the Network Adapter.
- Select the Network Device.
- Save Settings and start the Virtual Machine.
Cannot connect to a virtual machine?
If you cannot connect your VM on VMware, do the following:
- Shut down your virtual machine.
- In Workstation, go to VM > Settings > Network Adapter.
- Now, ensure that the network adapter is connected (that is, the Connected and Connect at power on options are selected).
- Next, make sure that the network adapter is configured for NAT or Bridged, and not Host-Only.
Leave a Reply